
Xano
What is Xano?
Xano gives a scalable backend that is frontend agnostic, with a PostgreSQL database, a ready-to-use API, and a No Code business logic builder to transform data to and from any source.
Integrating Draftbit & Xano
Setup steps in Xano
If you do not have a Xano account, create one here. The initial steps to create a new database are:
- After logging in, you will be welcomed by the Dashboard screen.
- Go to the Database tab from the left menu bar and click the button
Add Table. - Enter the table's name under
table_name, add a description underDescription. Make sure to checkAdd Basic CRUD Endpointsto allow Xano to generate API endpoints for CRUD operations. - Click the button
Add Tableto generate the table.
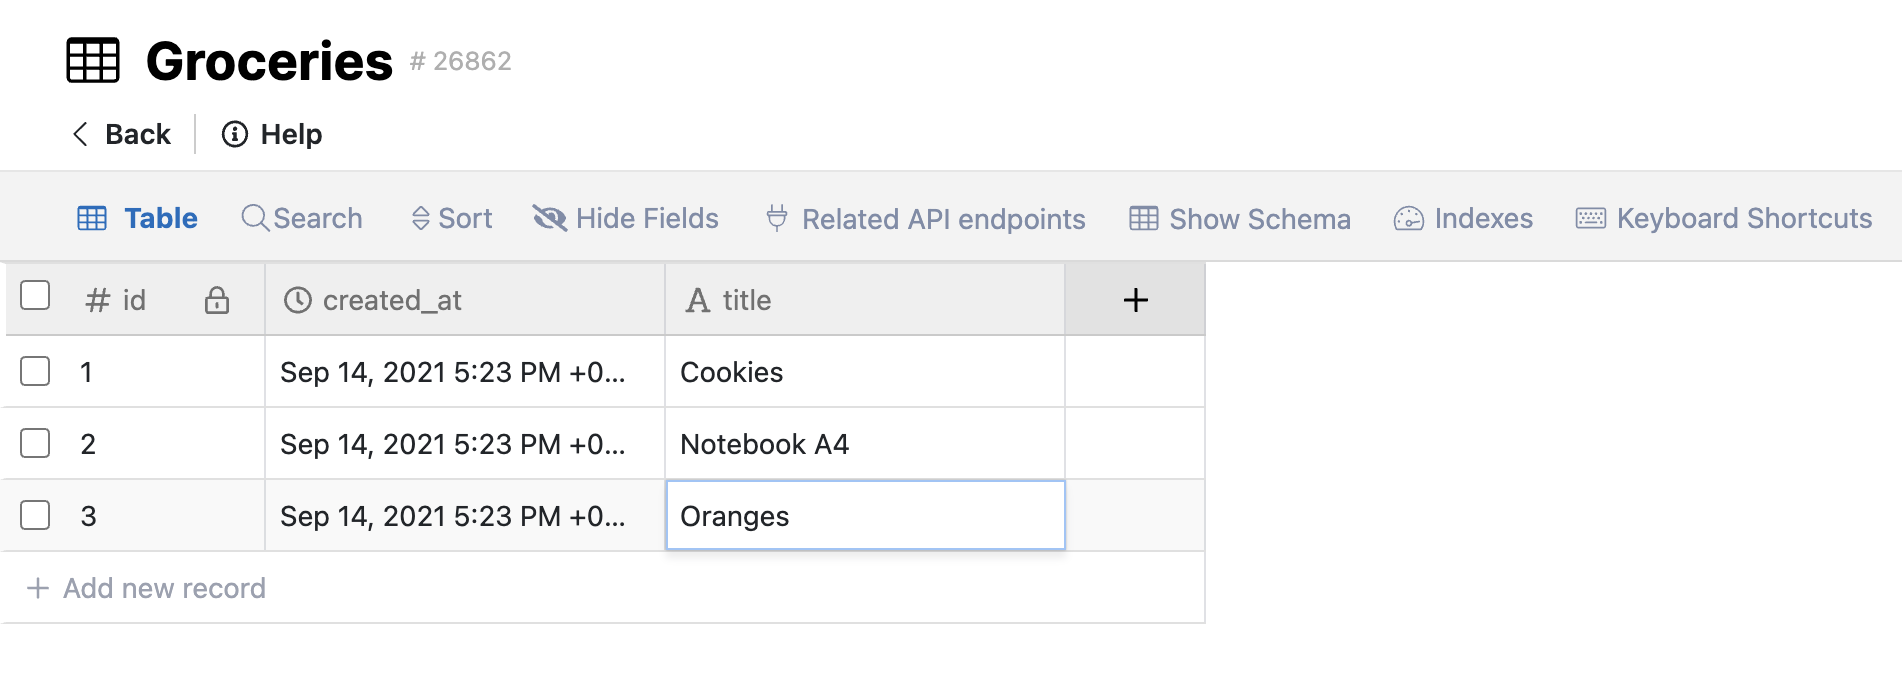
We are using a custom data table for this documentation in a database called Groceries. It represents the table_name and has some pre-populated data fields and values:
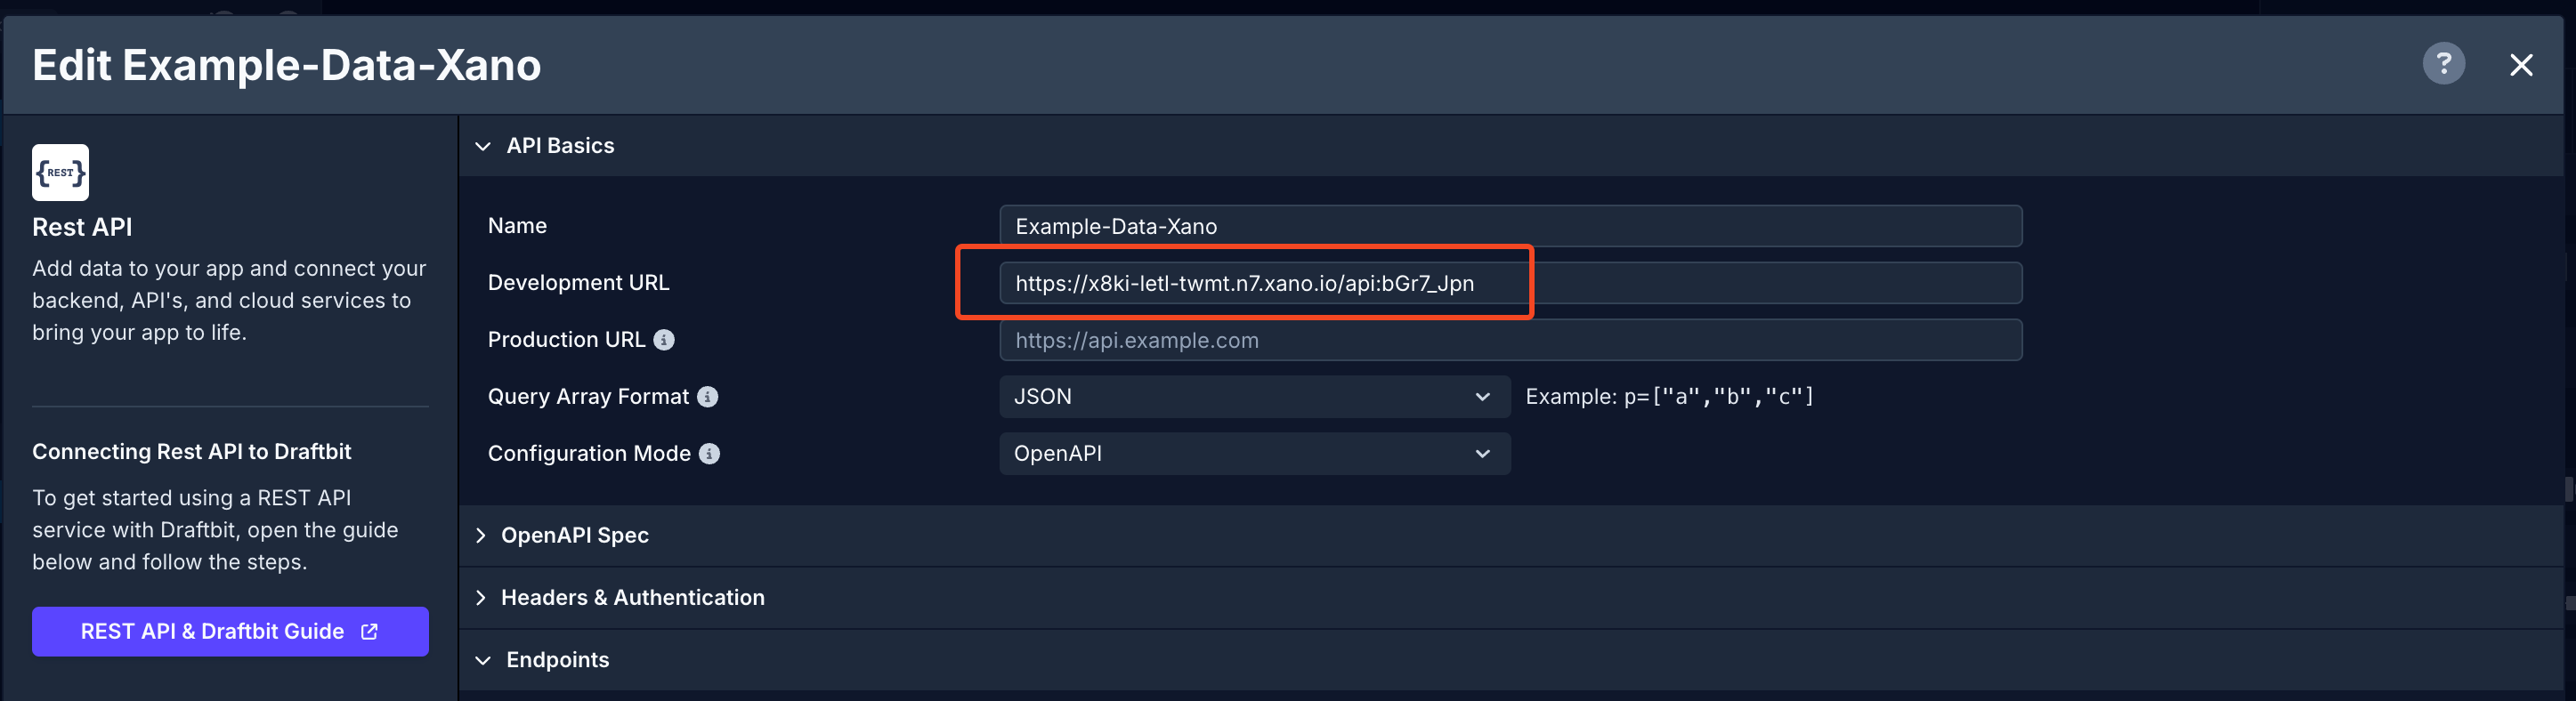
To utilize the data from the Xano into the Draftbit app, let's use the REST API service it gives access to. To connect the API in the Draftbit app, a Base URL is required. The Base URL of the REST API is of the format: https://<your-project-reference>.n7.xano.io/api:<your-api-param>.
You can find the Base URL in the API tab under the section Base Request URL.

Setup steps in Draftbit
To add the Xano API Base URL in your Draftbit app:
- Open the Data modal from the left menu bar
- From the
Add your custom APImenu, click onRest API. - Enter a name for your REST API service.
- Paste your Base URL (from the previous section) into the
Dev URLorProd URLinput field. - Click Save.
Dev & Prod URLSThe Base URL parameter has been updated to give you the ability to set separate base URLs for Development and Production. When you publish your app, you can set which base URL to use, Dev or Prod. Read more about Environments
Using Xano with Draftbit
GET request to fetch all records
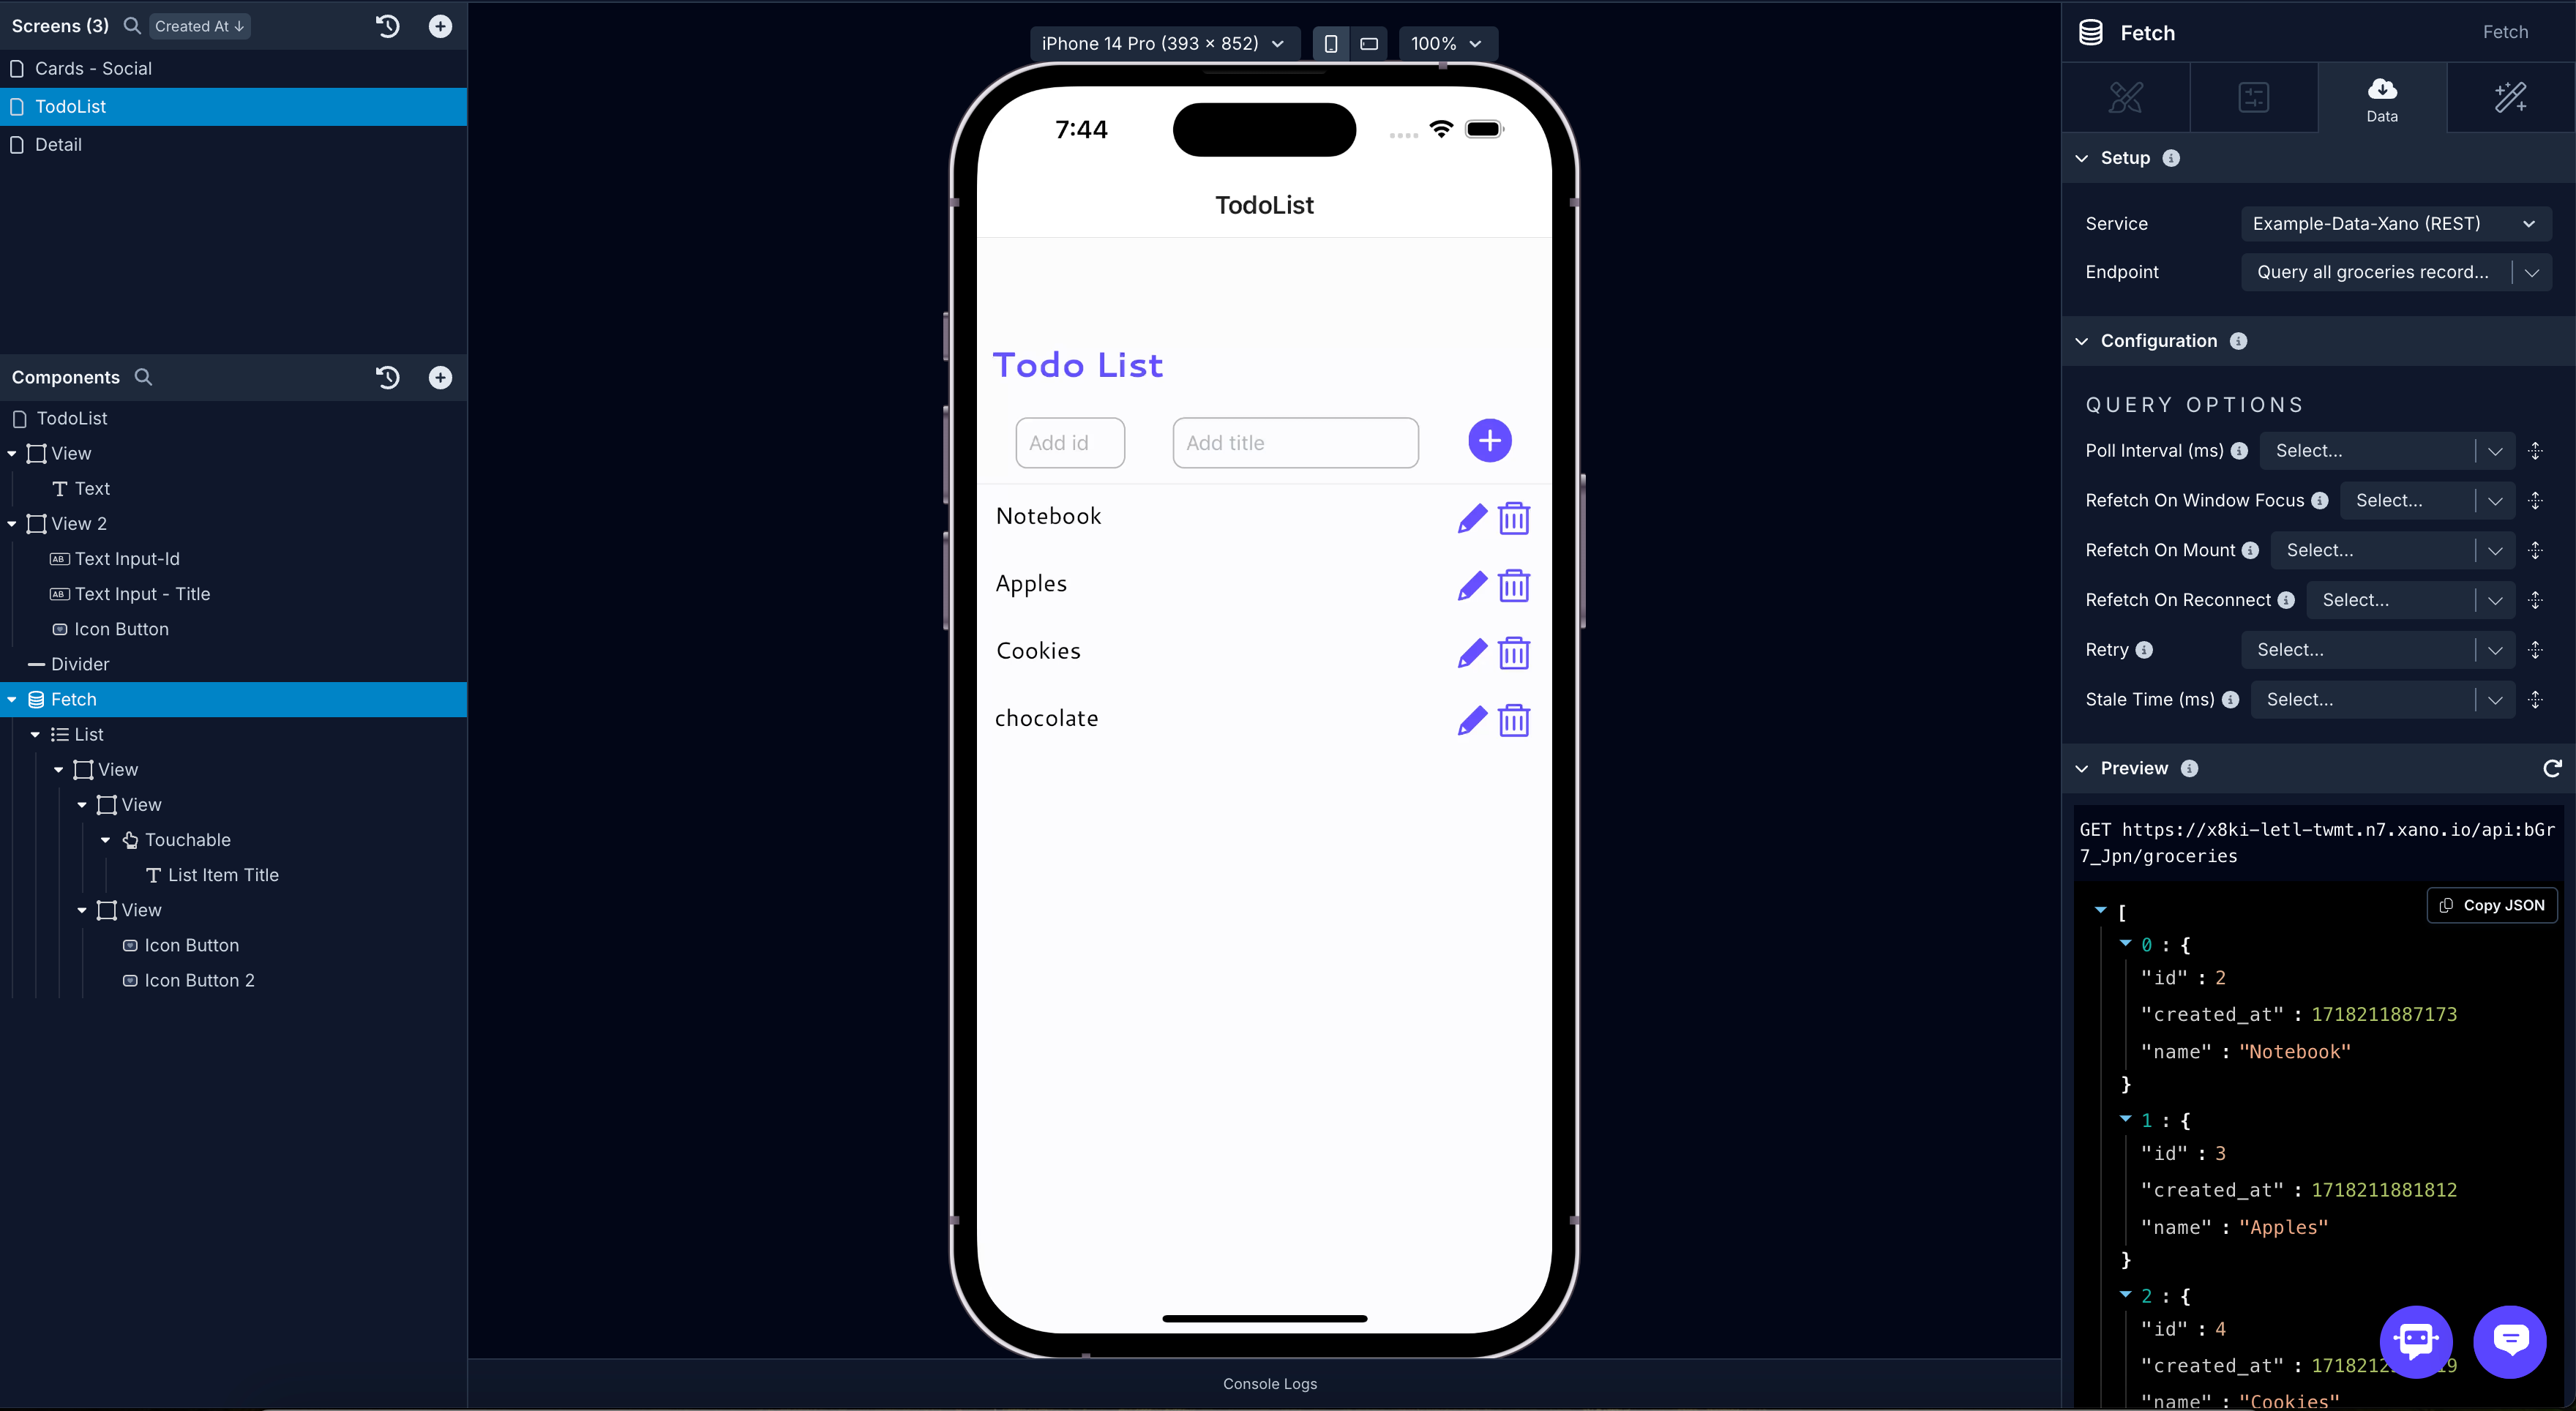
In this section, let's populate a Fetch component with all the data from the Xano data table and then display the data fetched from the Xano in a List component.
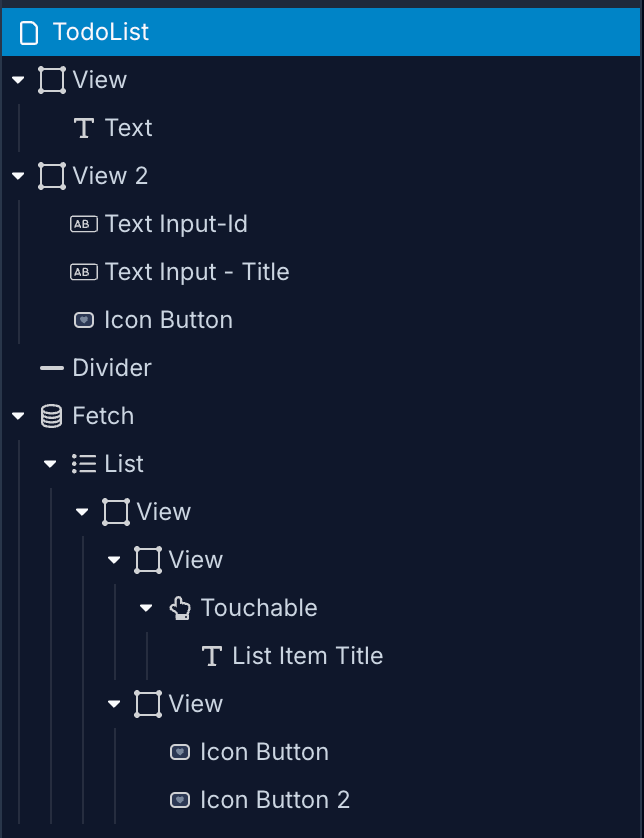
For reference, here is a how the Components tree looks like for this screen:
The next step is to create an endpoint. Let's try fetching the data using a GET HTTP request. Open the API & Cloud services modal, select Xano service, and then:
- Click Add endpoint.
- In Step 1: enter the name for the endpoint. Make sure the Method select is
GET. - Set the Role to
Get Manyas the endpoint is fetching a list of items. Set the Object Type togroceriesfor this example. - In Step 2: add the base name path:
/your-base-name. For the example below, it's/groceries. - In Step 4: click the Test button next to the Endpoint input to verify the response coming from Xano.
- Click Save.
On app screen:
- Select the Fetch component in the Components tree and go to the Data tab from Properties Panel.
- For Service, select the name of the Xano Service.
- For Endpoint, select the endpoint you want to fetch the data from.
- Select the List component in the Components tree and go to the Data tab from Properties Panel.
- In Data, select
Top-level responsefrom the dropdown menu. - Then, select the Text component in the Components tree and then go to the Data tab from the Properties Panel.
- Add a
{{varName}}value (inside the curly braces) to represent a data field from the Xano. For example, we add{{name}}to represent the column name from the Xano.
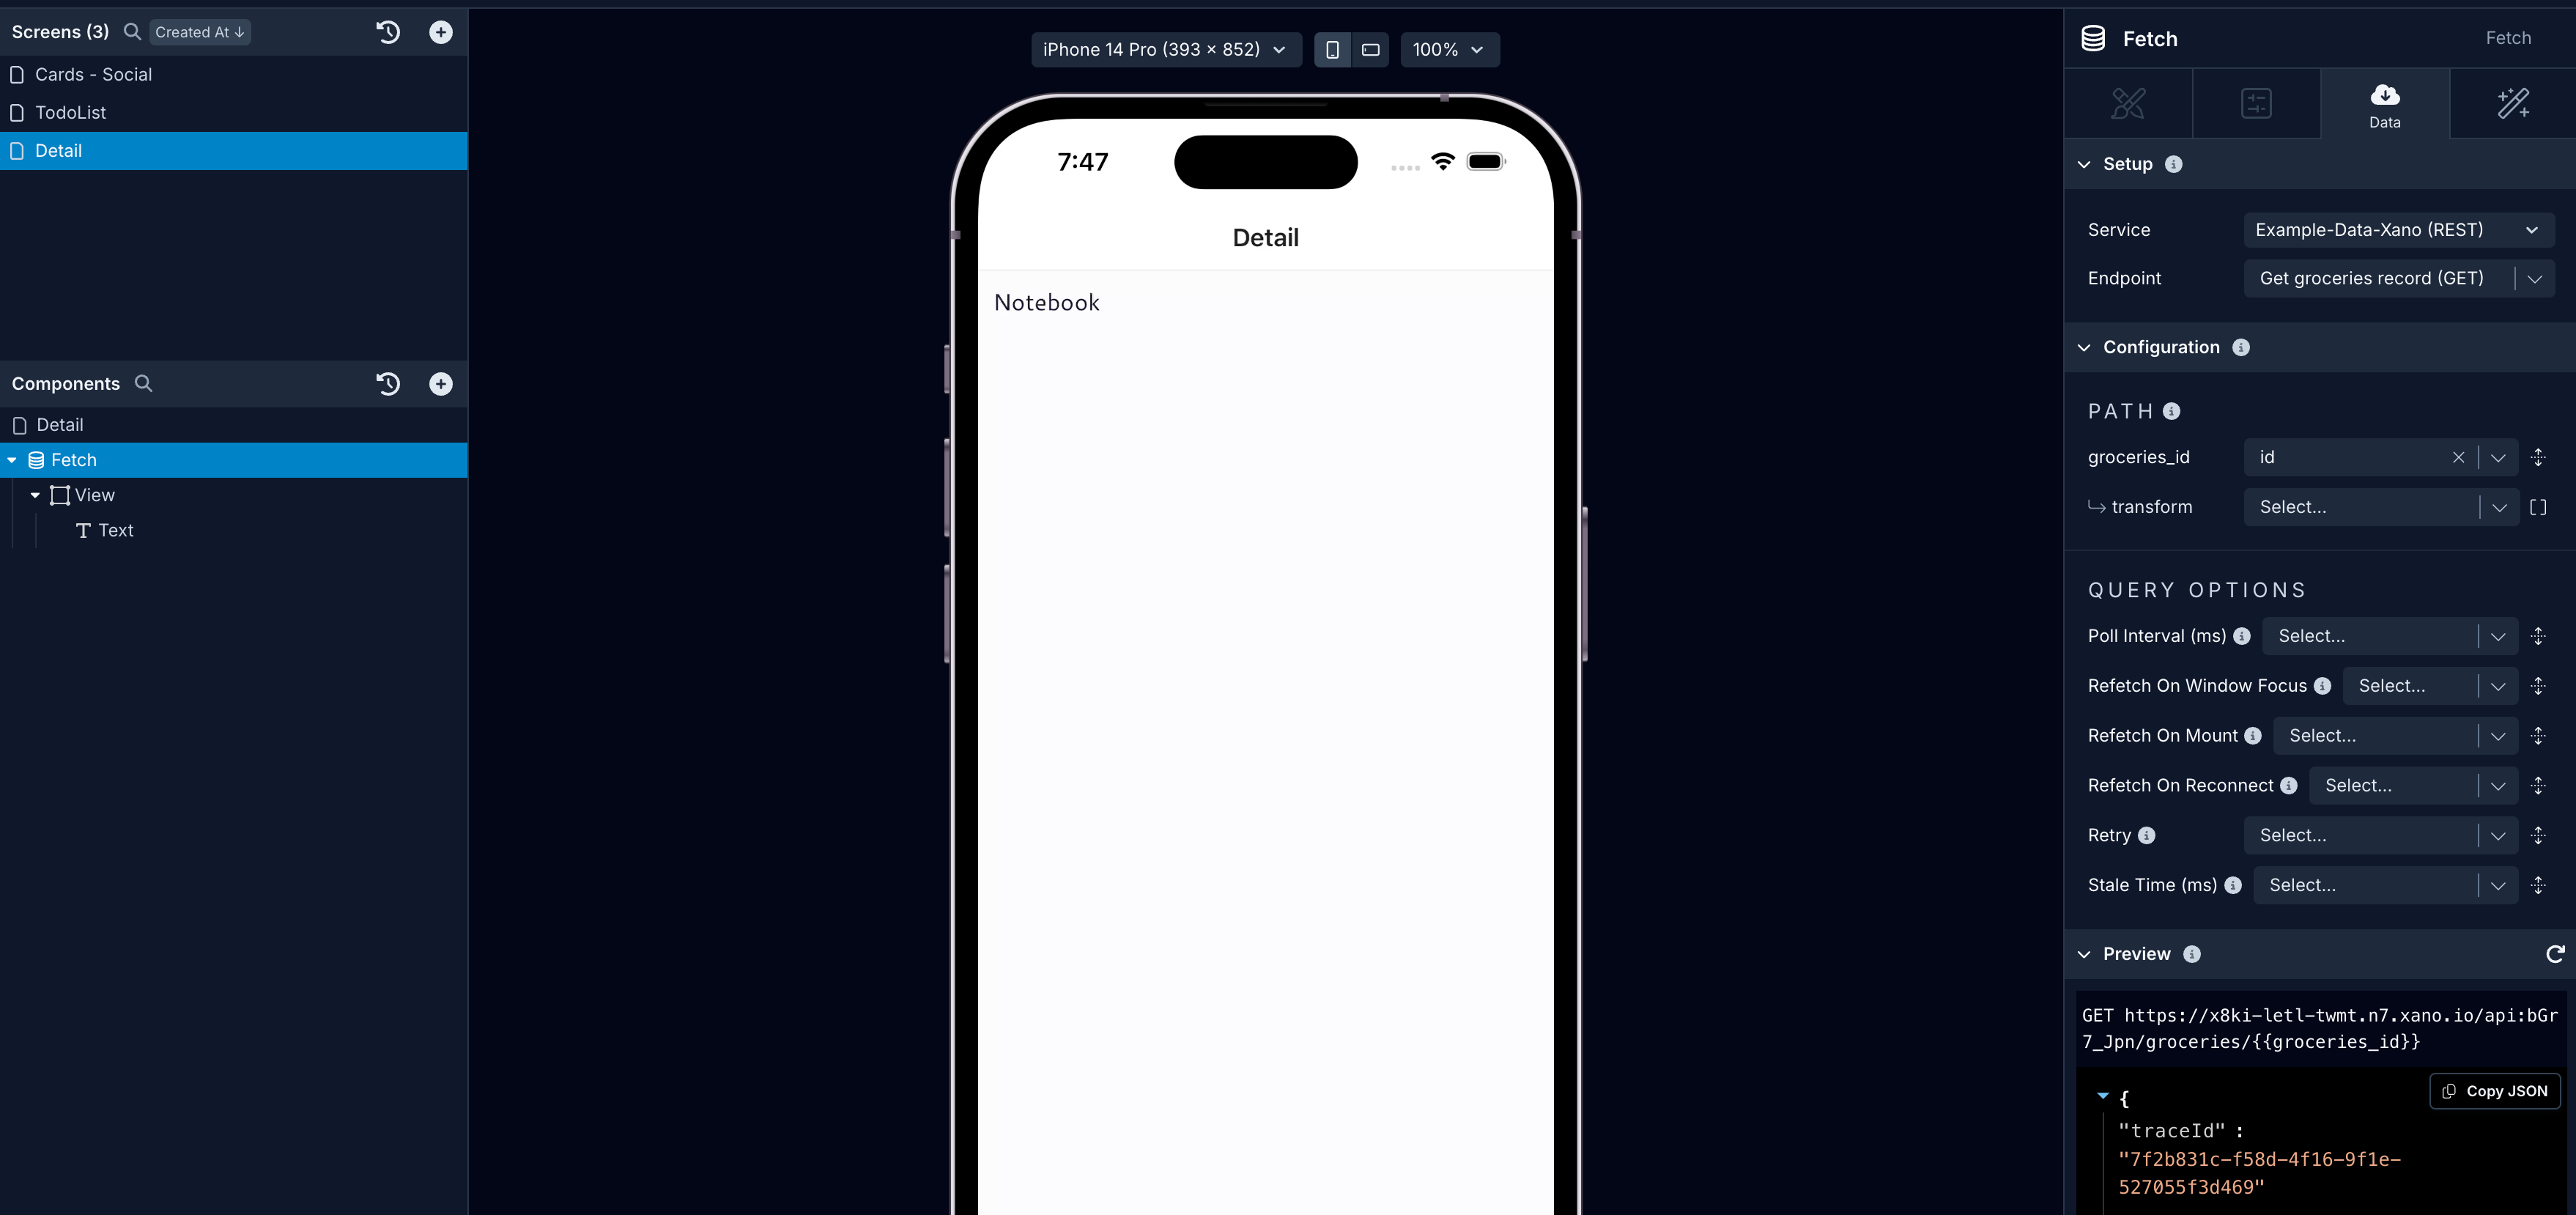
GET request to fetch a single record
In this section, let's populate a Fetch component with a single record from Xano. For reference, here is a how the Components tree looks like for this screen:

Also, from the List screen, we are sending the id of each list item as a navigation parameter when an action is triggered on the Touchable/Button component. This action will let you navigate to the screen where a single record is fetched and its details are shown.
To fetch a single post from Xano, you'll have to specify a record id that is coming from the navigation parameters.
Data is fetched using a GET HTTP request. Open the API & Cloud Services modal from the top navbar, select the Xano service, and then:
- Click Add endpoint.
- In Step 1: enter the Name for the endpoint and set the Method to
GET. - Set the Role to
Get Oneas the endpoint is fetching a single item. Set the Object Type togroceriesfor this example. - In Step 2: add the
/your-base-name/{{id}}variable. For the example below, it's/groceries/{{id}}. Then, add a Test value for the{{id}}. - In Step 4: click the Test button next to the Endpoint input to verify the response coming from Xano.
- Click Save.
On app screen:
- Select the Fetch component in the Components tree and go to the Data tab from Properties Panel.
- For Service, select the name of Xano.
- For endpoint, select the endpoint you want to fetch the data from.
- Set the value for the
idin the Configuration > URL Structure section to Navigation > id. - Then, select the Text component in the Components tree and then go to the Data tab from the Properties Panel.
- Add a
{{varName}}value (inside the curly braces) to represent the data field from Xano. For example, we add{{title}}to represent the field and value from the Xano data table. - Under Variables, you will see the variable name defined in the previous step. From the dropdown menu, select the appropriate field that represents the data field.
POST request to submit new data
Submitting new Data from the Draftbit app to a REST API requires the request to be sent using HTTP POST method.
Your component needs to have:
- accepts user input
- has a
Data Sourceprop
You can use any component that contains a Data Source prop to log user input and submit data. This list of components currently includes:
Once you have the necessary component(s) on your screen, you'll need to create a new endpoint in your Xano service:
- Click Add endpoint.
- In Step 1: enter a name for the endpoint and select the Method to
POST. - Set the Role to
Createas the endpoint is used to create a new record. Set the Object Type togroceriesfor this example. - In Step 2: enter the base name as path:
/your-base-name. For the example below, it's/groceries. - In Step 3: add a valid Body structure to submit a
POSTrequest. Add one or many{{variable}}for test values. Click Body Preview to validate the structure of the Body in the request. - An example of how Body in a request will look like:
{
  "key": {{textInputValue}}
}- In Step 5: click the Test button next to the Endpoint input to verify the response coming from the Xano.
- Click Save.
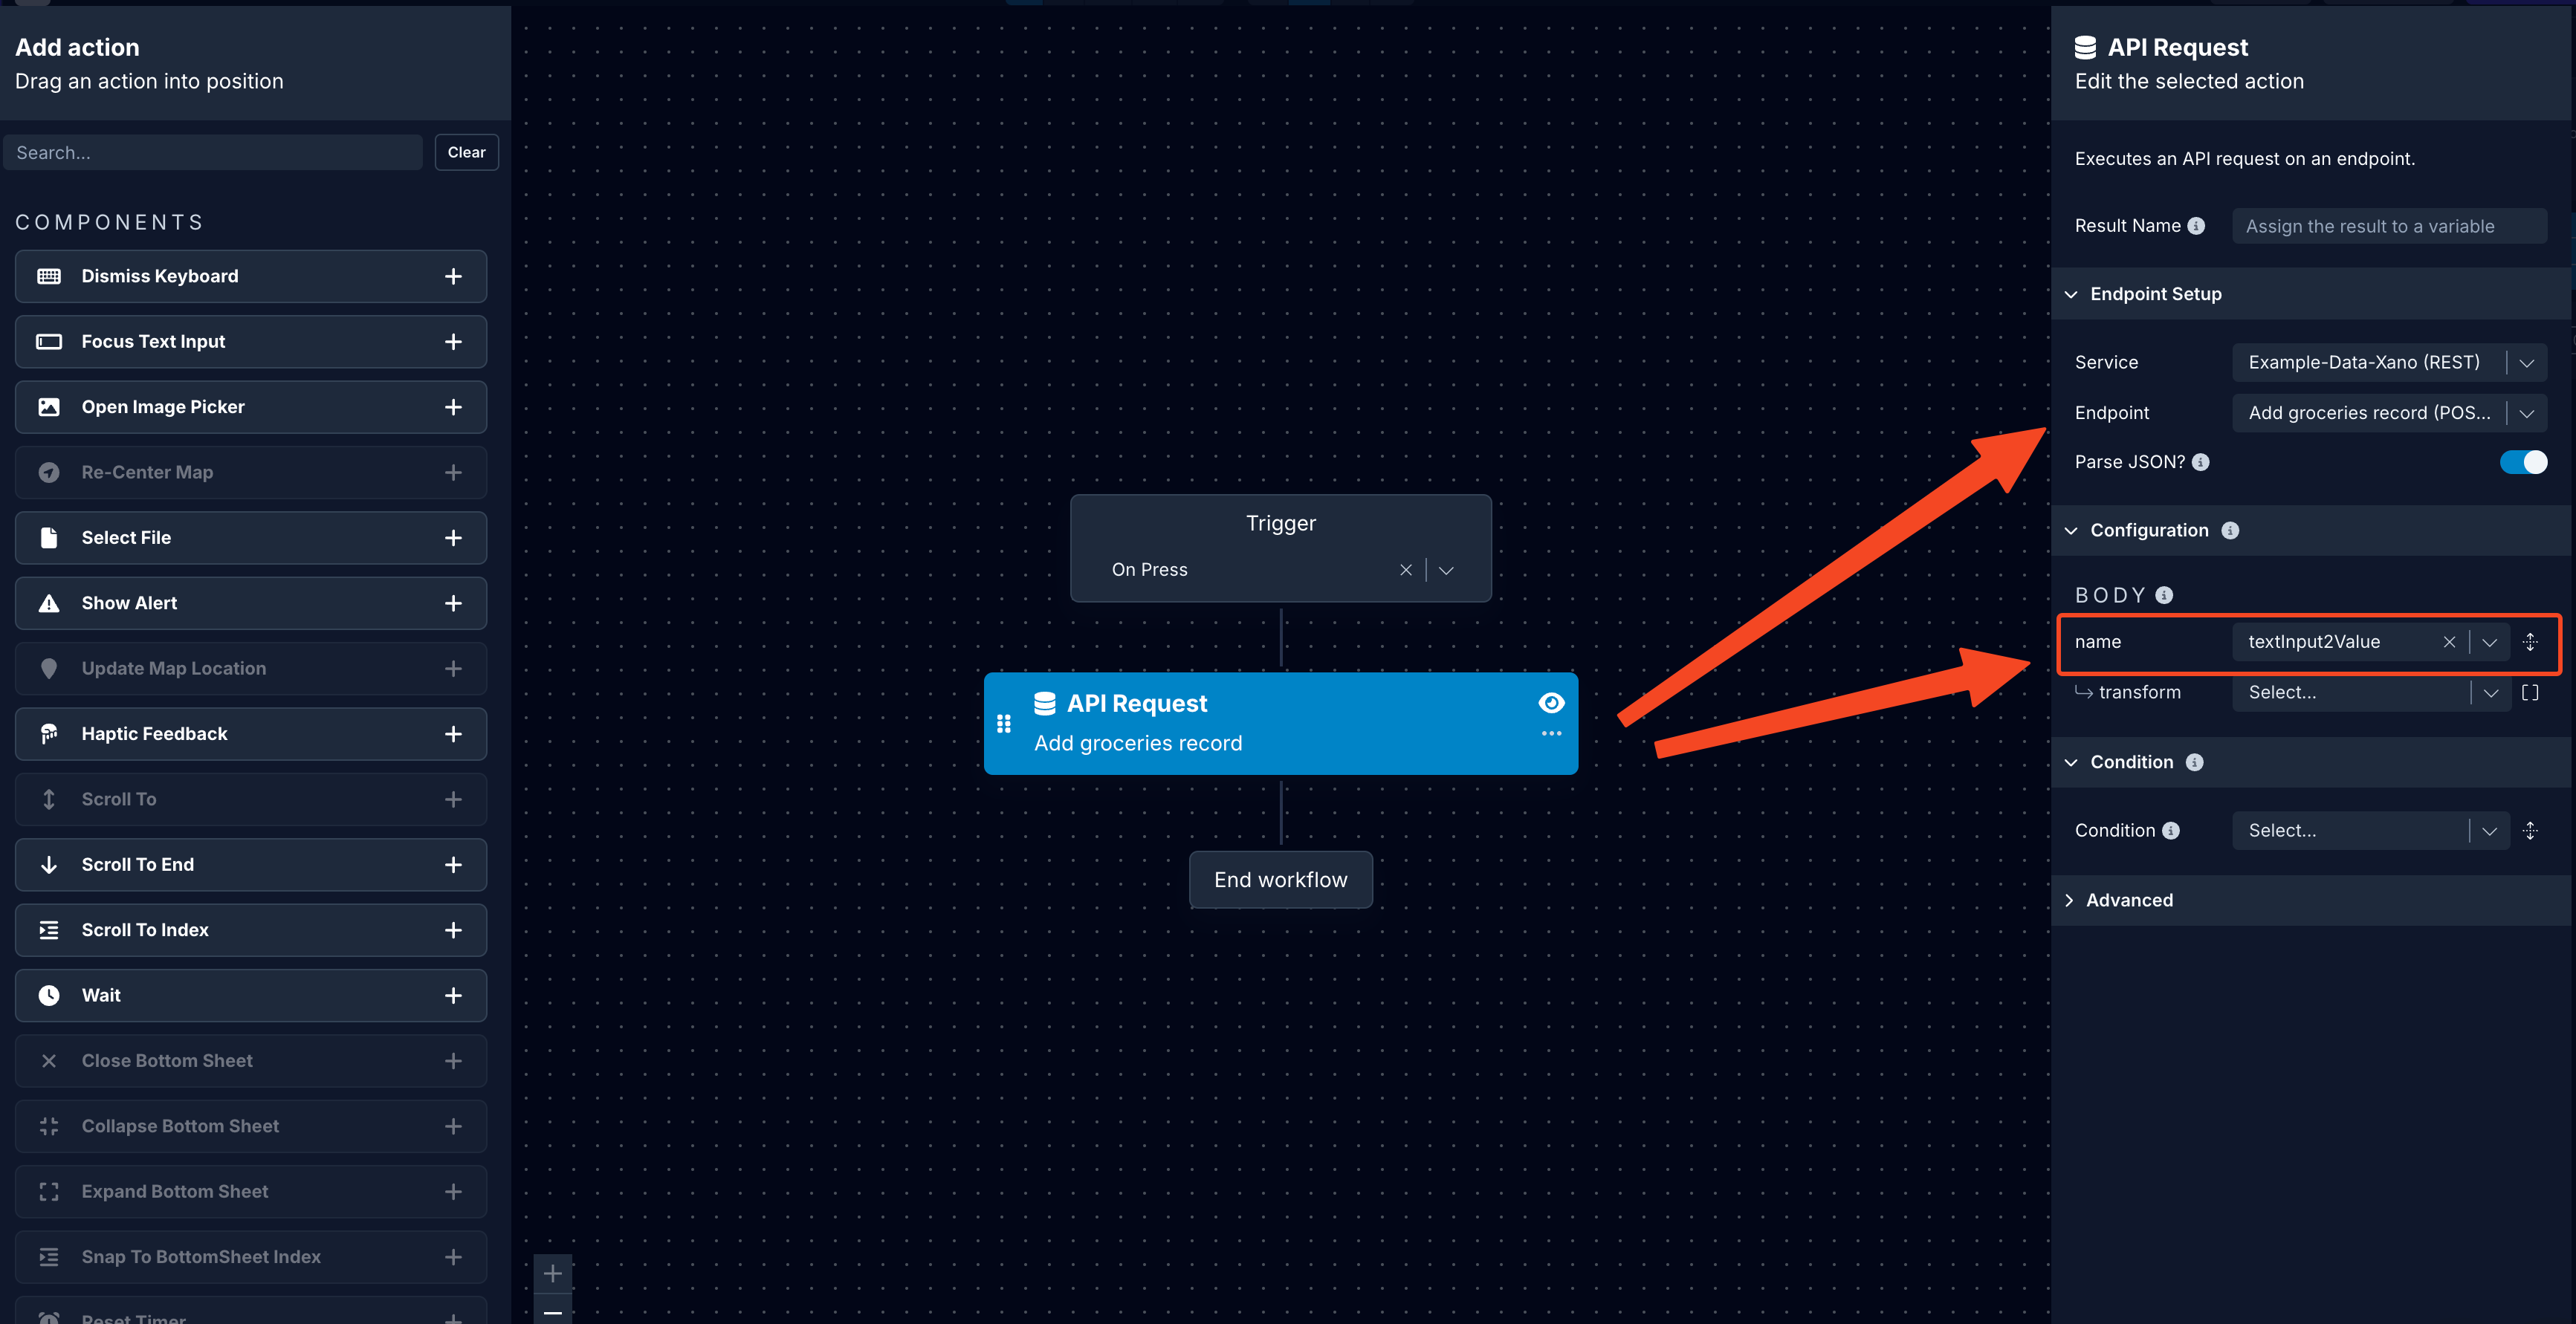
Using a Touchable/Button component, you can trigger the action API Request to submit the data to the endpoint.
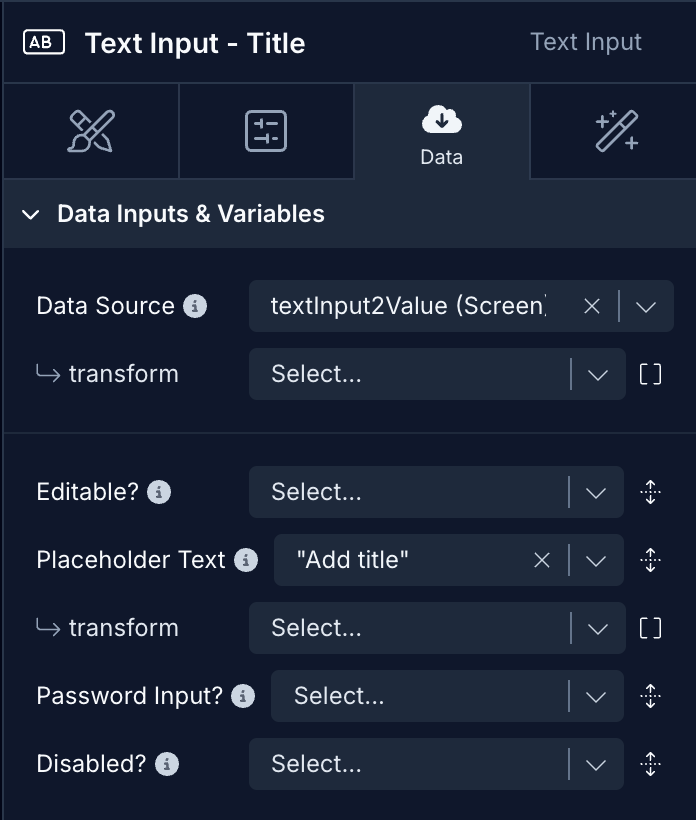
The textInputValue passed in the above example is the value of the Data Source property on the Text Input component:
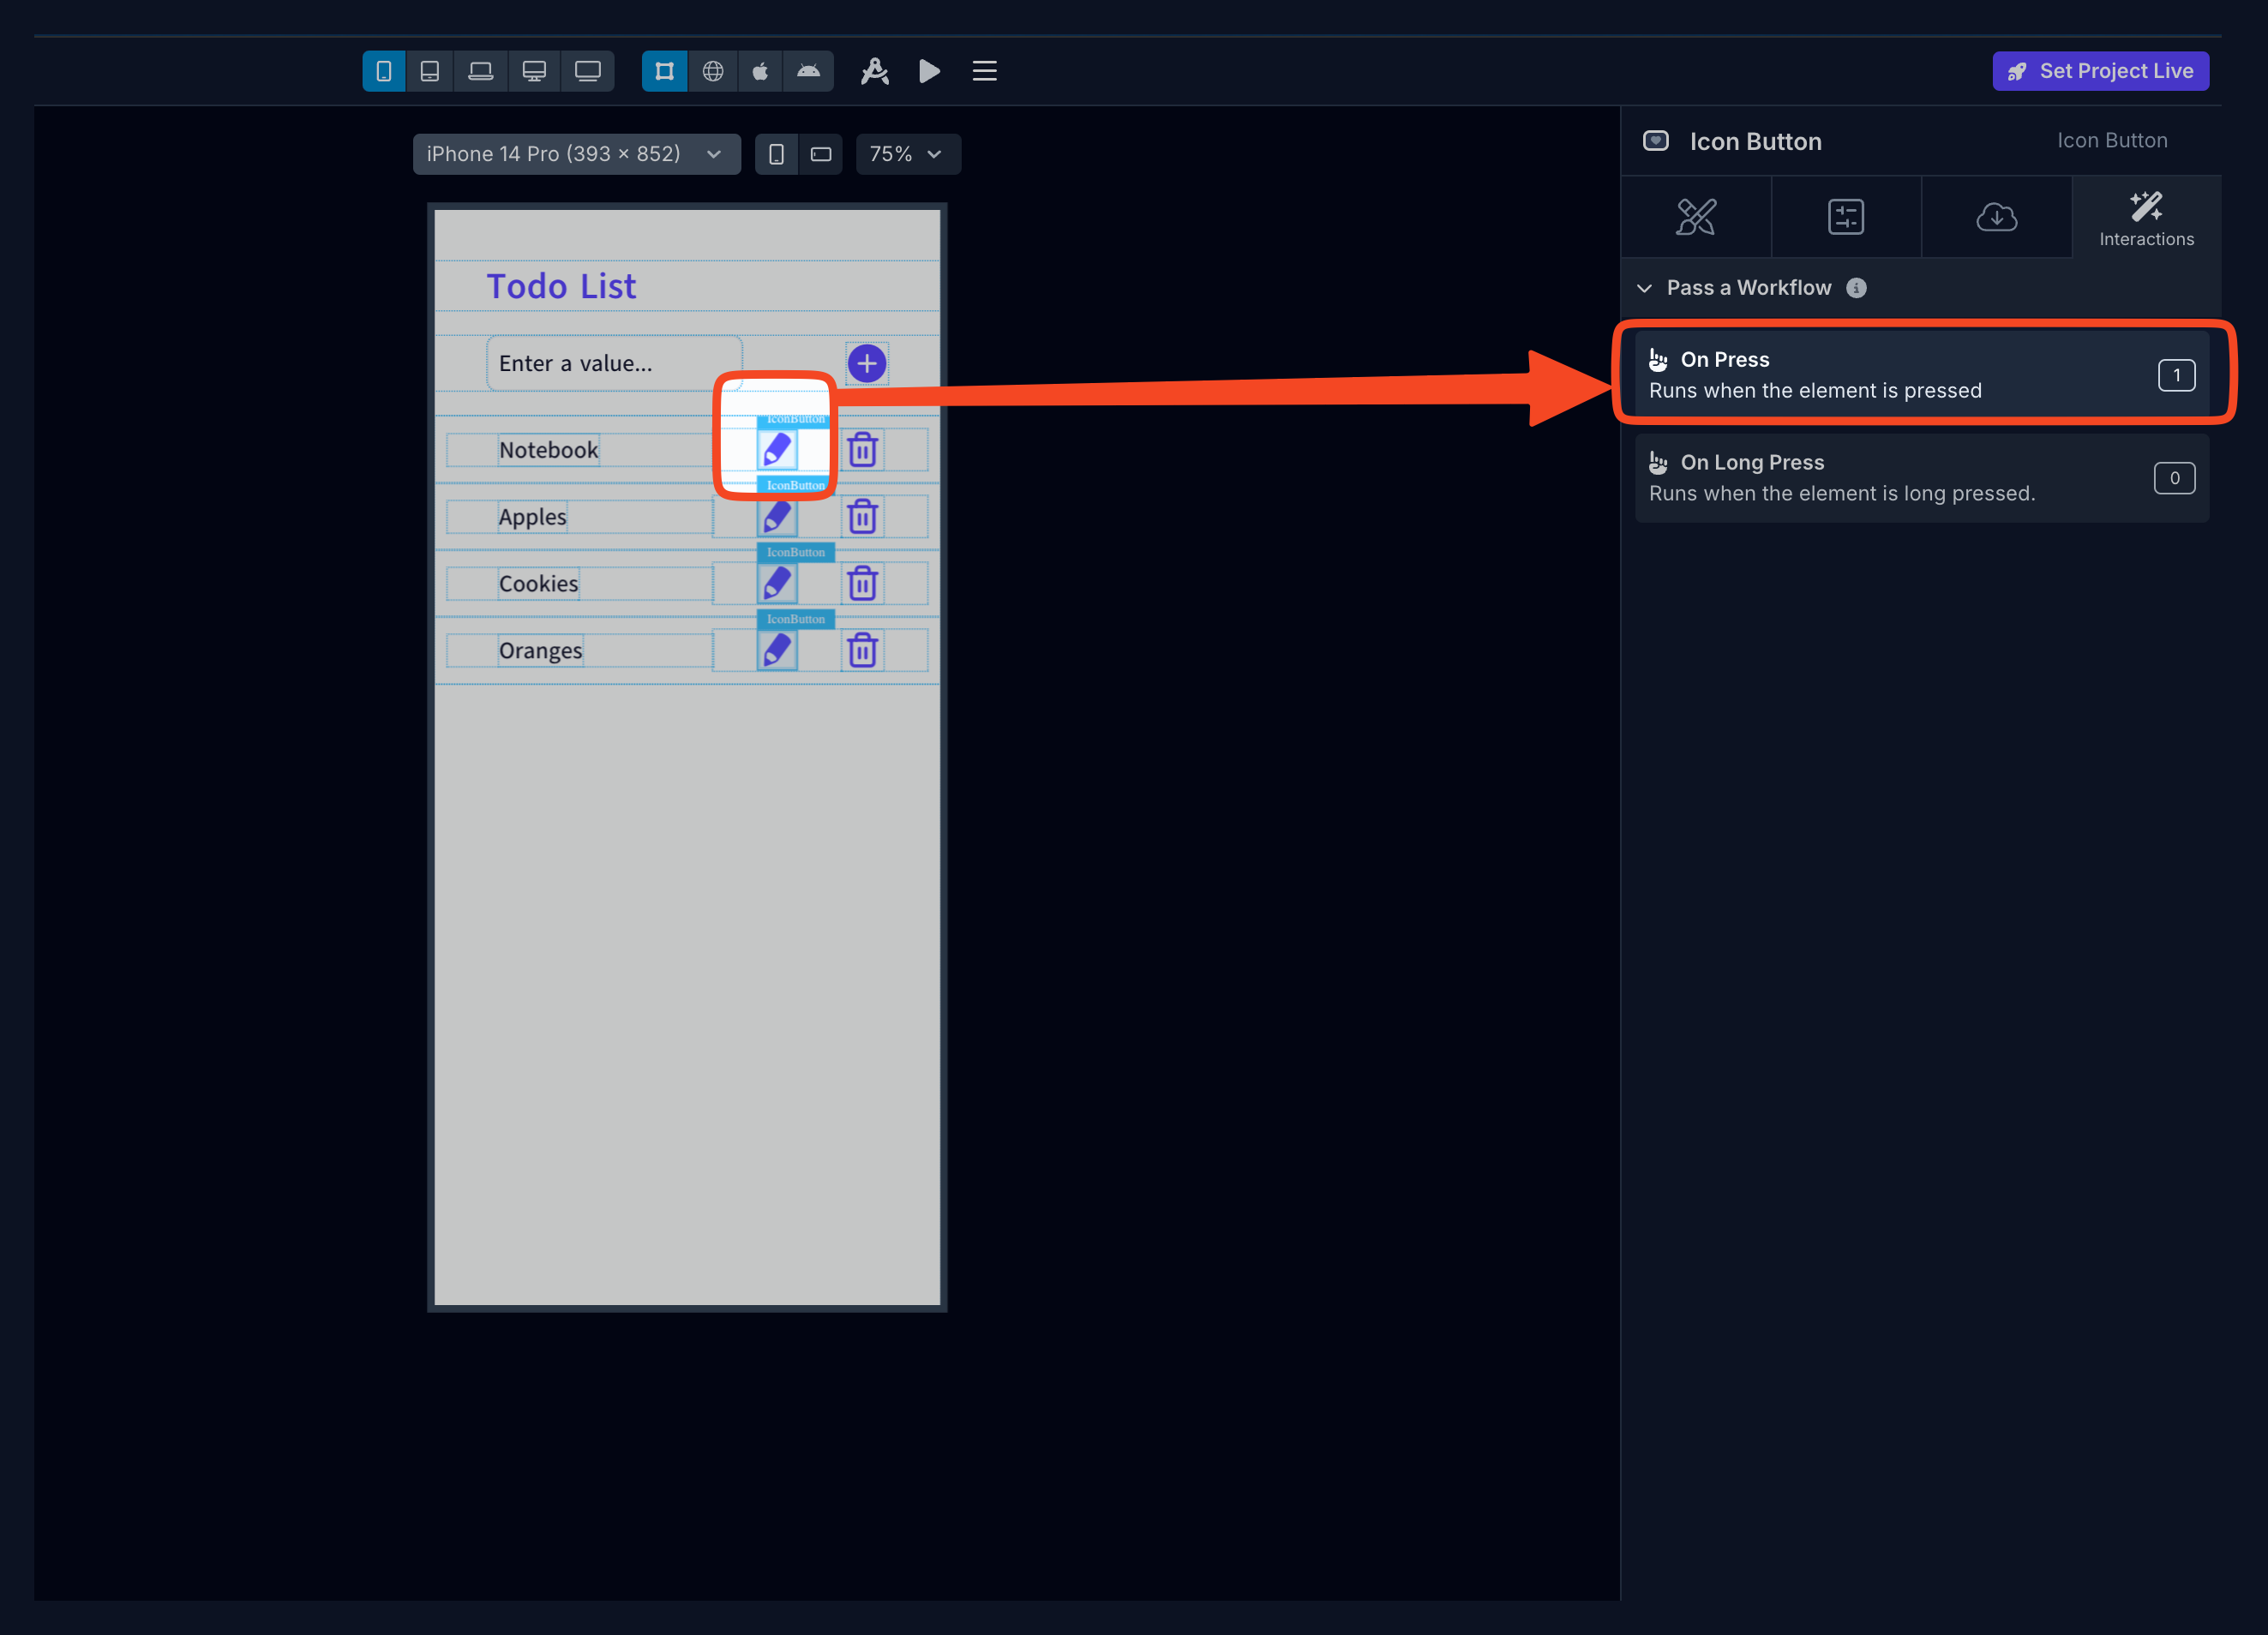
- Select the Icon Button and go to the Interactions tab.
- Here choose
OnPresstrigger to open Action Editor.
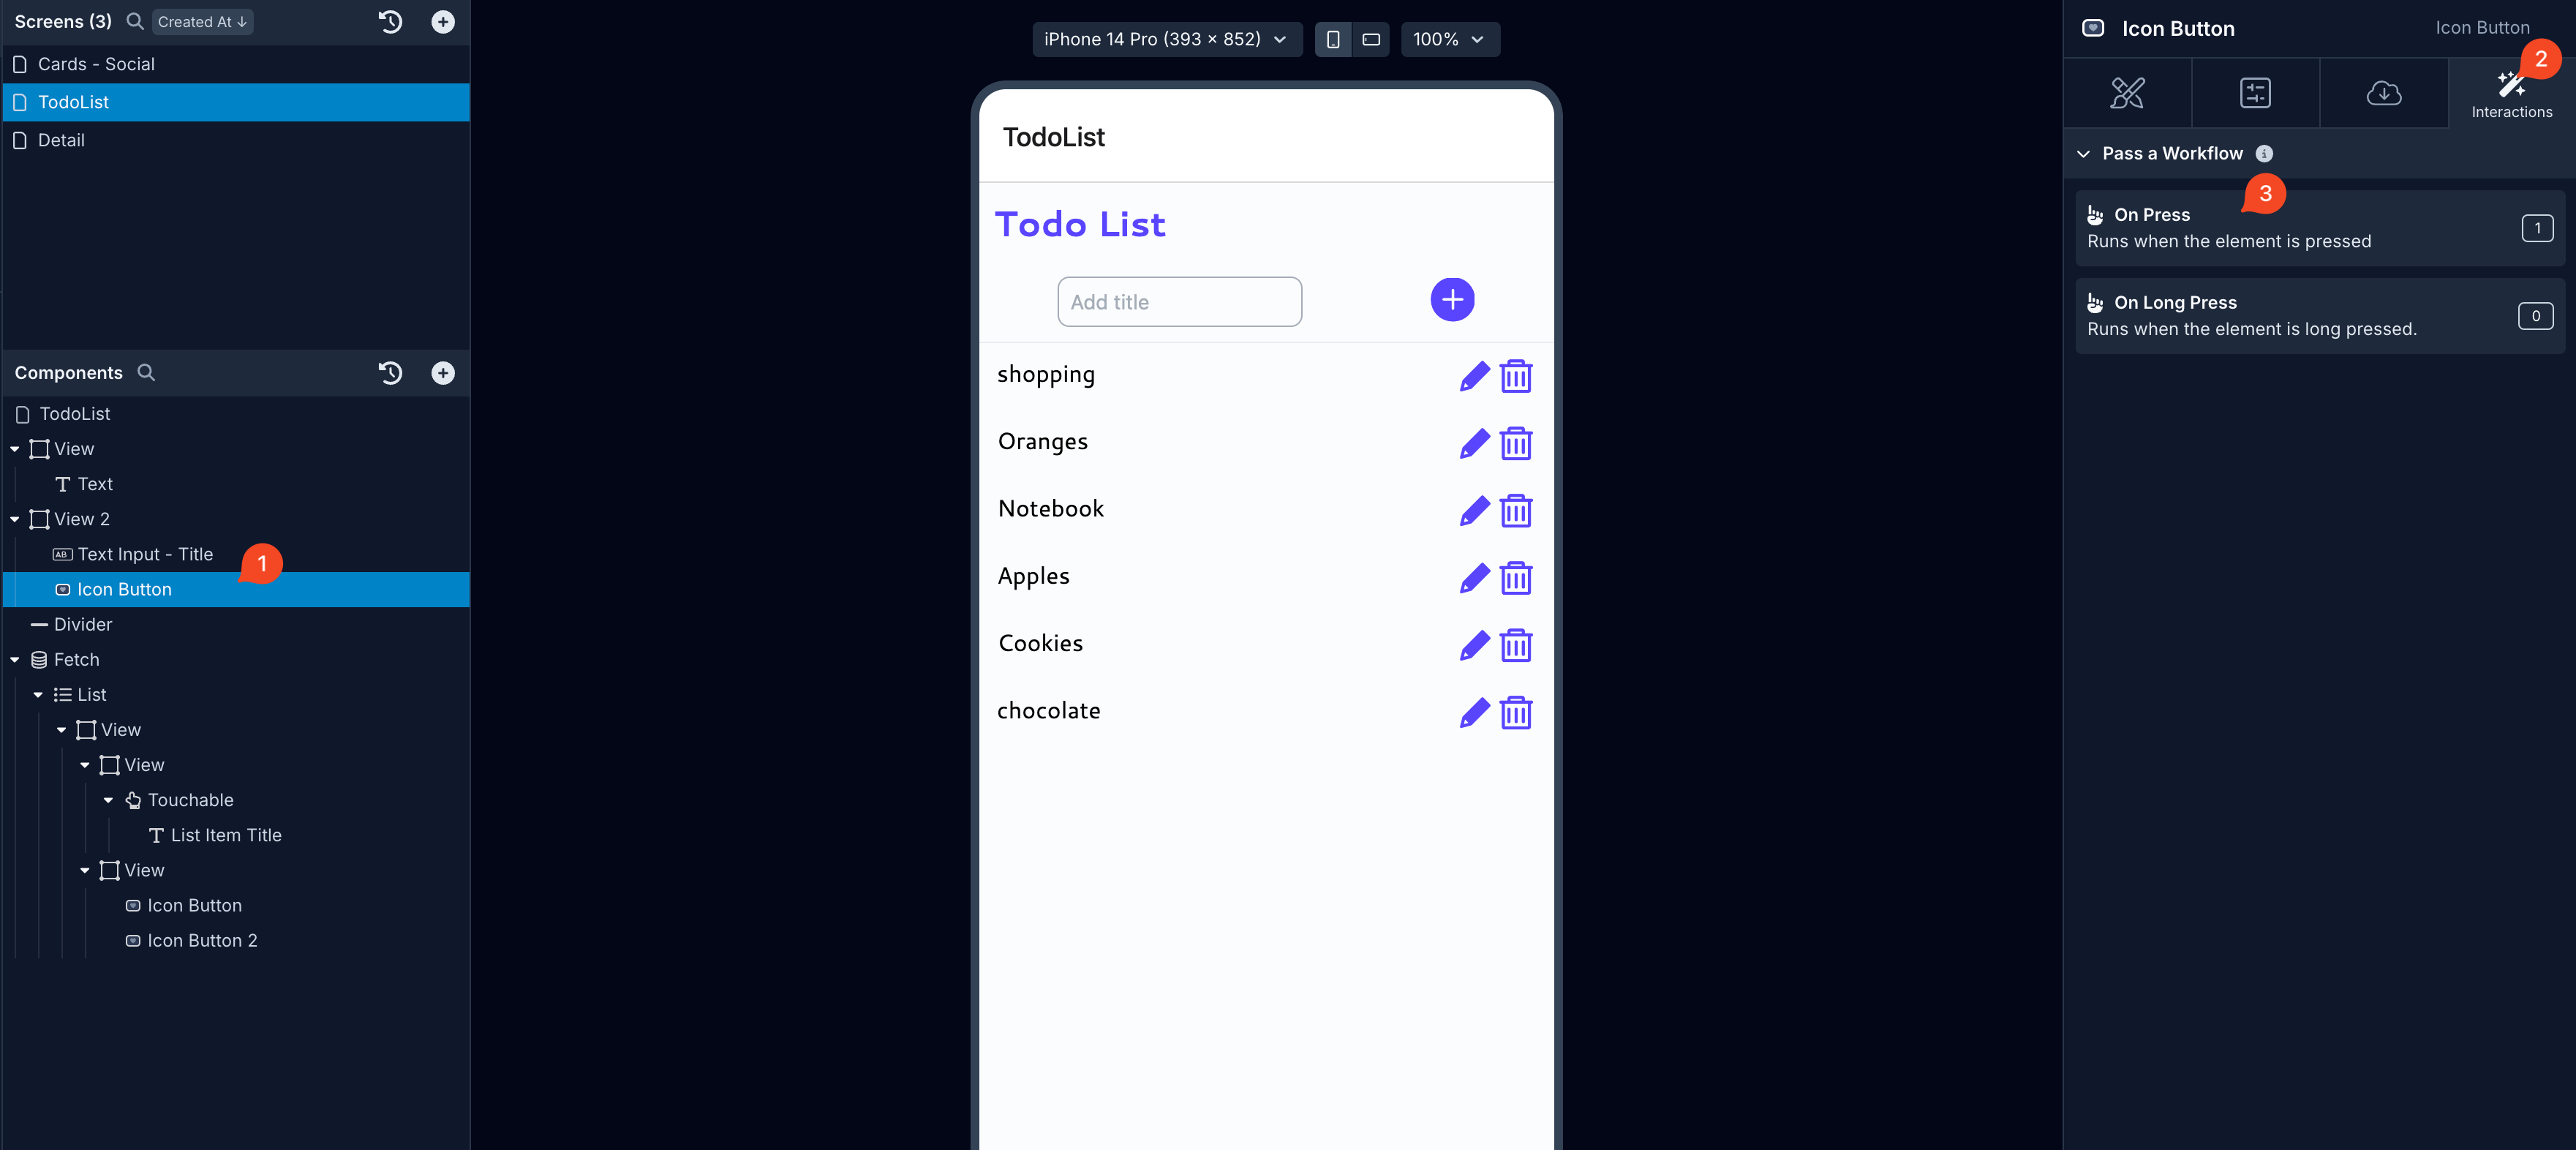
- In the Action Editor Add
API Requestaction to the action stack. - Configure the endpoint you created above and select the
textInputValuein the Body of the API request action.
POST request to update data
The POST request is used to update the single entry in the Xano record. It accepts similar input components as mentioned in the previous section and the API Request is triggered using a Touchable/Button component.
Your component needs to have:
- accepts user input
- has a
Data Sourceprop to update data using an API Request
You can use any component that contains a Data Source prop to log user input and submit data. This list of components currently includes:
Once you have the necessary component(s) on your screen, you'll need to create a new endpoint in your service:
- Click Add endpoint.
- In Step 1: enter a name for the endpoint and select the Method to
POST. - Set the Role to
Update. Set the Object Type togroceriesfor this example. - In Step 2: enter the base name as path:
/your-base-name/{{id}}. For the example below, it's/groceries/{{id}}. - In Step 3: add a valid Body structure to submit a
POSTrequest. Add one or many {{variable}} for test values. Click Body Preview to validate the structure of the Body in the request. - An example of how Body in a request will look like:
{
  "key": {{textInputValue}}
}- In Step 5: click the Test button next to the Endpoint input to verify the response coming from Xano.
- Click Save.
Using a Touchable/Button component, you can trigger the action API Request to update the data to the endpoint. In the example below, we pass the selected item’s data using Navigation parameters to the Screen where the information will be updated. You can find more details on how to use Navigation parameters to pass data in this tutorial.
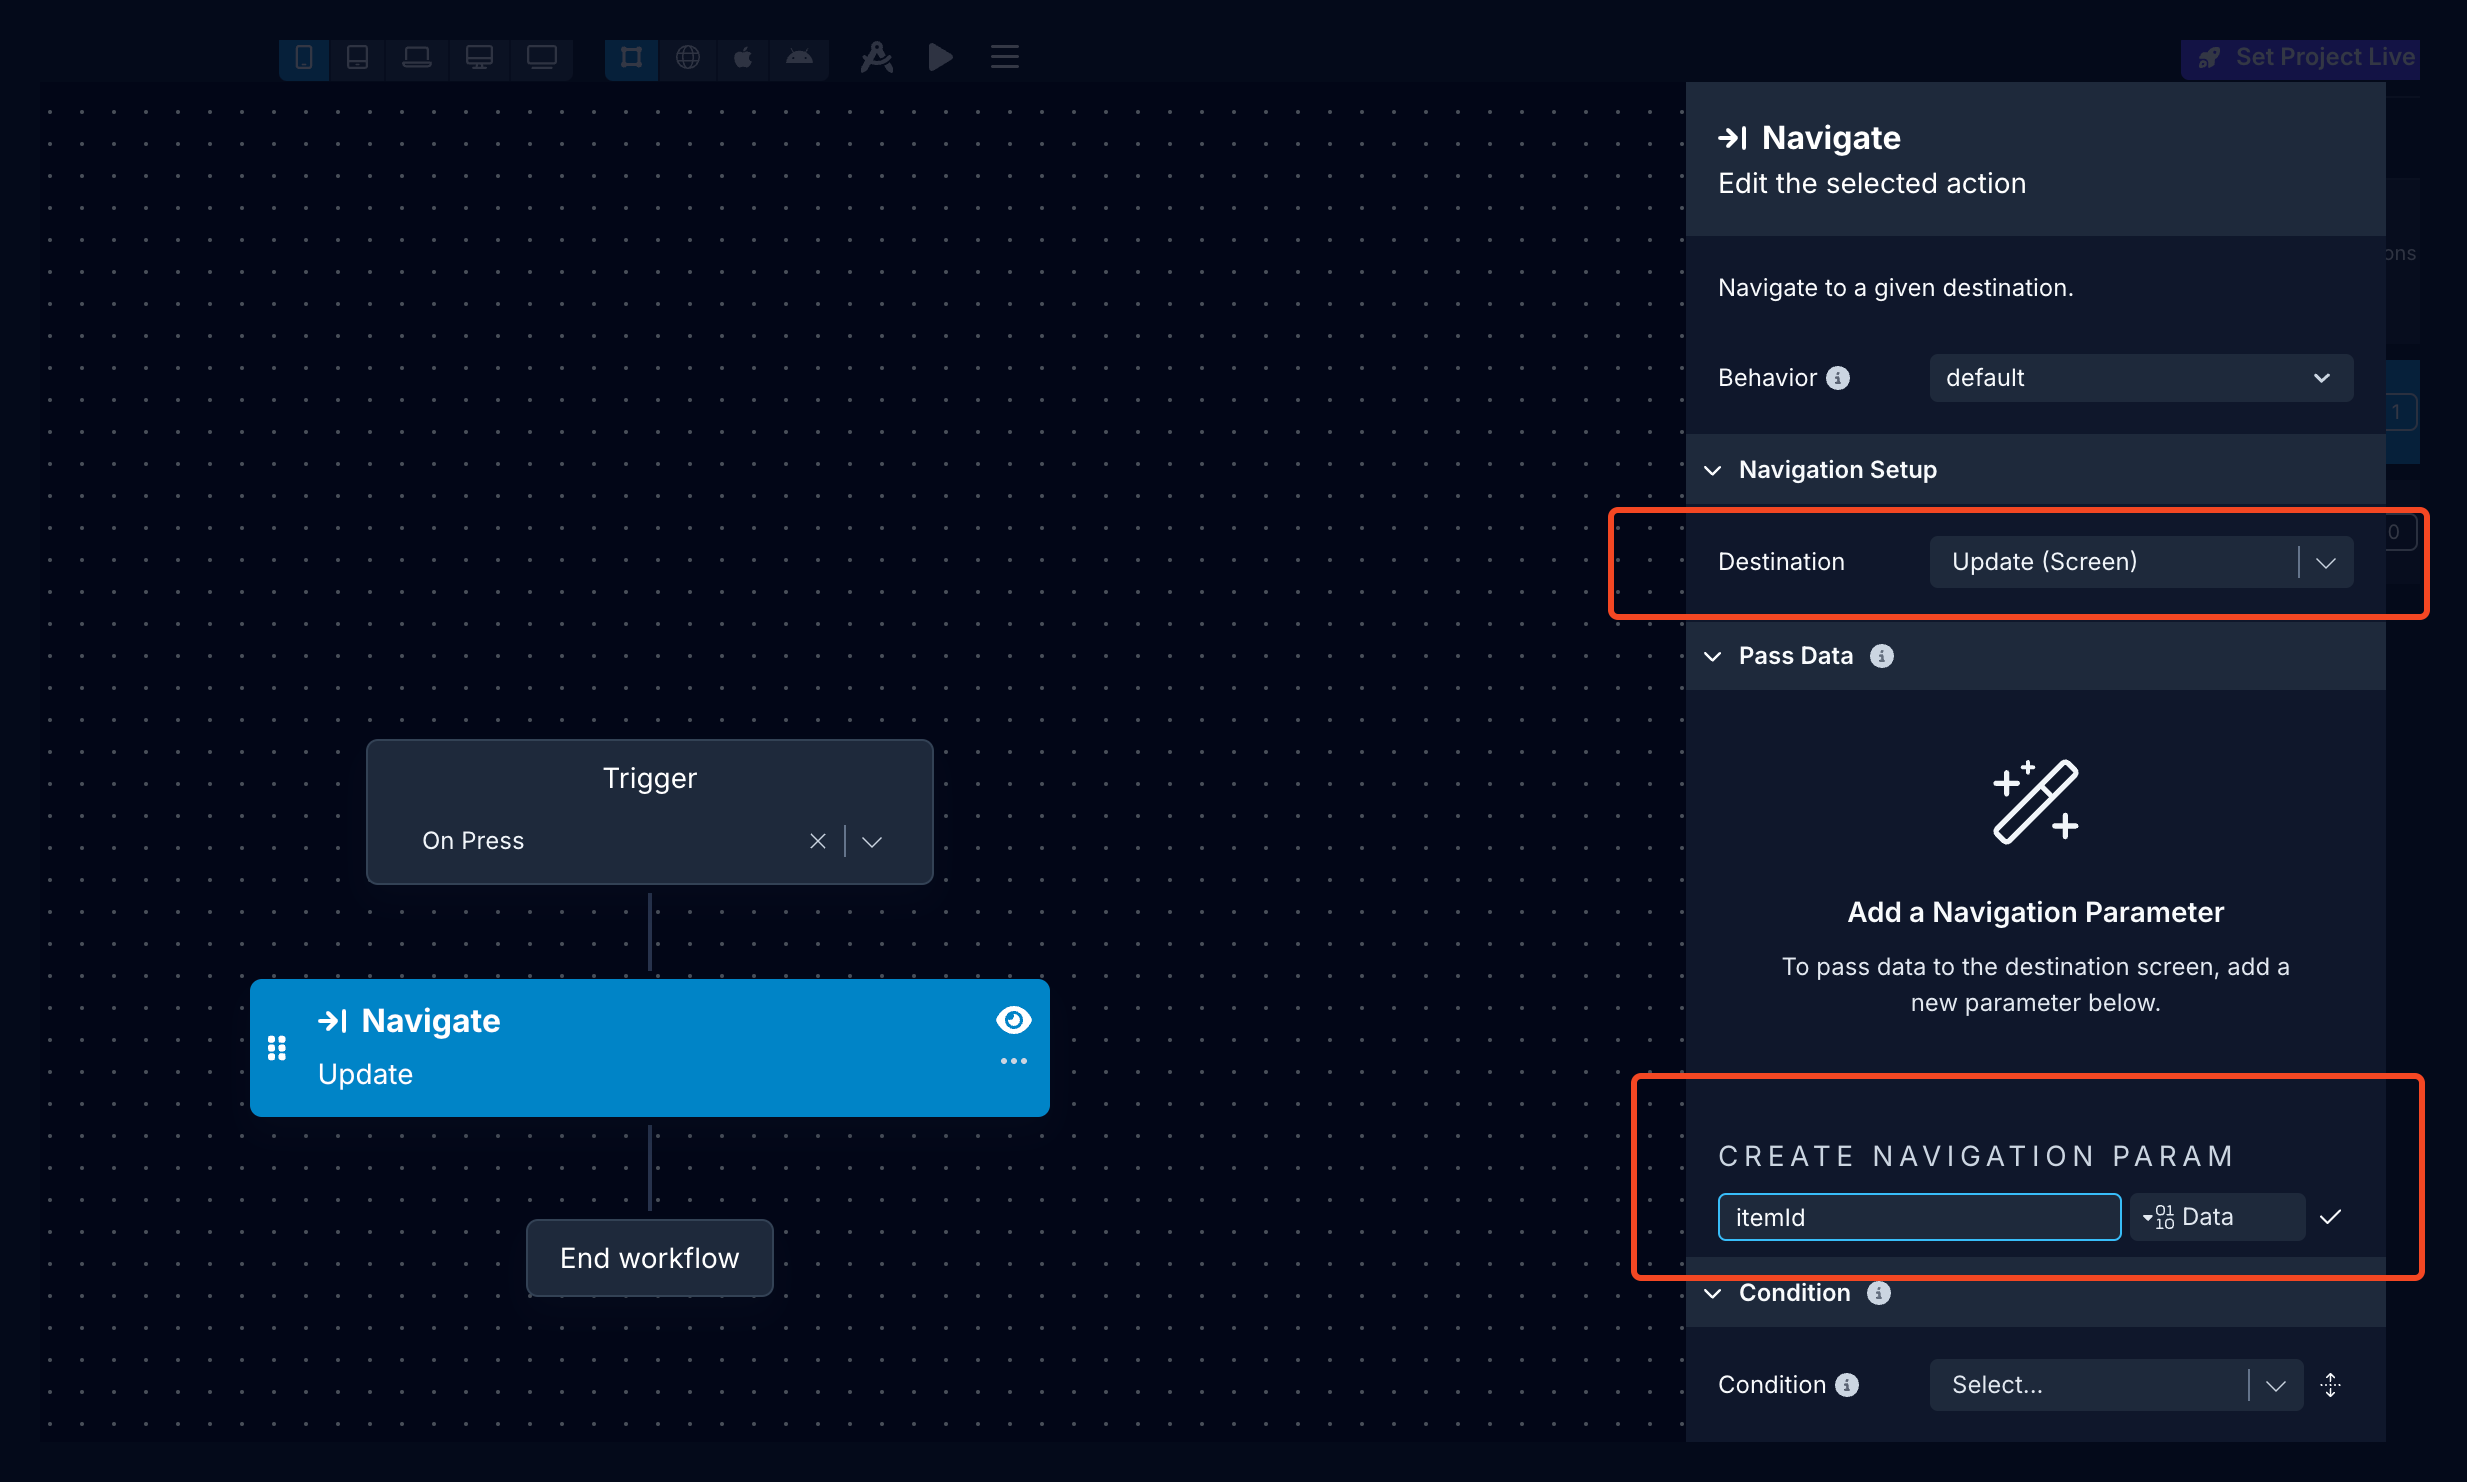
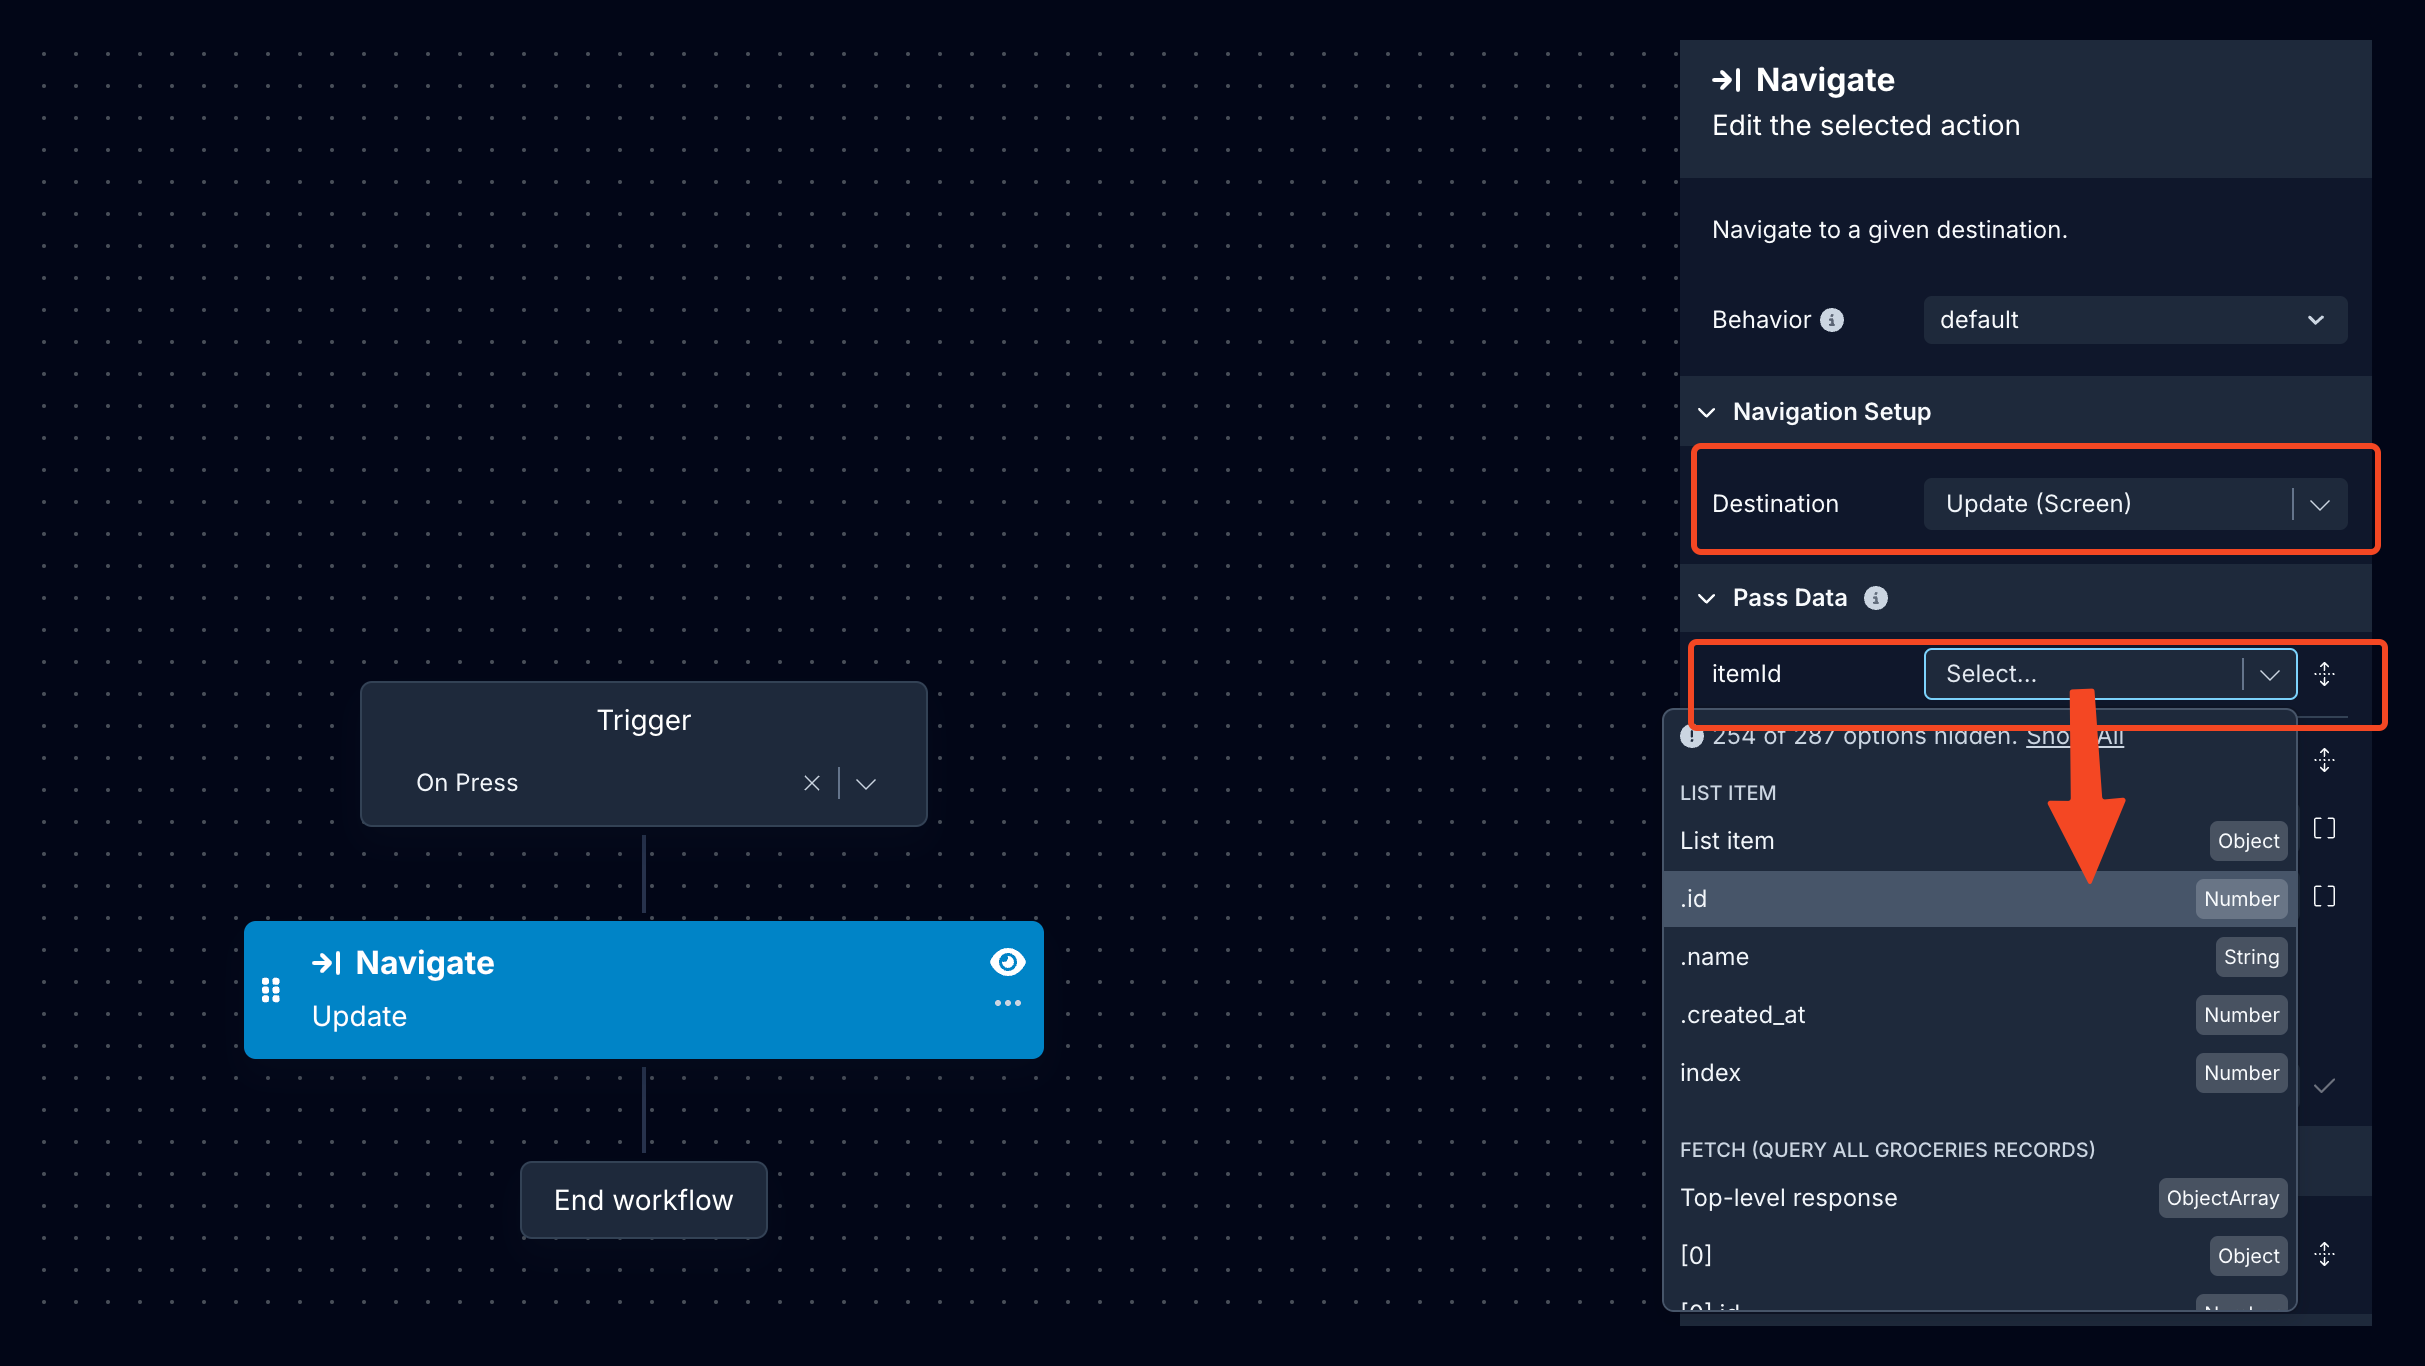
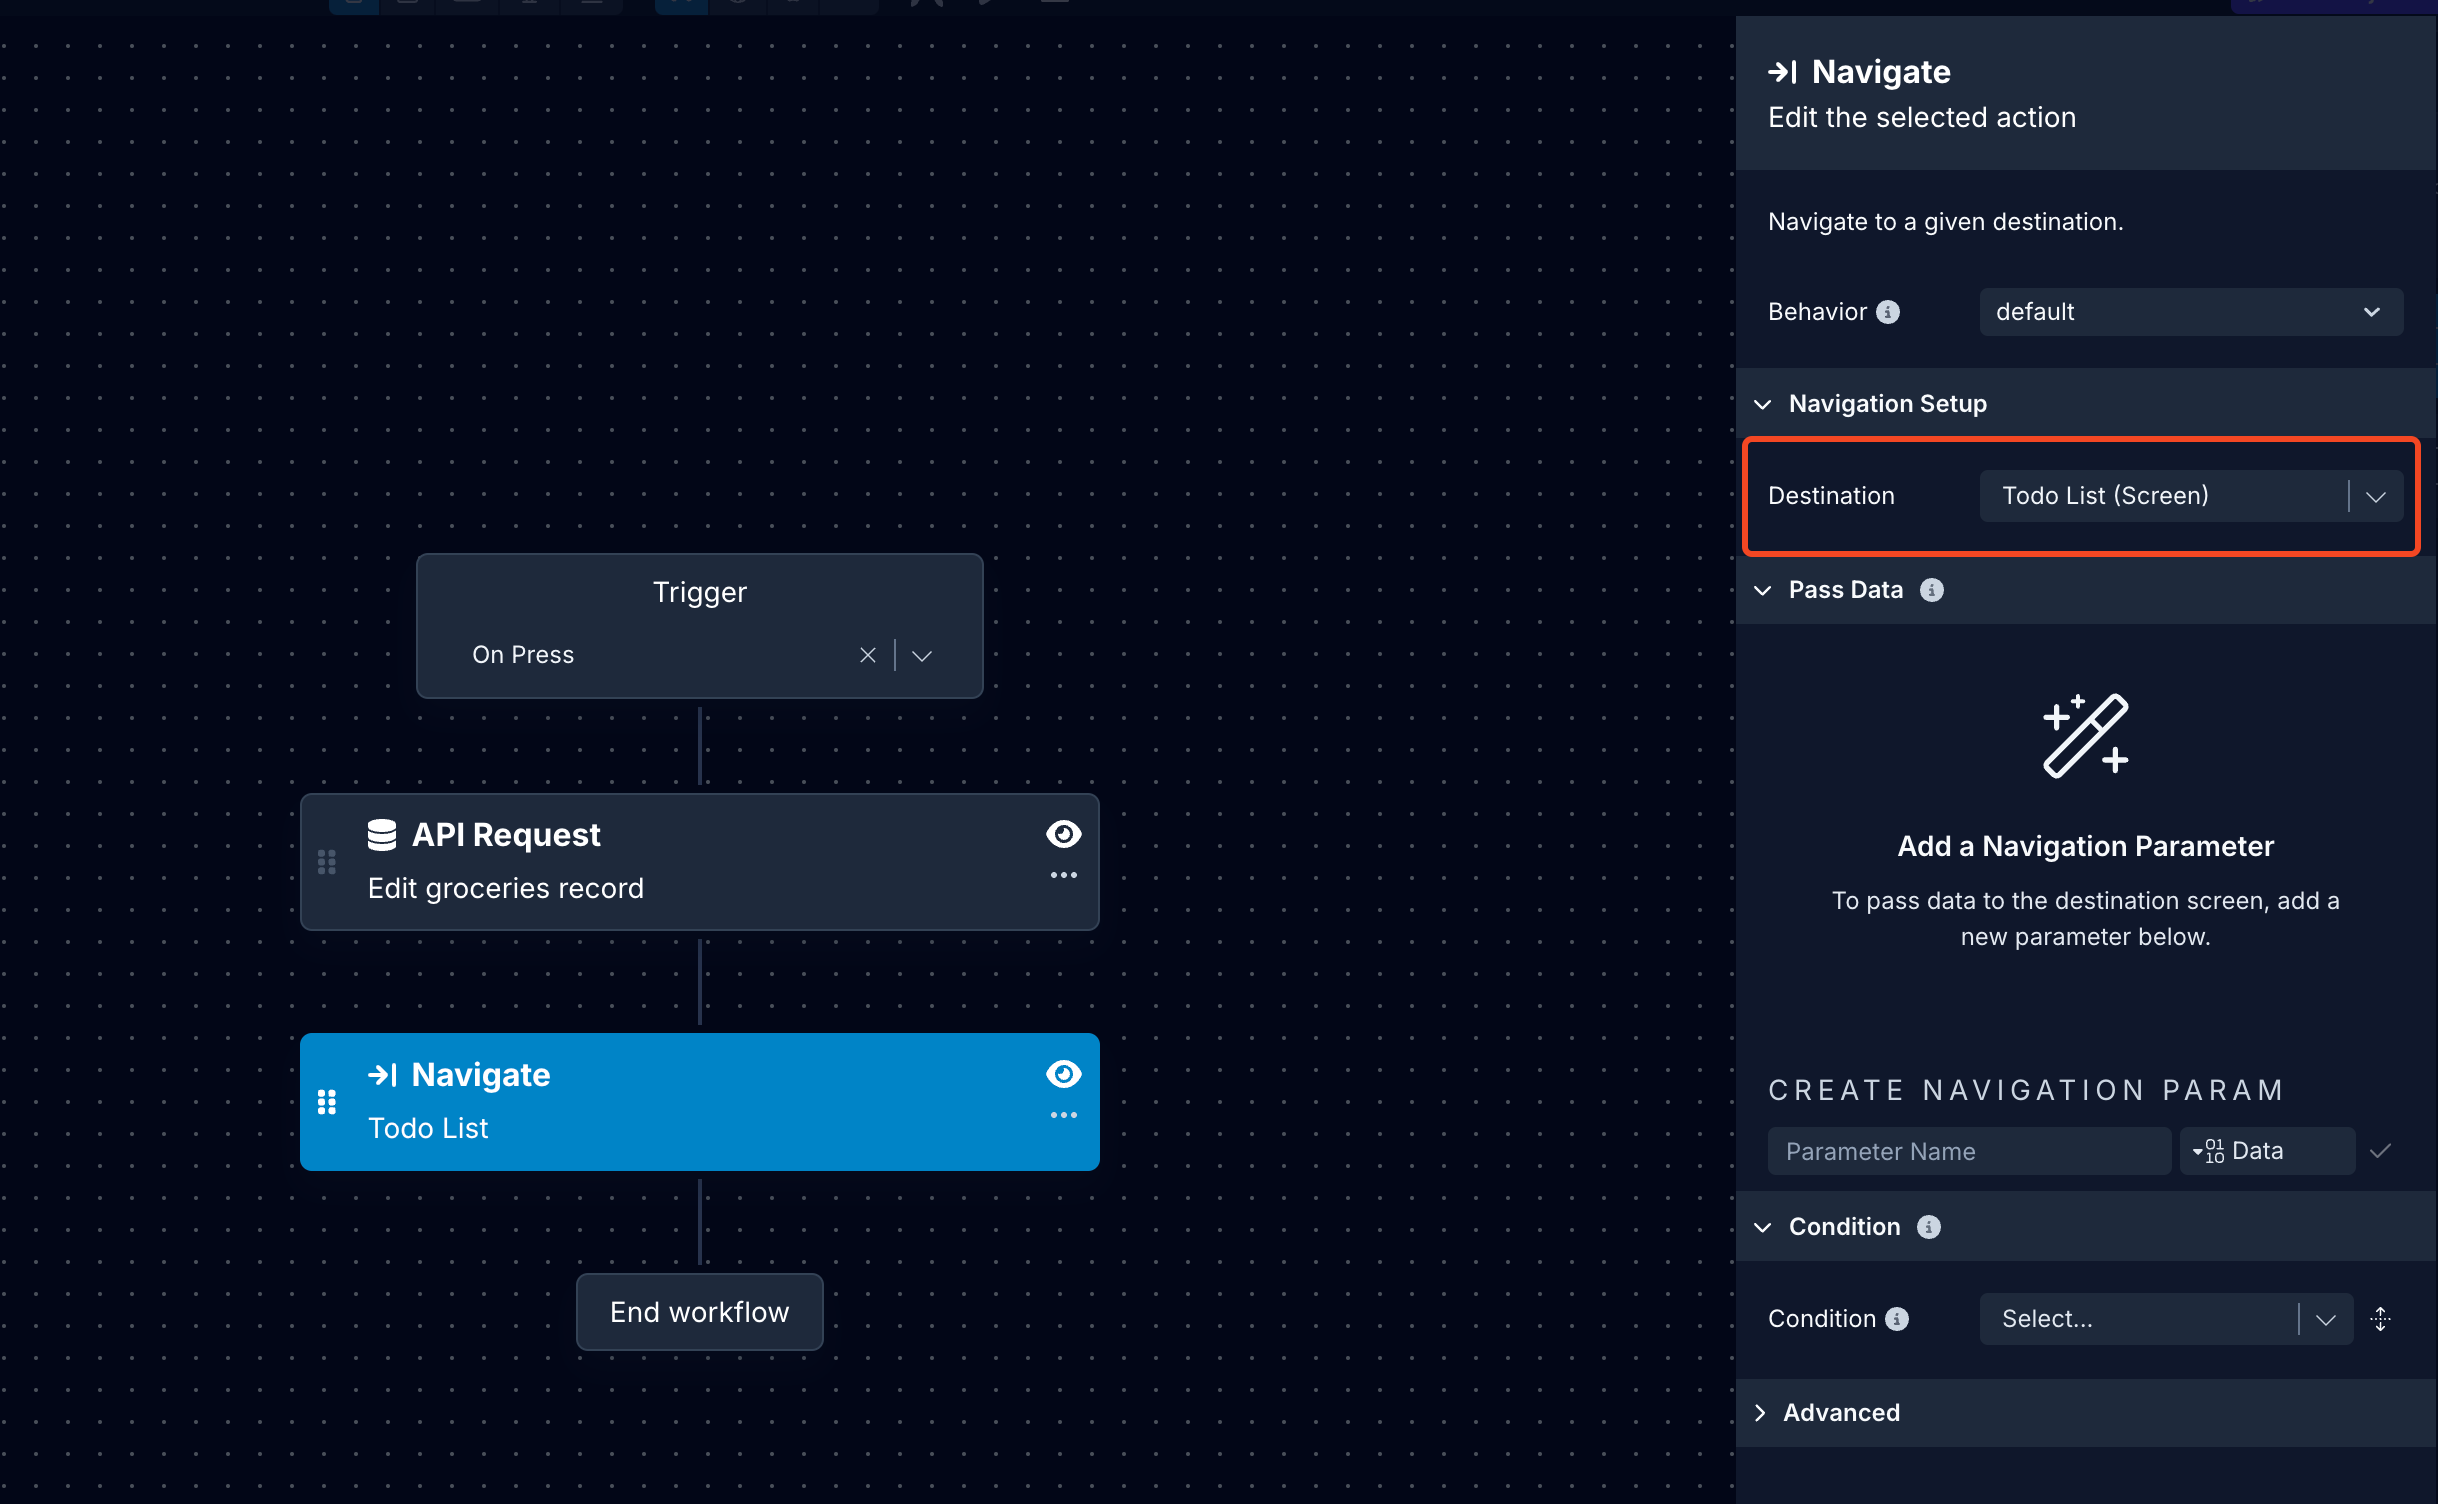
First in the Icon Button's On Press trigger you 'll add Navigate action and choose the Destination as the Screen you are going to update the item's information:
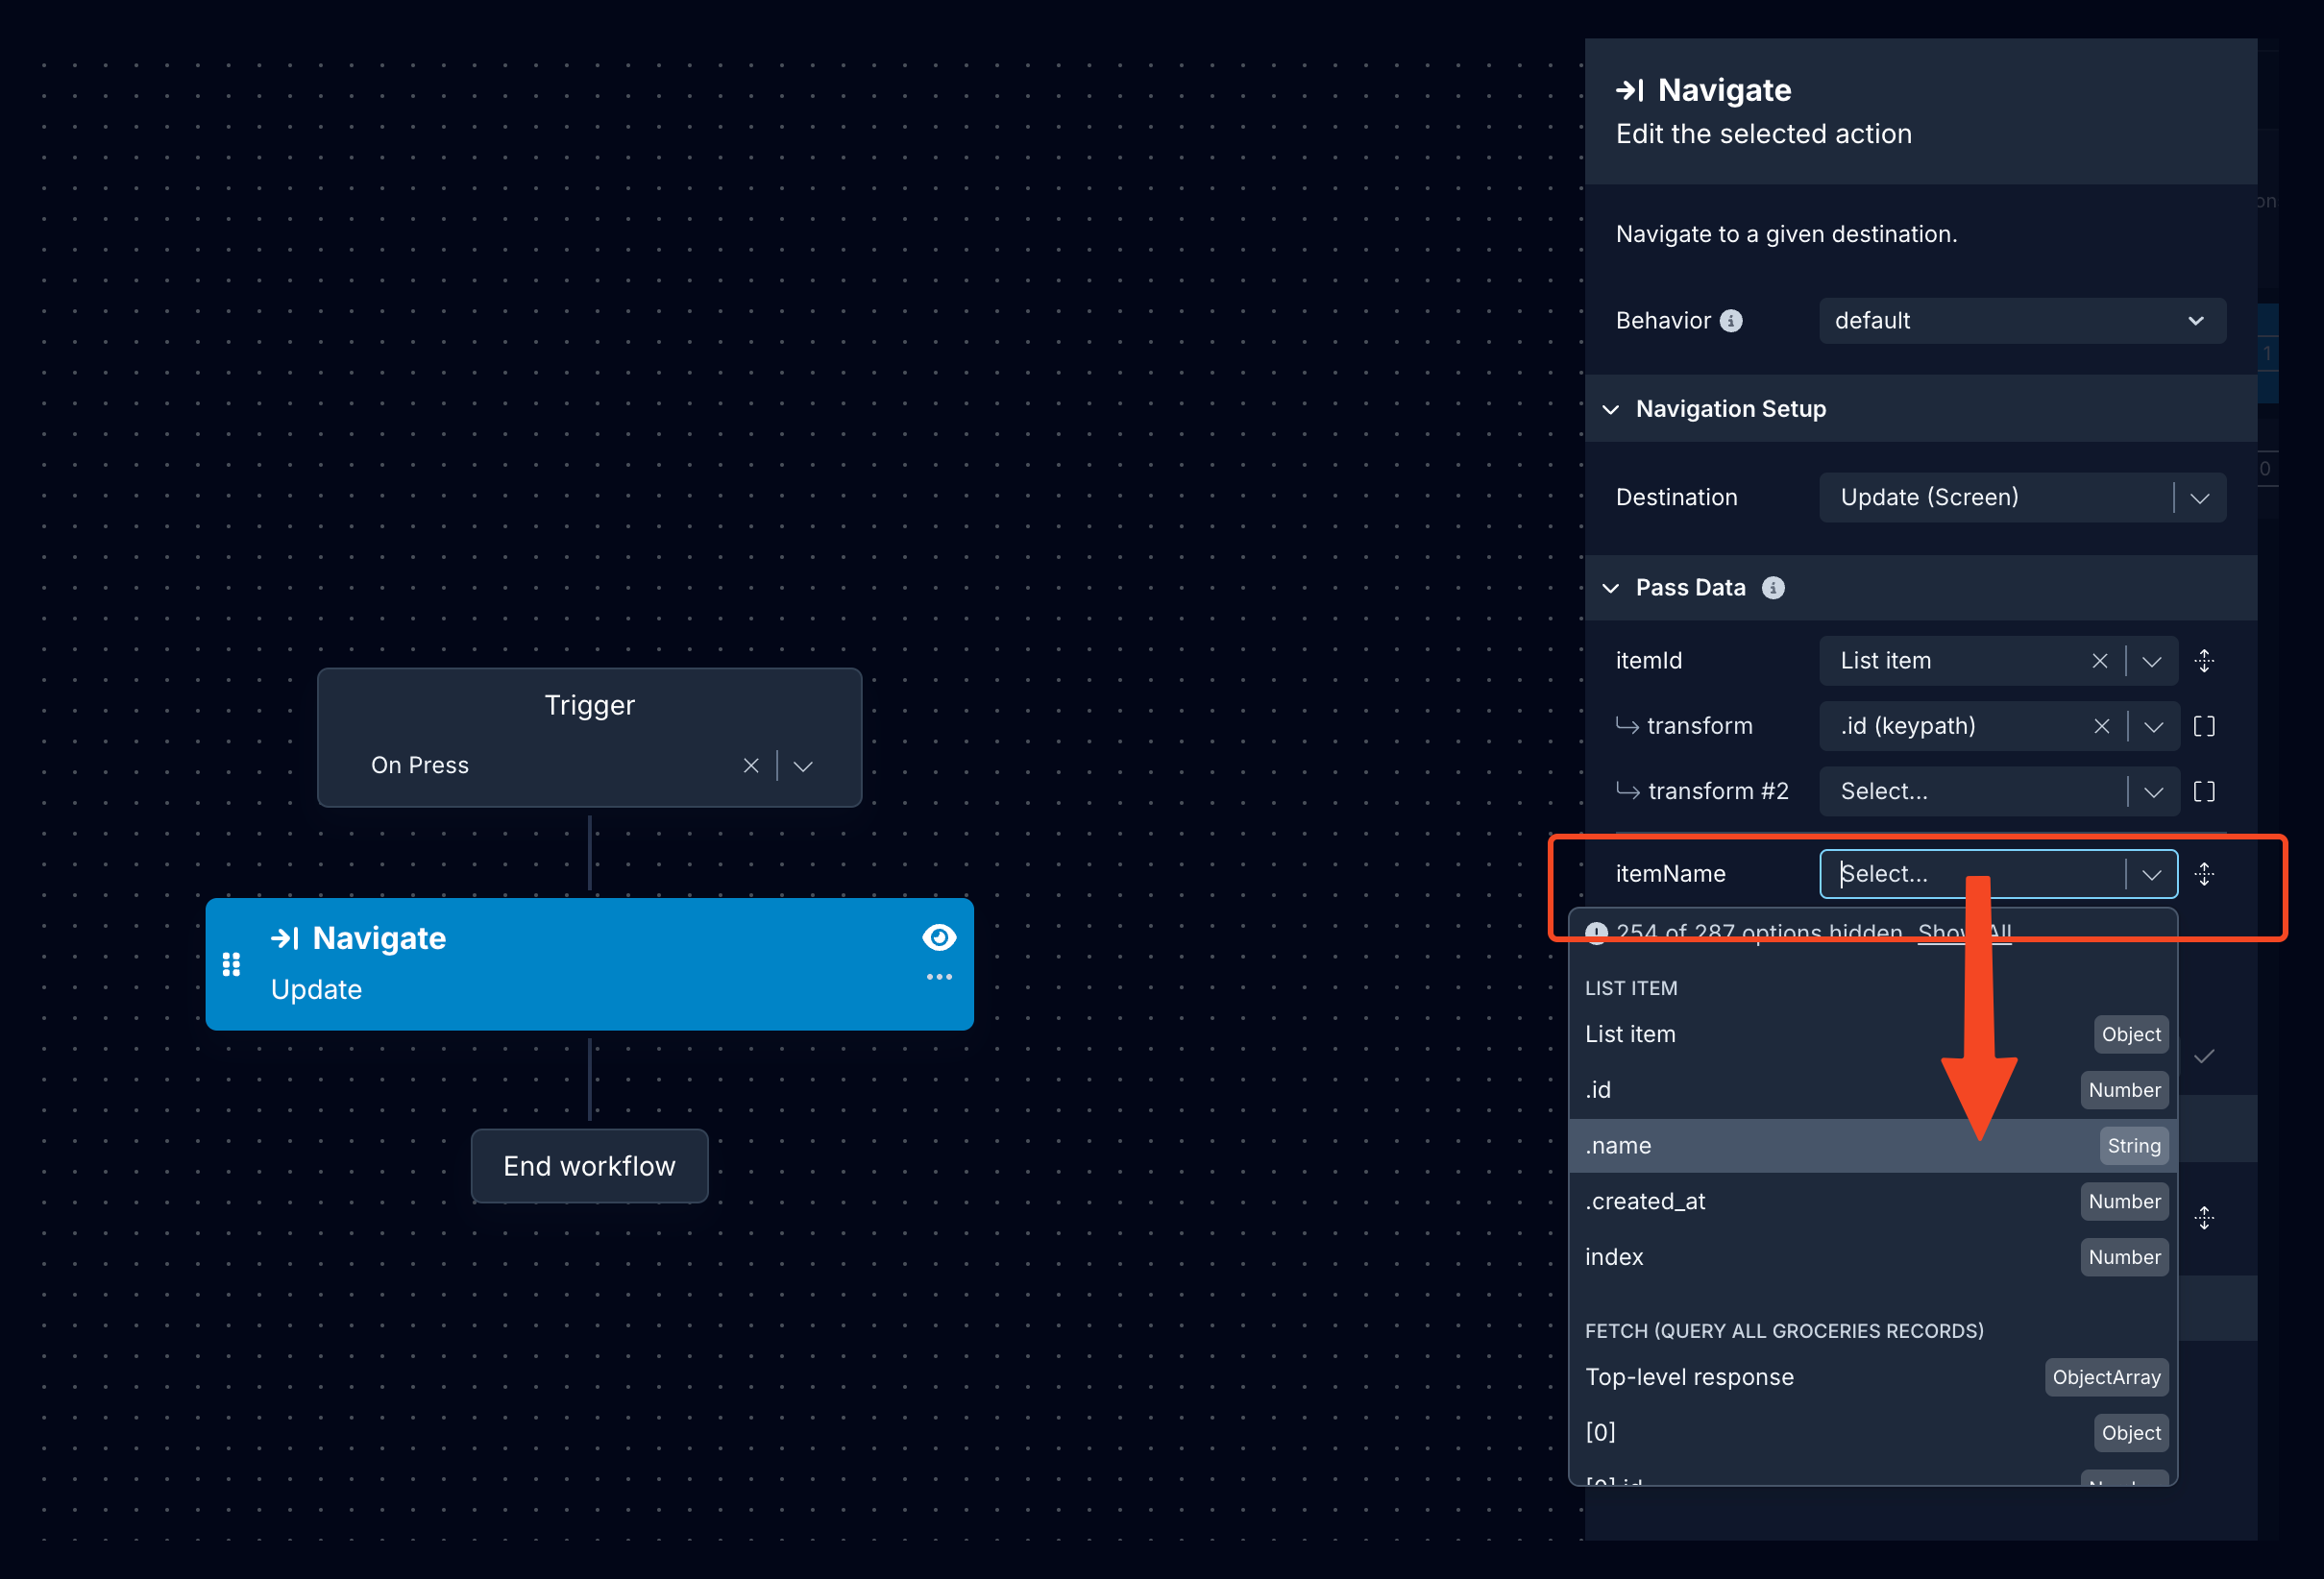
Below you can add Navigation parameters for item id and item name:
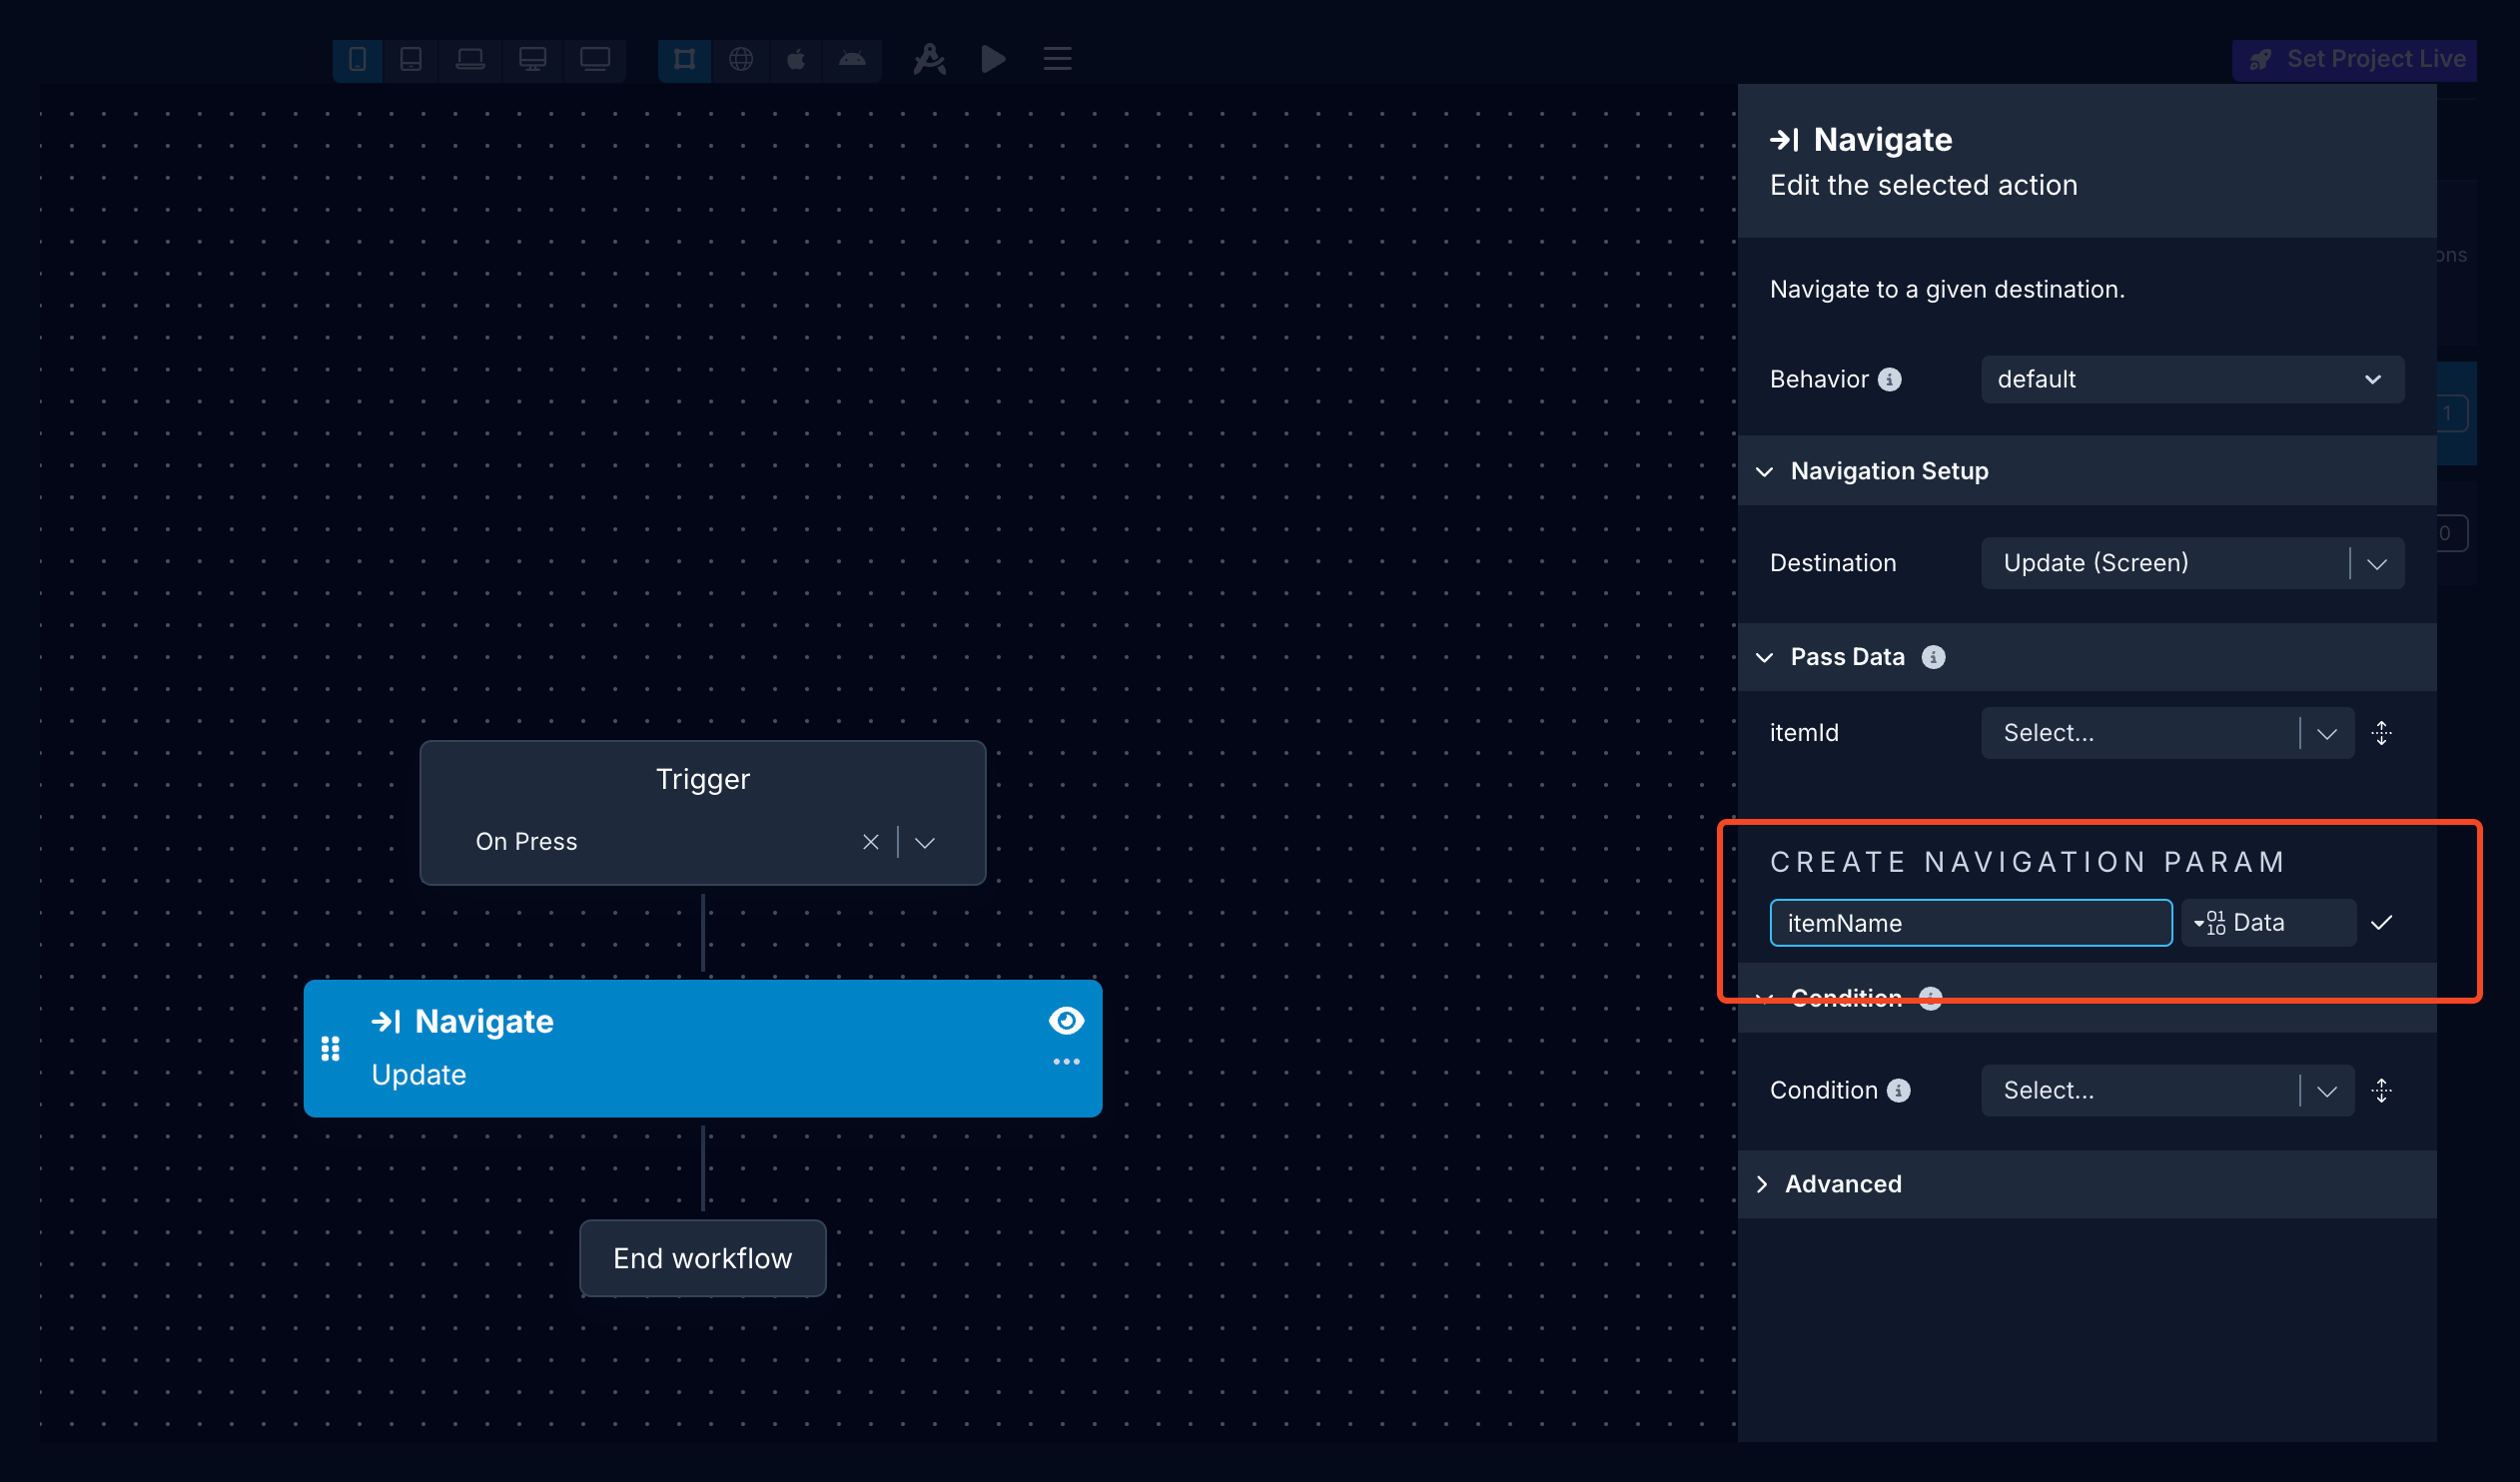
And then select the respective key values from the dropdown:
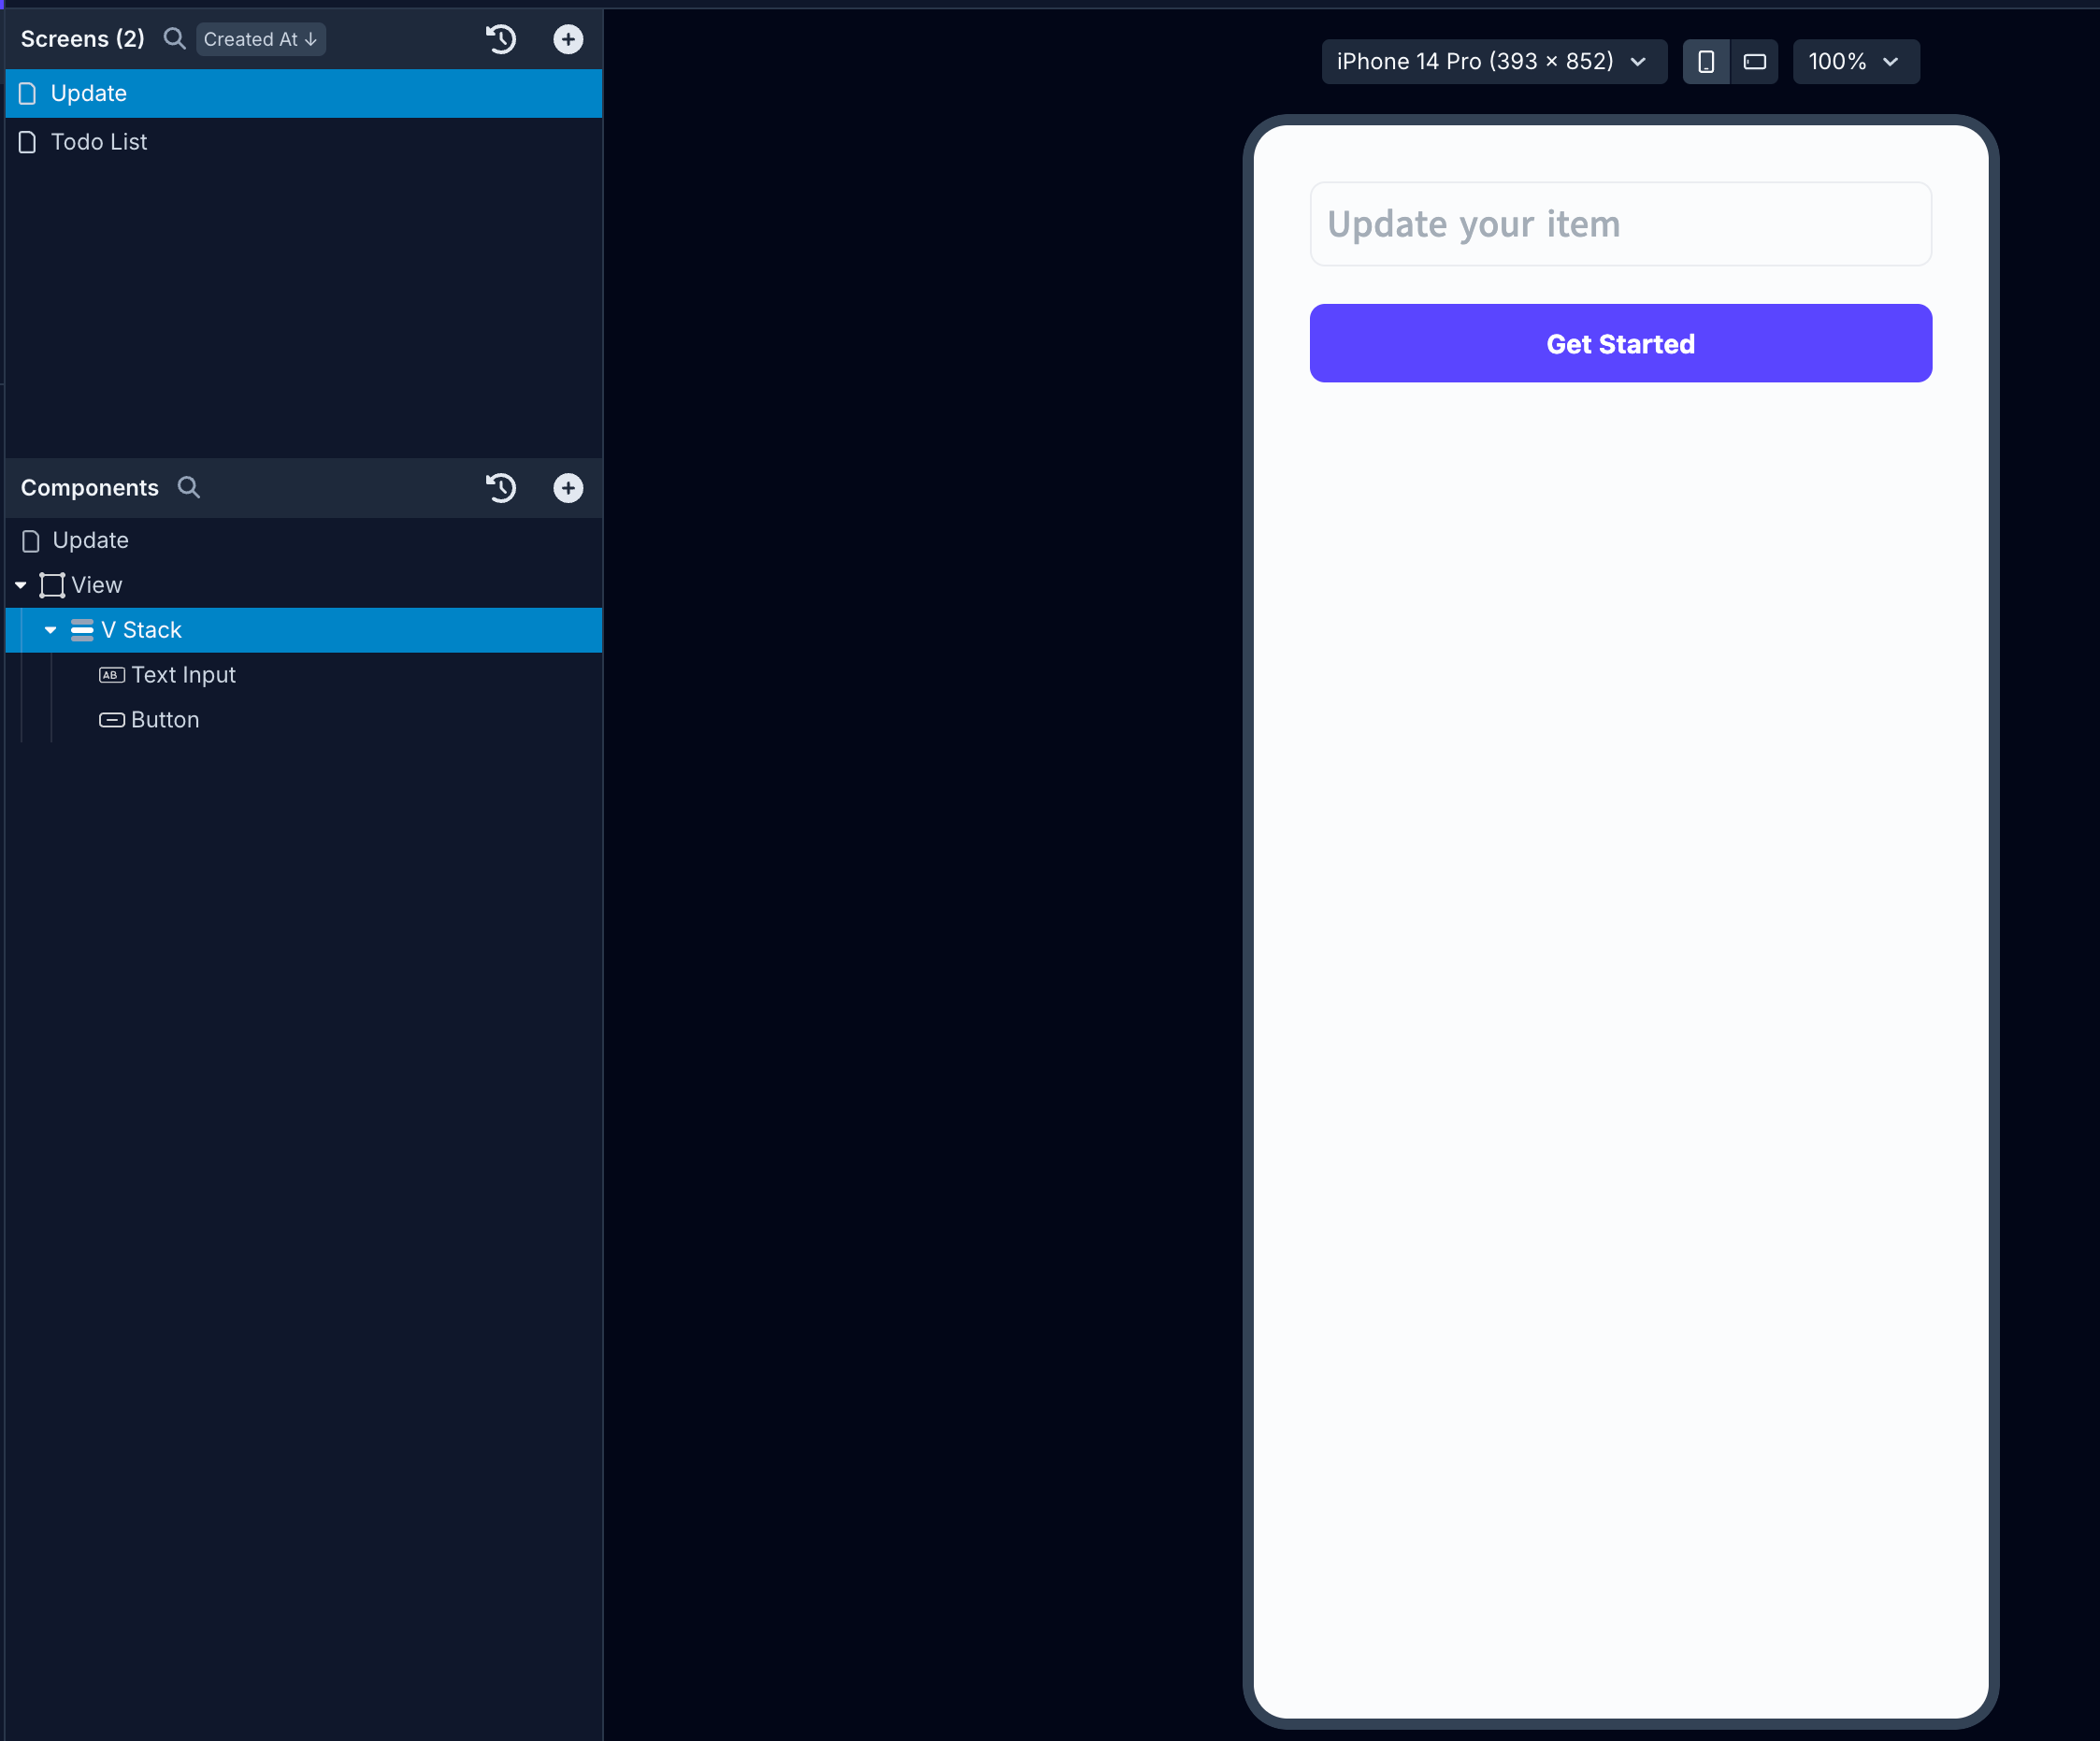
In this setup, in the Destination Screen we have a TextInput component to update the name of the item and a Button component:
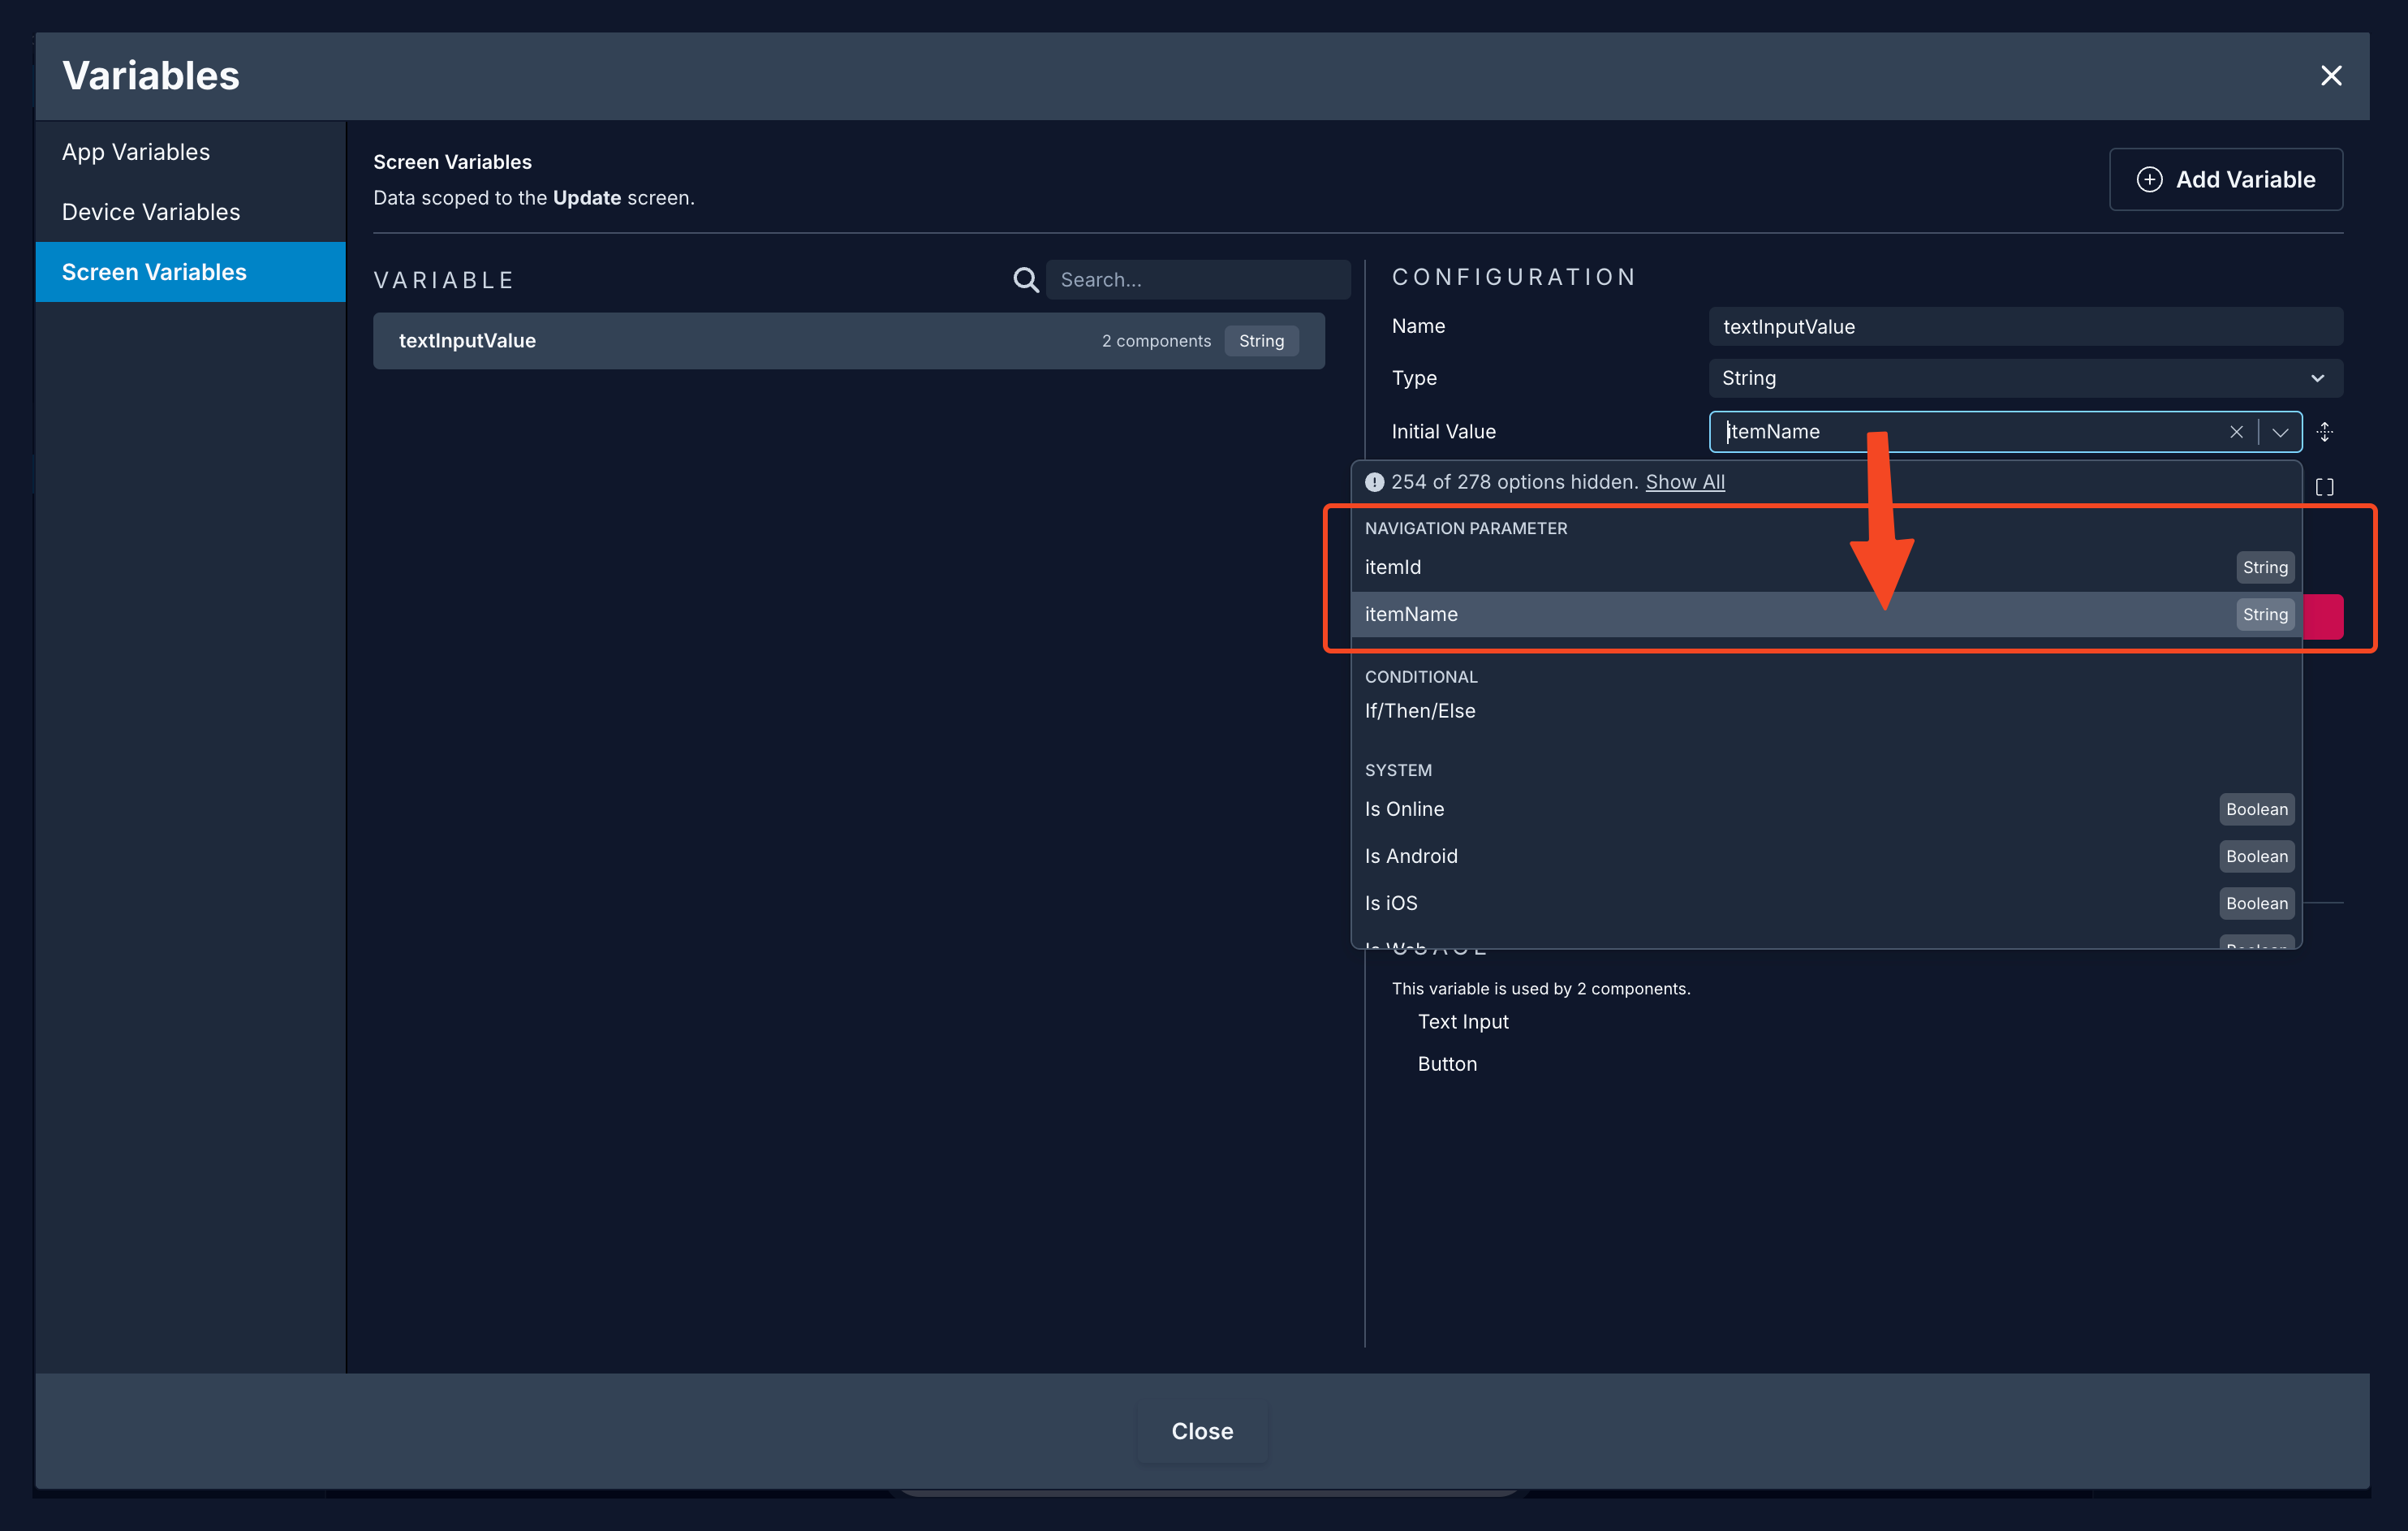
Open to the Variables modal to select the Initial Value of the TextInput component as the itemName Navigation parameter:
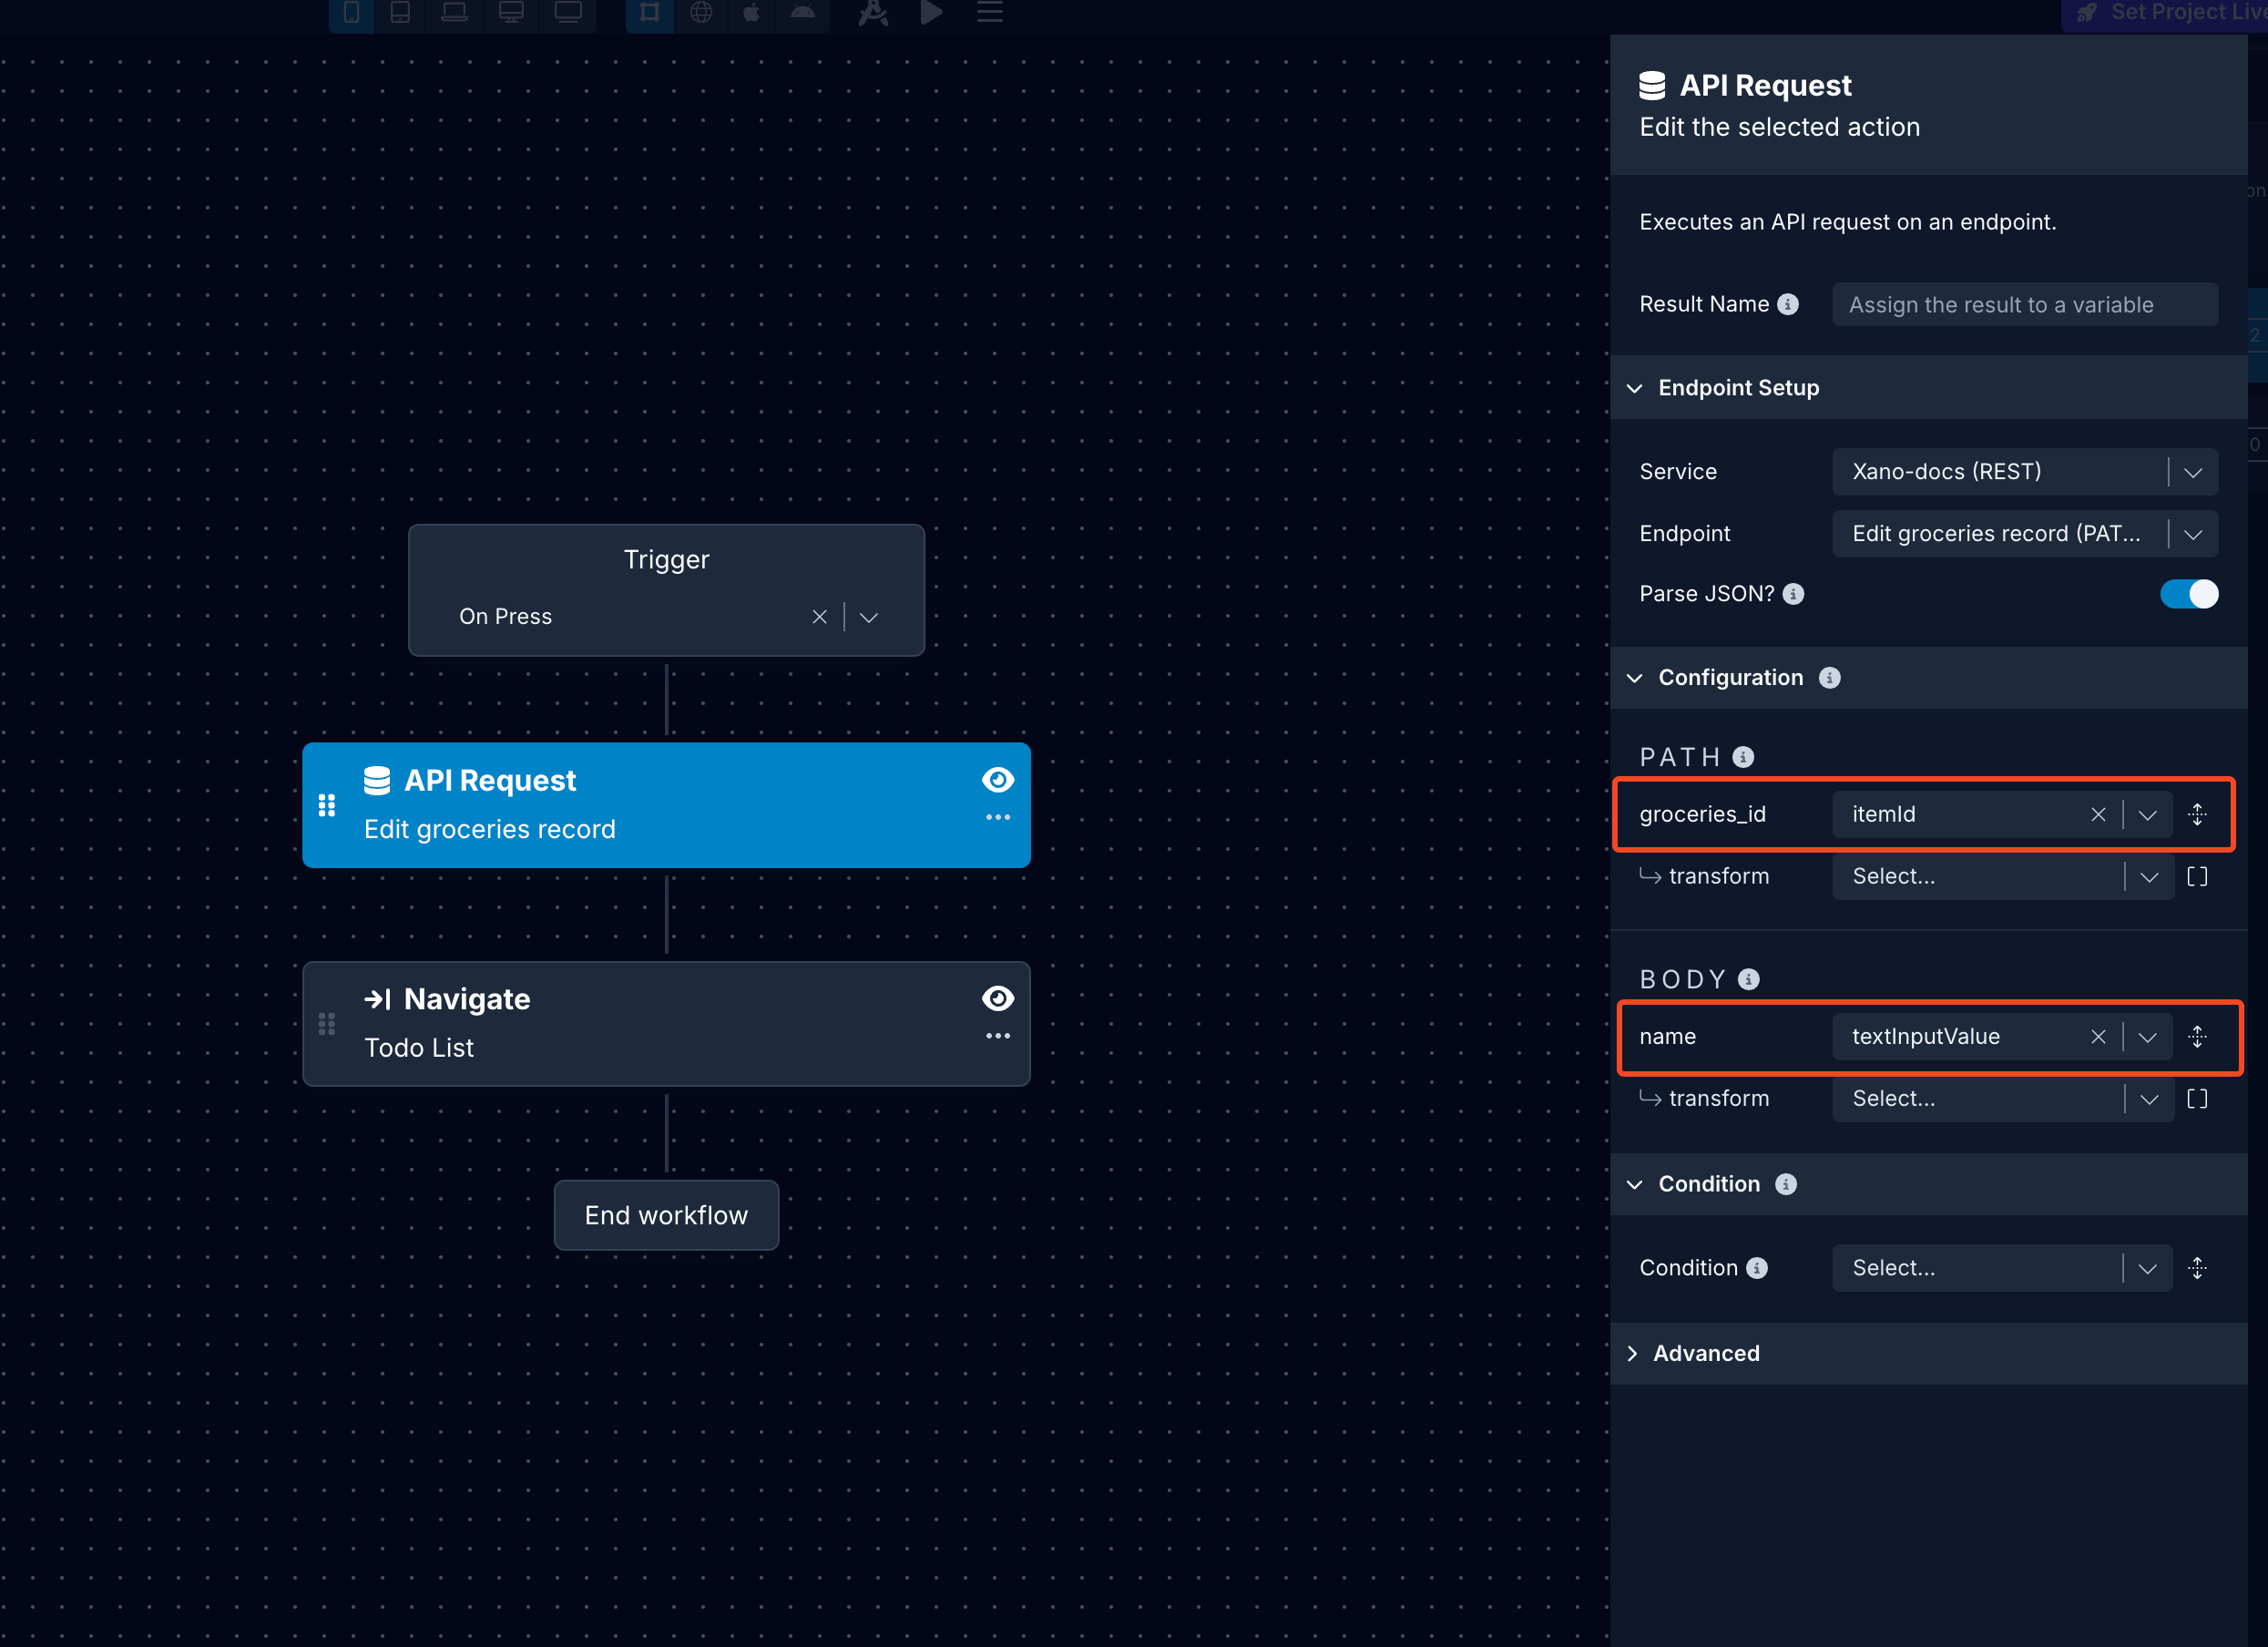
Now, select the Button component and, in the On Press trigger’s Action Stack, add an API request action. Choose the endpoint for updating the item data. In the Configuration section, assign the itemId Navigation parameter as the identifier for the item to be updated and the textInputValue Screen Variable as the new item name:
You can then navigate user back to the first Screen:
DELETE request to delete data
The DELETE request is sent to the Xano data table with an item's id to remove that particular record from the table.
For example, once you have the necessary component(s) on your screen, you'll need to create a new endpoint in your Xano REST API service. In the new endpoint you'll need to:
- Click Add endpoint.
- In Step 1: enter a name for the endpoint and select the Method to
DELETE. - Set the Role to
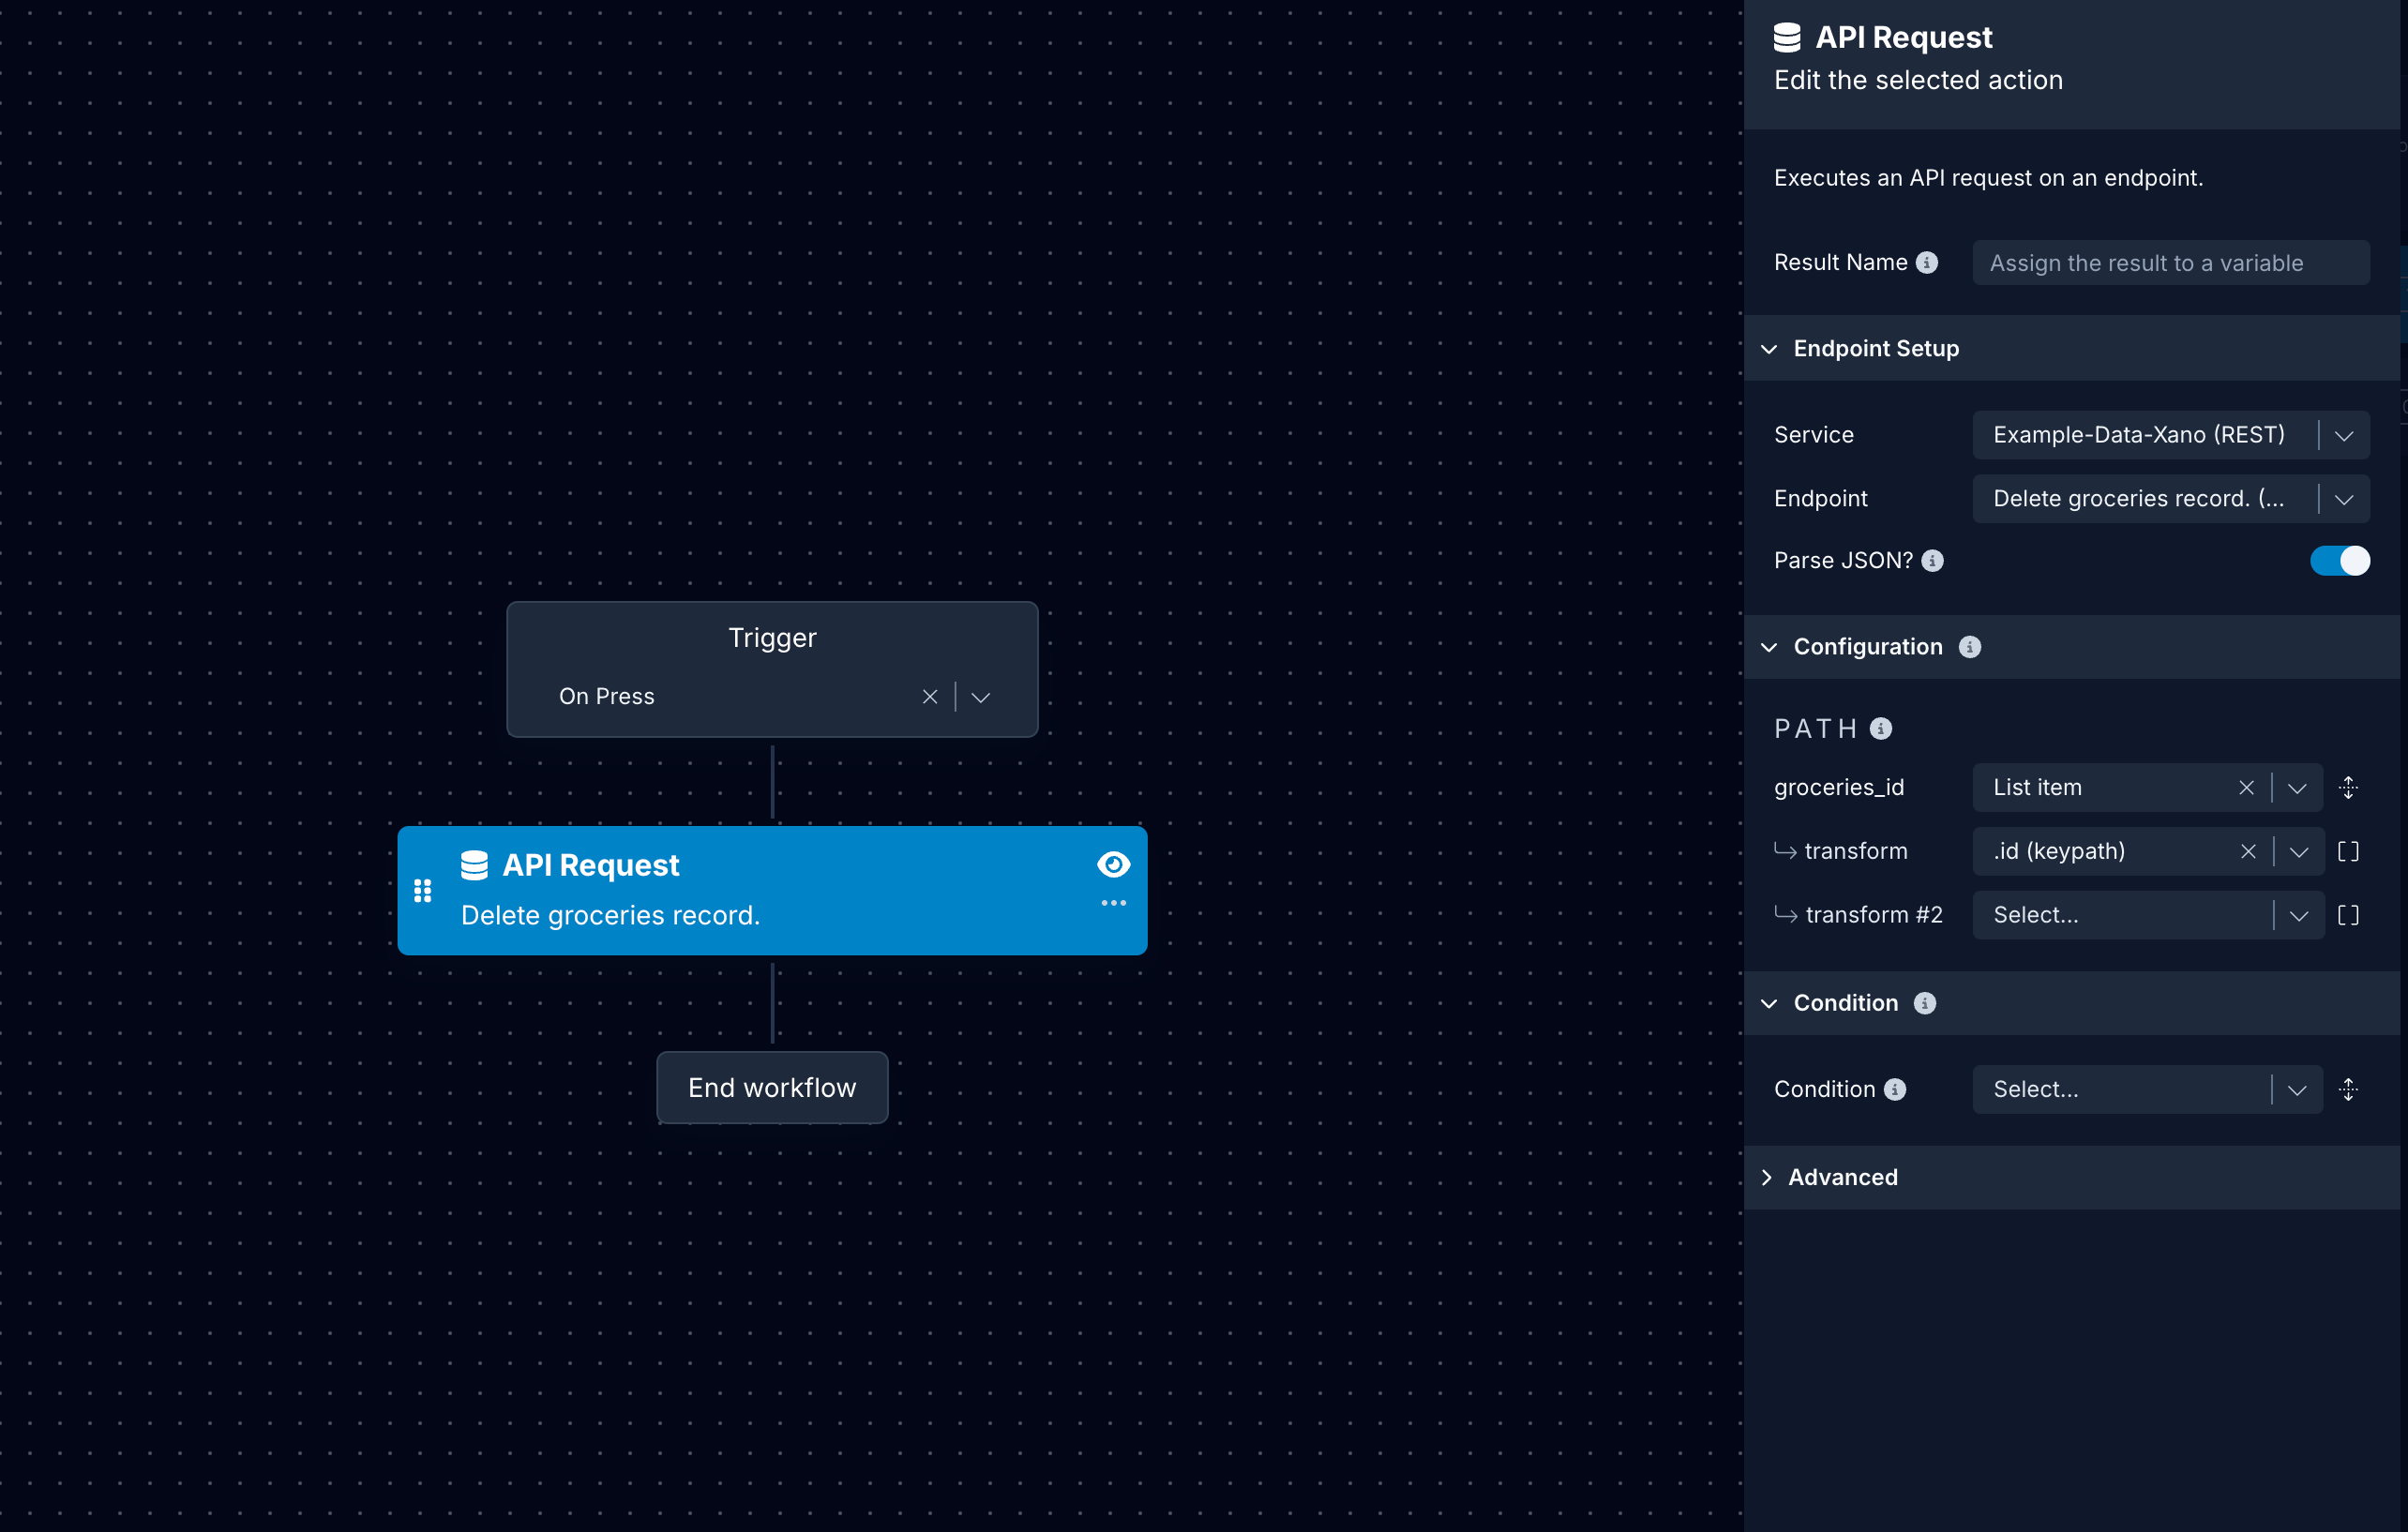
Delete. Set the Object Type togroceriesfor this example. - In Step 2: add
/your-base-name/{{id}}whereidis provided as a test value of an existing record when testing the endpoint. In your app, you will have to pass theidof a single record. - In Step 4: click the Test button next to the Endpoint input to verify the response from Xano.
- Click Save.
Using a Touchable/Button component or an Icon Button, you can add the API Request action to trigger the DELETE request.
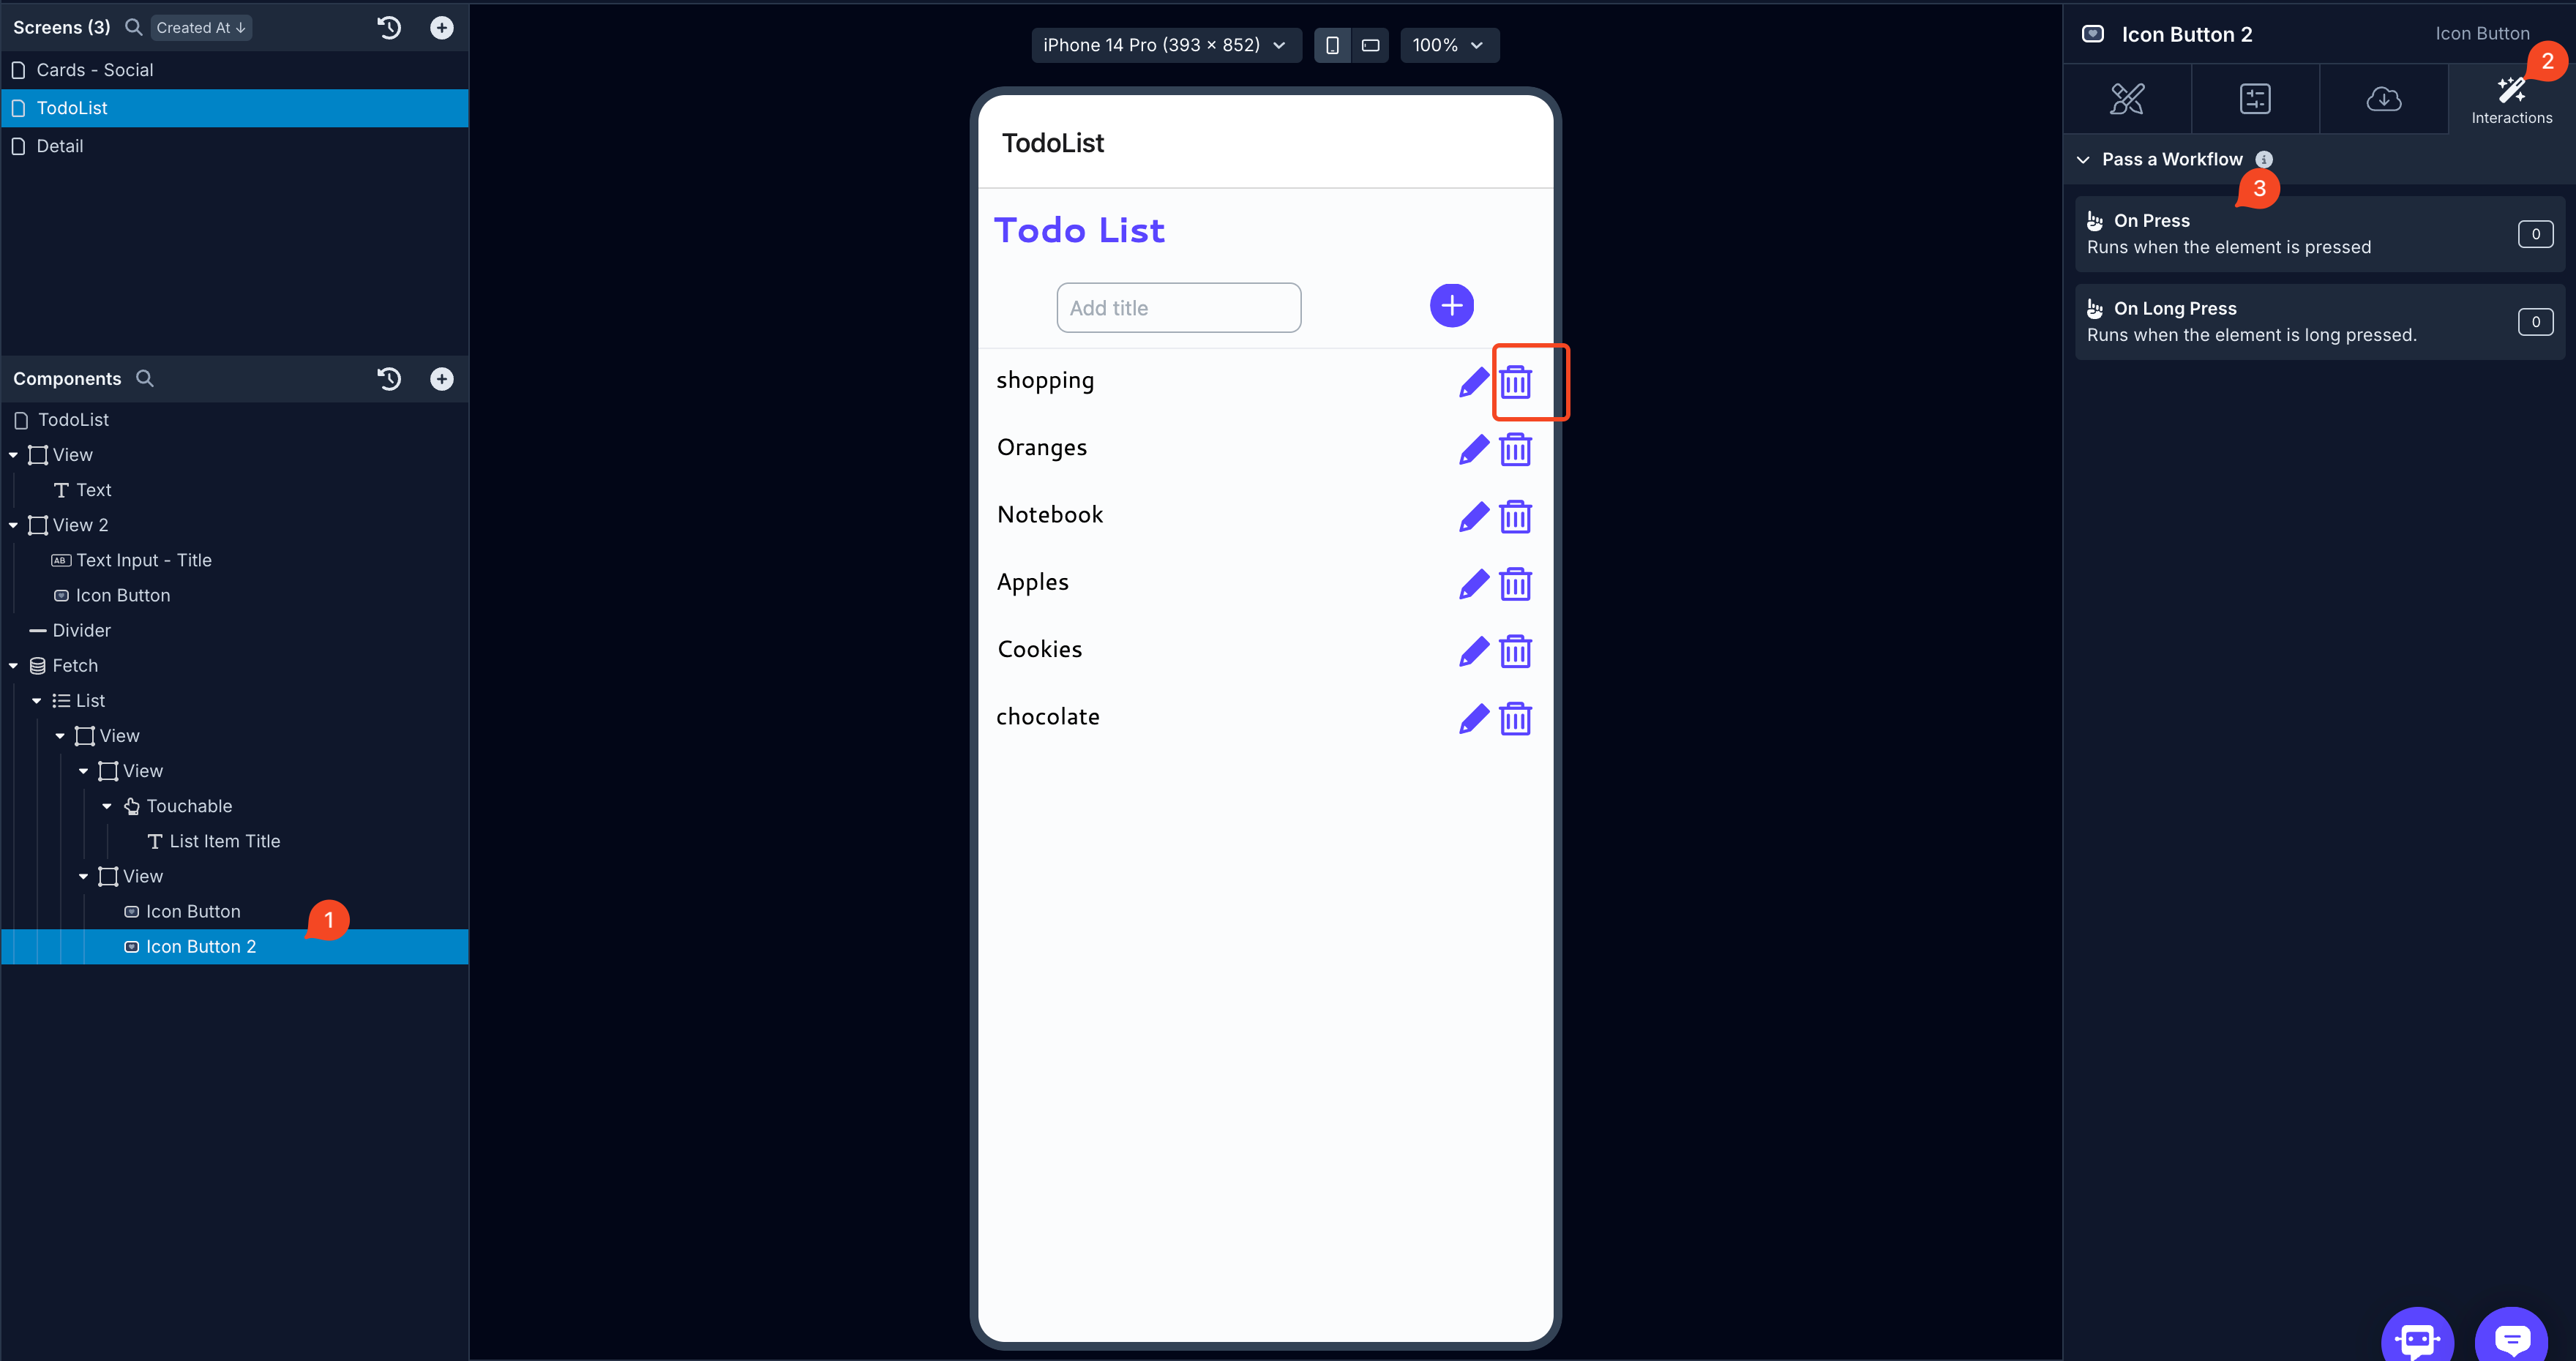
- In the Action Editor, add
API Requestaction and configure yourDELETEendpoint.
Additional Resources
For Authentication with Xano and Draftbit, please refer to the guide here.