Backendless
What is Backendless?
Section titled “What is Backendless?”Backendless is a cloud backend platform that enables developers to create apps without server coding. It provides programmable services that supply standard server functions.
It supports features such as user management, relational data, push notifications, publish/subscribe messaging, geolocation, video/audio recording, and live streaming on the server, file service etc. Backendless makes these services available through the implementation of API.
Integrating Draftbit & Backendless
Section titled “Integrating Draftbit & Backendless”Setup steps in Backendless
Section titled “Setup steps in Backendless”If you don’t have a Backendless account, create one here.
The initial step is to create a new application.
- Click on the button Create new app.
- Enter the name of the app in the modal window.
- Click the button Create to create the new app.
After the app configuration, you must have a custom data table or you can configure one in Backendless. For example, we are using a custom data table called Teams with pre-populated custom data.

Get your REST API URL
Section titled “Get your REST API URL”To perform read and write operations on Backendless, you need to have a Base URL of the following syntax:
https://api.backendless.com/<application-id>/<REST-api-key>/dataYou are required to pass in your application ID and your REST API key. To get your Backendless application ID and REST API key you need to:
- Navigate to
Manage. - Click on the
App ID and API Keyssection, copy the<application-id>and<REST-api-key>.

Setup steps in Draftbit
Section titled “Setup steps in Draftbit”To connect Backendless Base URL to your Draftbit app:
- Open the Data modal from the left menu bar
- From the
Connect a Servicemenu, click onBackendless. - Enter a name for your REST API.
- Copy your Base URL (from the previous section) and paste it into the
Dev URLorProd URLinput field. - Click
Save.

Using Backendless with Draftbit
Section titled “Using Backendless with Draftbit”Fetch all records
Section titled “Fetch all records”In this section, let’s populate a Fetch component with all the data from the Backendless and then display it in a List component.
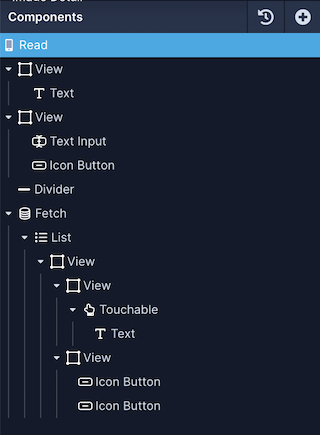
For reference, here is a how the Components tree looks like for this screen:
The next step is to create an endpoint. Let’s fetch the data using a GET HTTP request. Open the Data modal, select the Backendless service, and then:
- Click
Add endpoint. - In Step 1: enter the name for the endpoint. Make sure the Method select is
GET. - Set the Role to
Get Manyas the endpoint is fetching a list of items. Set the Object Type togroceriesfor this example. - In Step 2: add the base name path:
/table_name. This is the name of the data table you initially created in Backendless. For this example, it is going to be/groceries. - In Step 4: click the Test button next to the Endpoint input to verify the response coming from the Backendless.
- Click Save.
On app screen:
- Select the Fetch component in the Components tree and go to the Data tab from Properties Panel.
- For Service, select the name of the Backendless Service.
- For Endpoint, select the endpoint you want to fetch the data from.
- In Configuration for
table_name, enter the name of the table where the data is stored in Backendless. - Select the List component in the Components tree and go to the Data tab from Properties Panel.
- In Data, select
Top-level responsefrom the dropdown menu. - Then, select the Text component in the Components tree and then go to the Data tab from the Properties Panel.
- Add a
{{varName}}value (inside the curly braces) to represent a data field from the Backendless. For example, we add{{name}}to represent the column name from the Backendless.

Fetch a single record
Section titled “Fetch a single record”In this section, let’s populate a Fetch component with a single record from Backendless. To fetch a single post, you’ll have to specify a record id that is coming from the navigation parameters.
Data is fetched using a GET HTTP request. Open the API & Cloud Services modal from the Data tab of the left menu bar, select the Backendless service, and then:
- Click Add endpoint.
- In Step 1: enter the Name for the endpoint and set the Method to
GET. - Set the Role to
Get Oneas the endpoint is fetching a single item. Set the Object Type togroceriesfor this example. - In Step 2: add the
/table_name/{{id}}variable. Then, add a Test value for the {{id}}. For this example, it is/groceries/{{id}}. - In Step 4: click the Test button next to the Endpoint input to verify the response coming from the Backendless.
- Click Save.
On app screen:
- Select the Fetch component in the Components tree and go to the Data tab from Properties Panel
- For Service, select the name of the Backendless Service.
- For Endpoint, select the endpoint you want to fetch the data from.
- Set the value for the
idin the Configuration > URL Structure section.

Submit new data
Section titled “Submit new data”Submitting new Data from the Draftbit app to a REST API requires the request to be sent using HTTP POST method.
Your component needs to have:
- accepts user input
- has a
Data Sourceprop
You can use any component that contains a Data Source prop to log user input and submit data. This includes all the Input and Control components.
Once you have the necessary component(s) on your screen, you’ll need to create a new endpoint in your service:
- Click Add endpoint.
- In Step 1: enter a name for the endpoint and select the Method to
POST. - Set the Role to
Createas the endpoint is used to create a new record. Set the Object Type togroceriesfor this example. - In Step 2: enter the base name as path:
/table-name. For this example, it’s/groceries/. - In Step 3: add a valid Body structure to submit a
POSTrequest. Add one or many{{variable}}for test values. Click Body Preview to validate the structure of the Body in the request. - In Step 5: click the Test button next to the Endpoint input to verify the response coming from the Backendless.
- Click Save.
An example of how Body in a request will look like:
{ "title": {{textInputValue}}}To submit data from within the app, you can use a Touchable/Button component to trigger the action API Request:
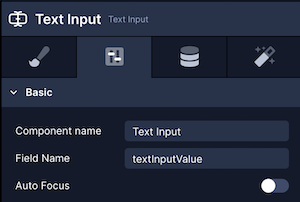
The textInputValue passed in the above example is the value of the Data Source property on the TextInput component:
Update data
Section titled “Update data”The PUT request is used to update the single entry in the Backendless table. It accepts similar input components as mentioned in the POST request and the API Request is triggered using a Touchable/Button component.
Your component needs to have:
- accepts user input
- has a
Data Sourceprop to update data using an API Request
You can use any component that contains a Data Source prop to log user input and submit data. This includes all the Input and Control components.
Once you have the necessary component(s) on your screen, you’ll need to create a new endpoint in your service:
- Click Add endpoint.
- In Step 1: enter a name for the endpoint and select the Method to
PUT. - Set the Role to
Update. Set the Object Type togroceriesfor this example. - In Step 2: enter the base name as path:
/table-name/{{id}}. For the example below, it’s/groceries/{{id}}. - In Step 3: add a valid Body structure to submit a PUT request. Add one or many {{variable}} for test values. Click Body Preview to validate the structure of the Body in the request.
- In Step 5: click the Test button next to the Endpoint input to verify the response coming from the Backendless.
- Click Save.
Similar to POST request, you can use a Touchable/Button component to trigger the action API Request.
Delete data
Section titled “Delete data”The DELETE request is sent with an item’s id to remove that particular record from the table.
Once you have the necessary component(s) on your screen, you’ll need to create a new endpoint in your service:
- Click Add endpoint.
- In Step 1: enter a name for the endpoint and select the Method to
DELETE. - Set the Role to
Delete. Set the Object Type togroceriesfor this example. - In Step 2: add
/table-name/{{id}whereidis provided as a test value of an existing record when testing the endpoint. In your app, you will have to pass theidof a single record, for example, as a navigation parameter. For this example, it’sgroceries/{{id}}. - In Step 4: click the Test button next to the Endpoint input to verify the response from the Backendless.
- Click Save.
Using a Touchable/Button component, you can add the API Request action to trigger the DELETE request.
Additional resources
Section titled “Additional resources”- To get familiar with Backendless, check out their REST API guide.
- For Authentication with Backendless and Draftbit, please refer to the guide here.