
Airtable
What is Airtable?
Organize anything with Airtable, a modern database created for everyone. Airtable is a fast and flexible way to create tables to keep track of anything, from sales leads to vacation planning to inventory management.
Integrating Draftbit & Airtable
Setup steps in Airtable
If you don't have an Airtable account, create one here.
Before you start in Draftbit, make sure you have an Airtable Base created. To create a new base:
- From your Airtable dashboard, click
+ Add a Base - You can start from scratch, or start from a template.
For this guide, we will use an Airtable to create a Base from scratch. Here is how the example Airtable Base looks like:
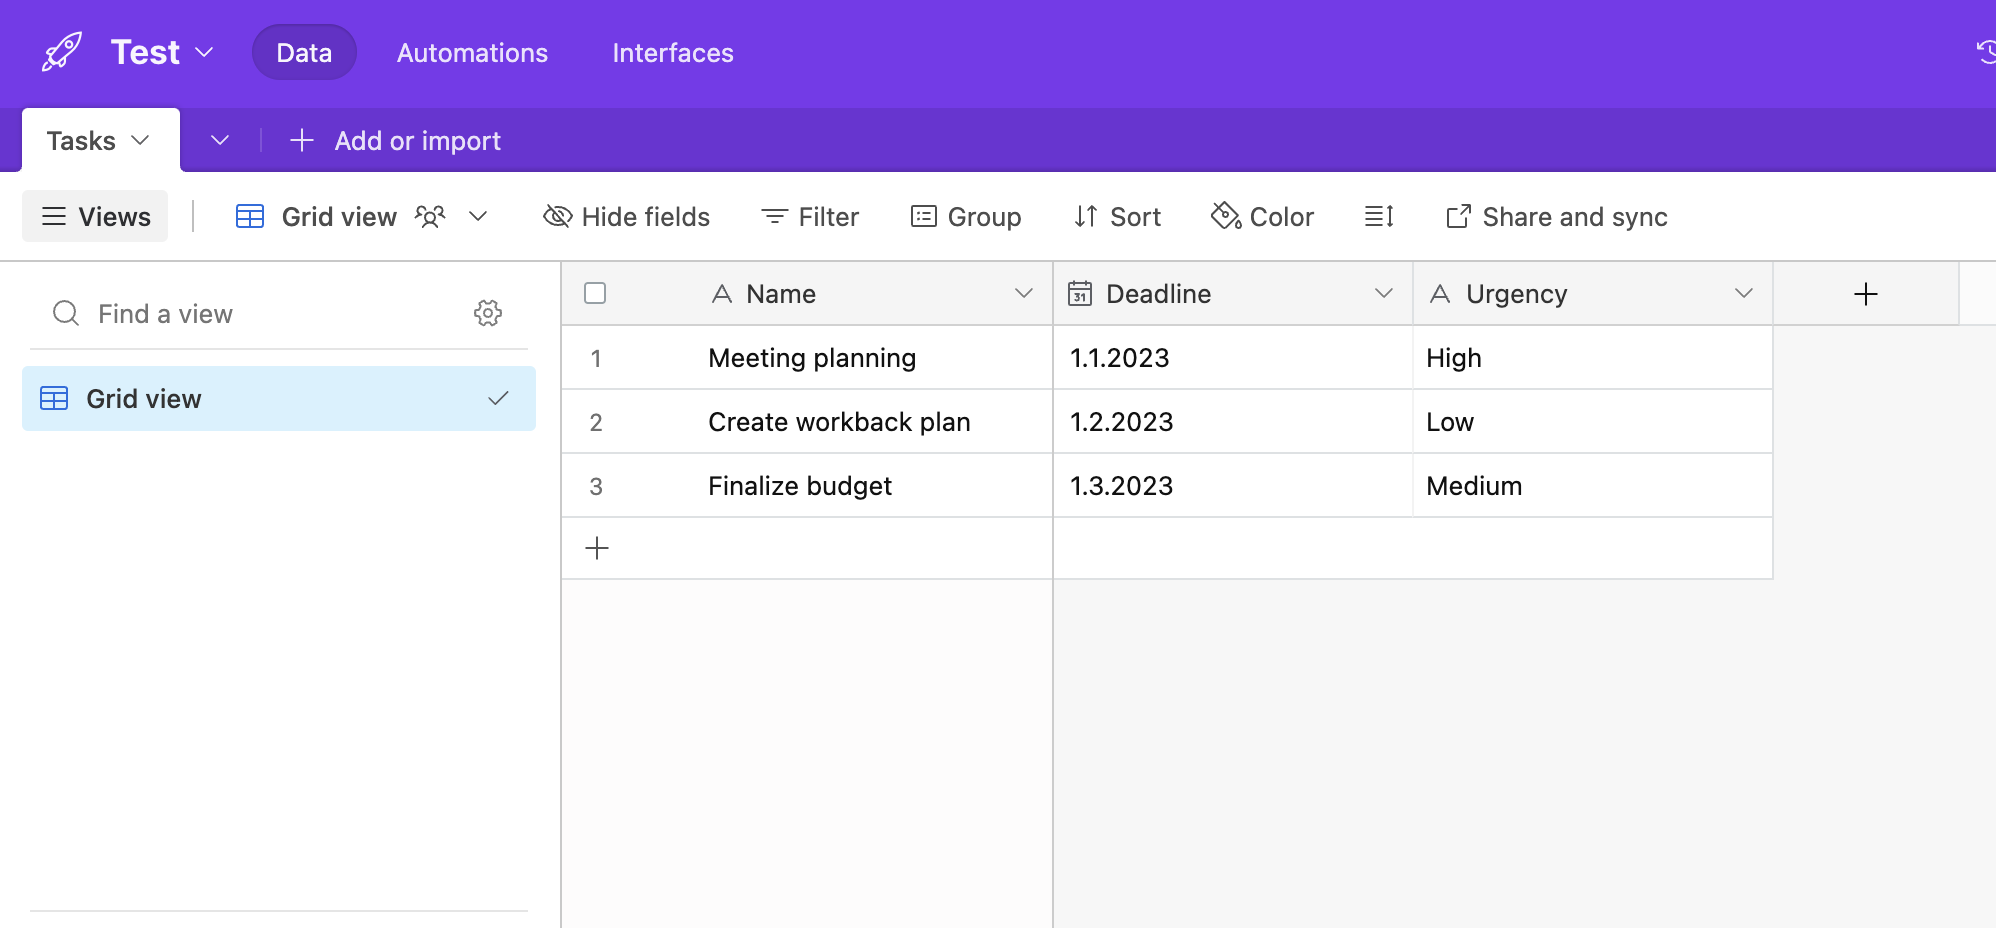
The Base above has a field name title with multiple records inside it.
Maintain good Field hygiene!The names you use for your fields will be used directly in your code so it's recommended that you use
camelCase
Get your Base URL & Personal Access Token
Identify your Base URL and Personal Access Token — you'll need them in the next step.
- To get your Base URL:
- From your Base, click the Help in the top right corner.
- Then click the API Documentation tab.
- Navigate to the Authentication tab from the left navigation bar.
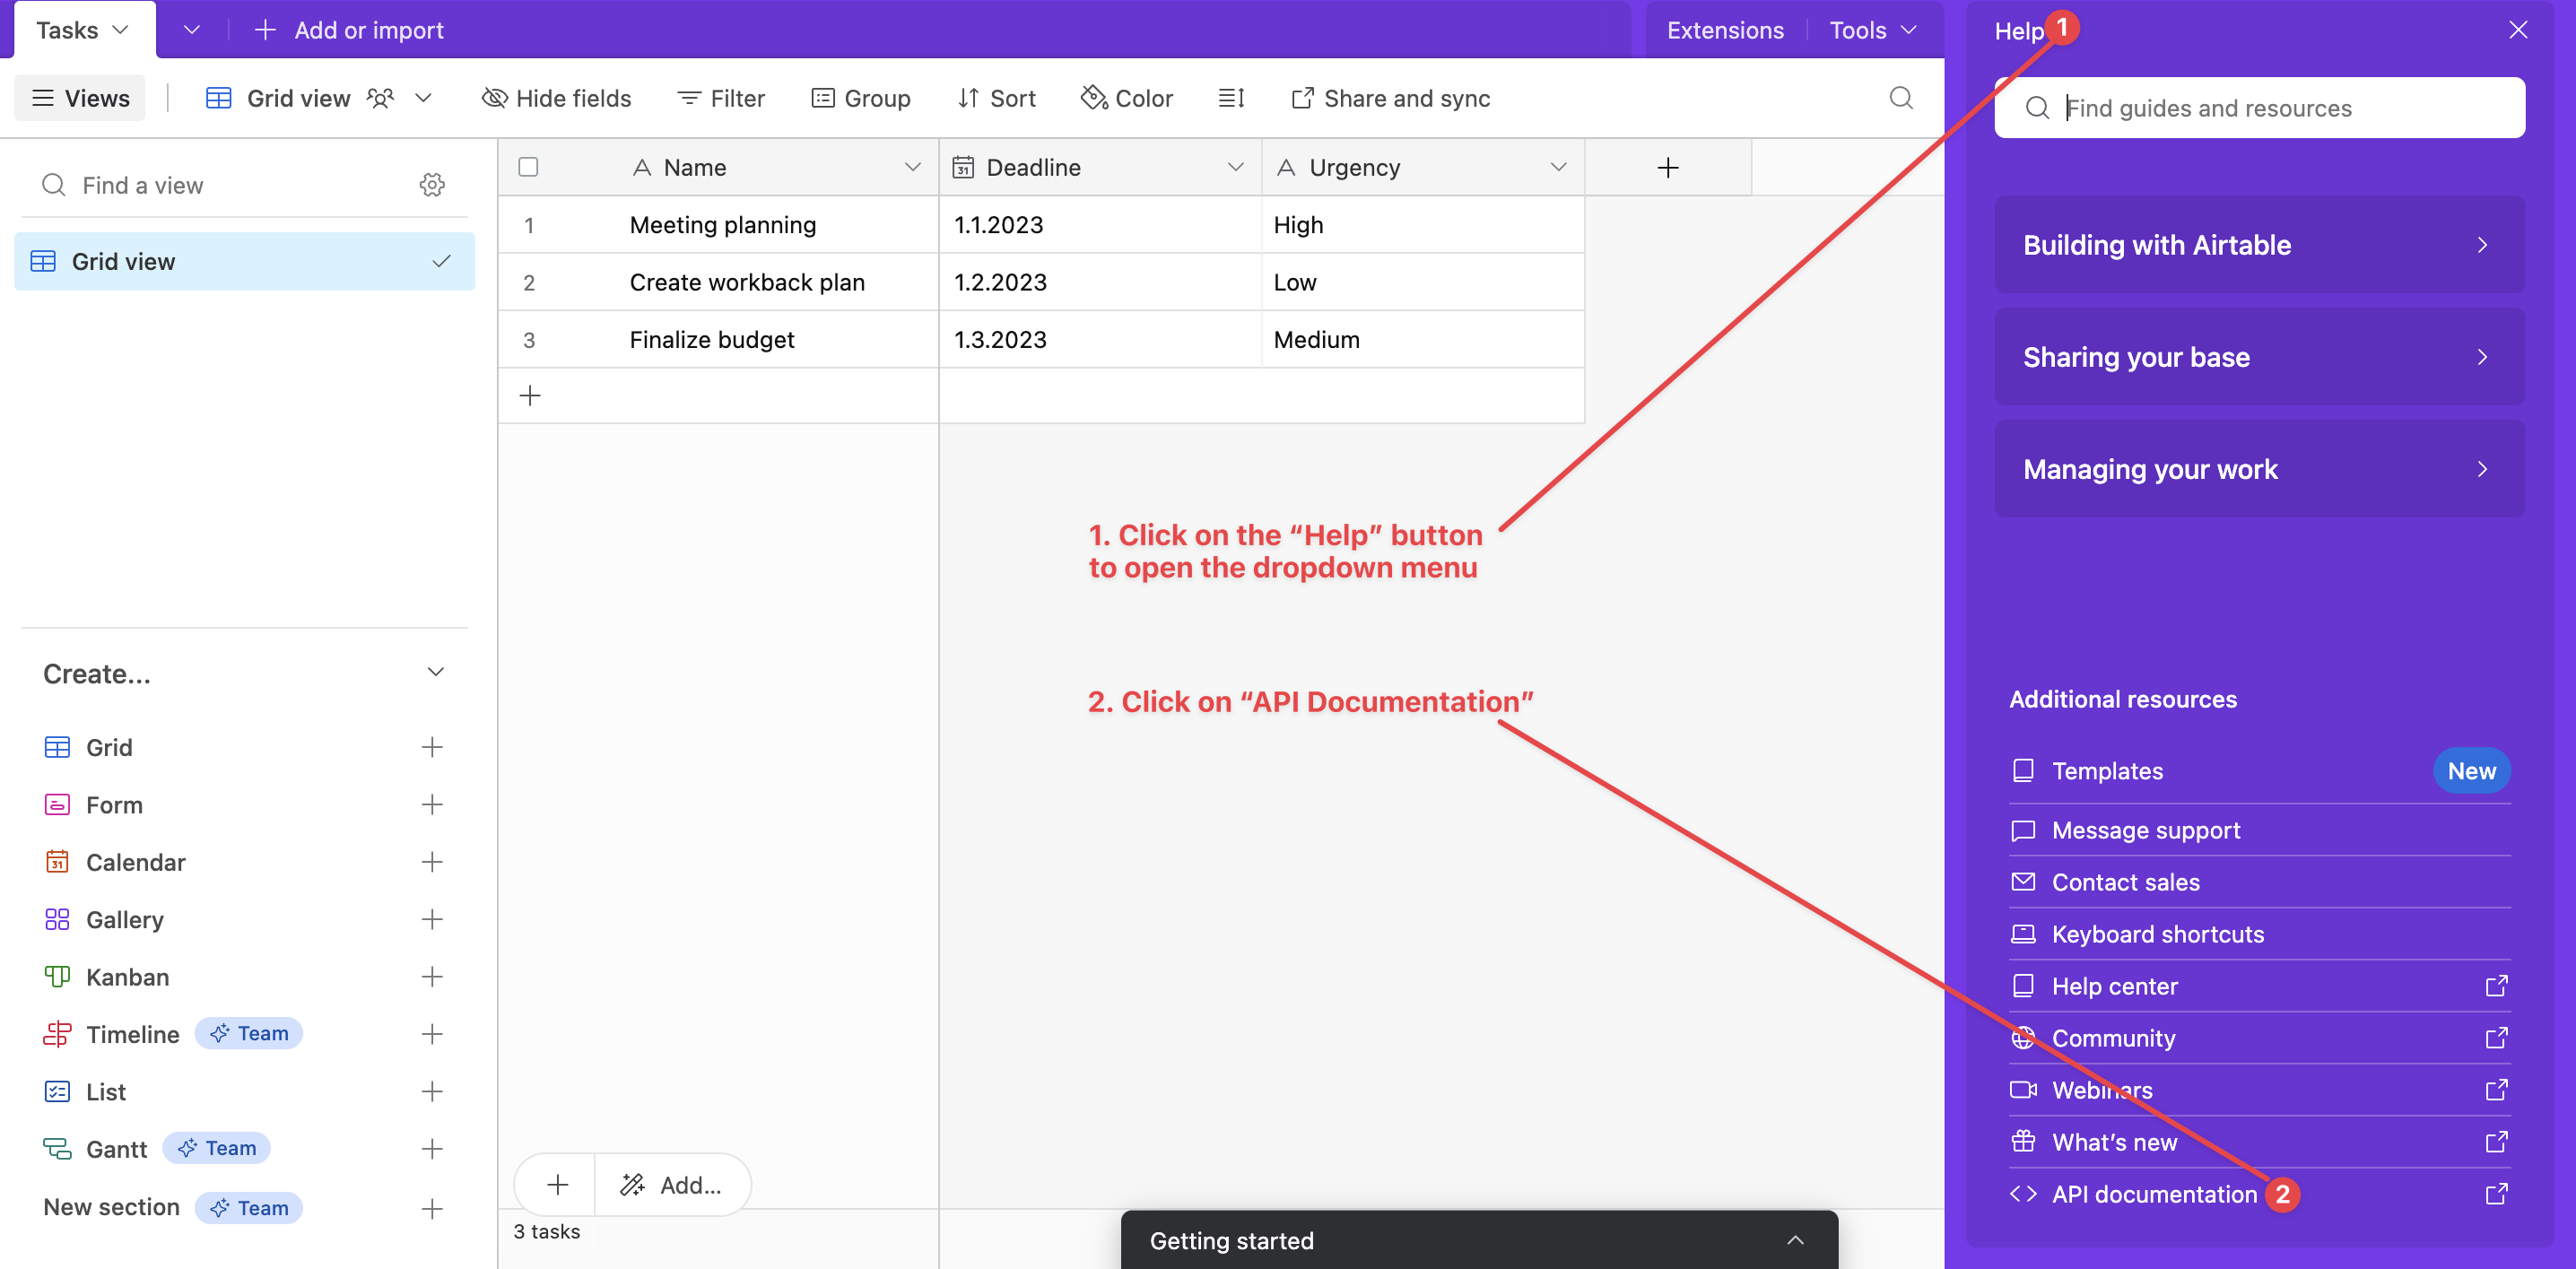
- After the documentation opens for the selected Base, in the Introduction tab you will see your Base ID.
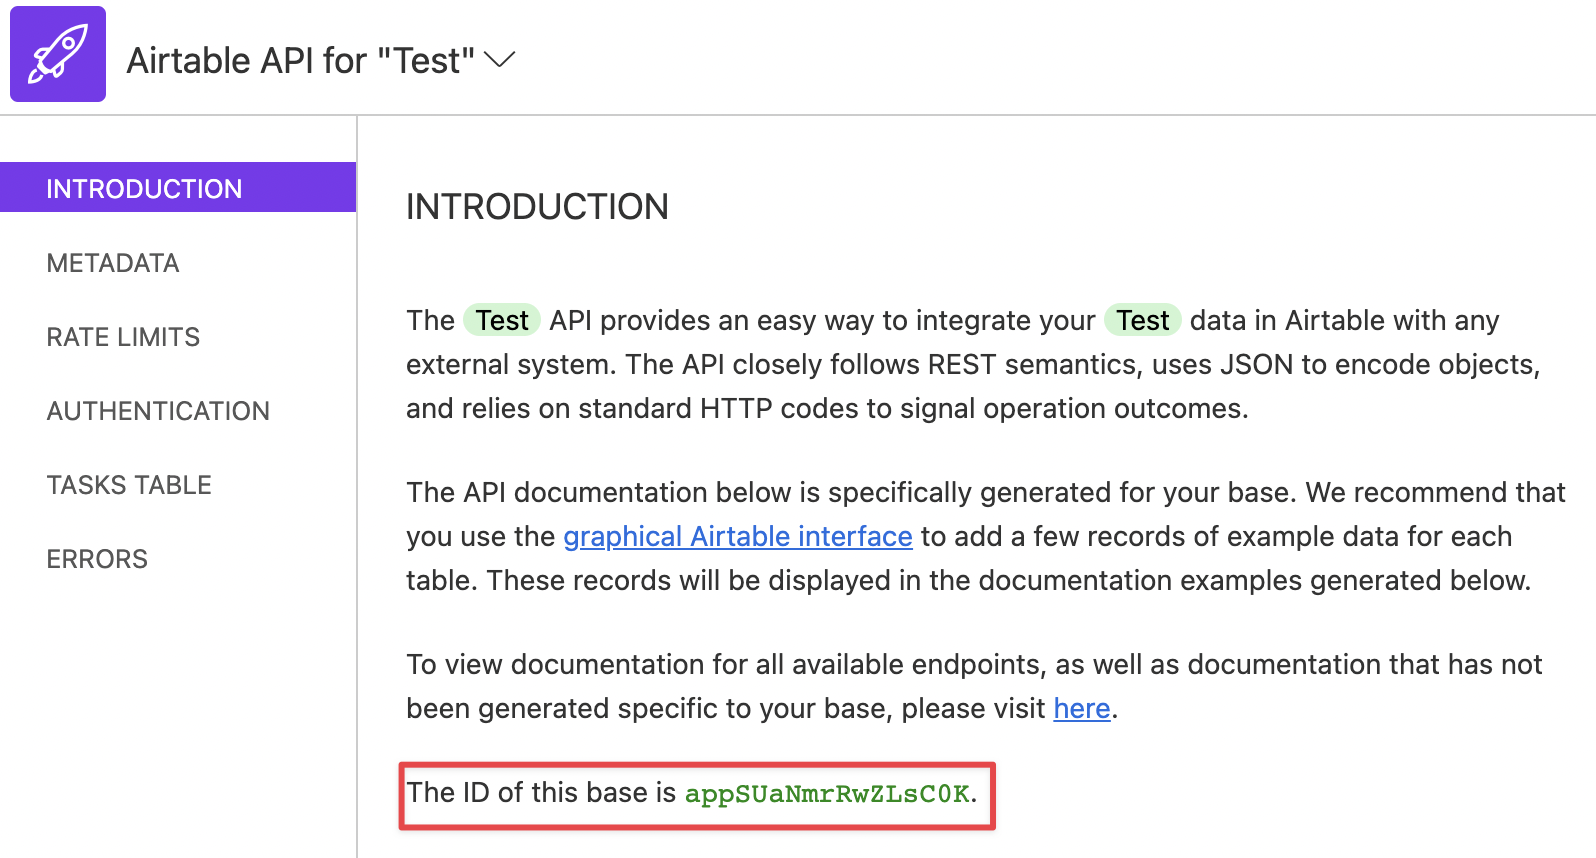
- Your Base ID will compose the tail of your Base URL and it should look something like this:
https://api.airtable.com/v0/<your-base-id>2.To get your Personal Access Token:
- The personal access tokens panel can be accessed at /create/tokens
- Click on Create new token button
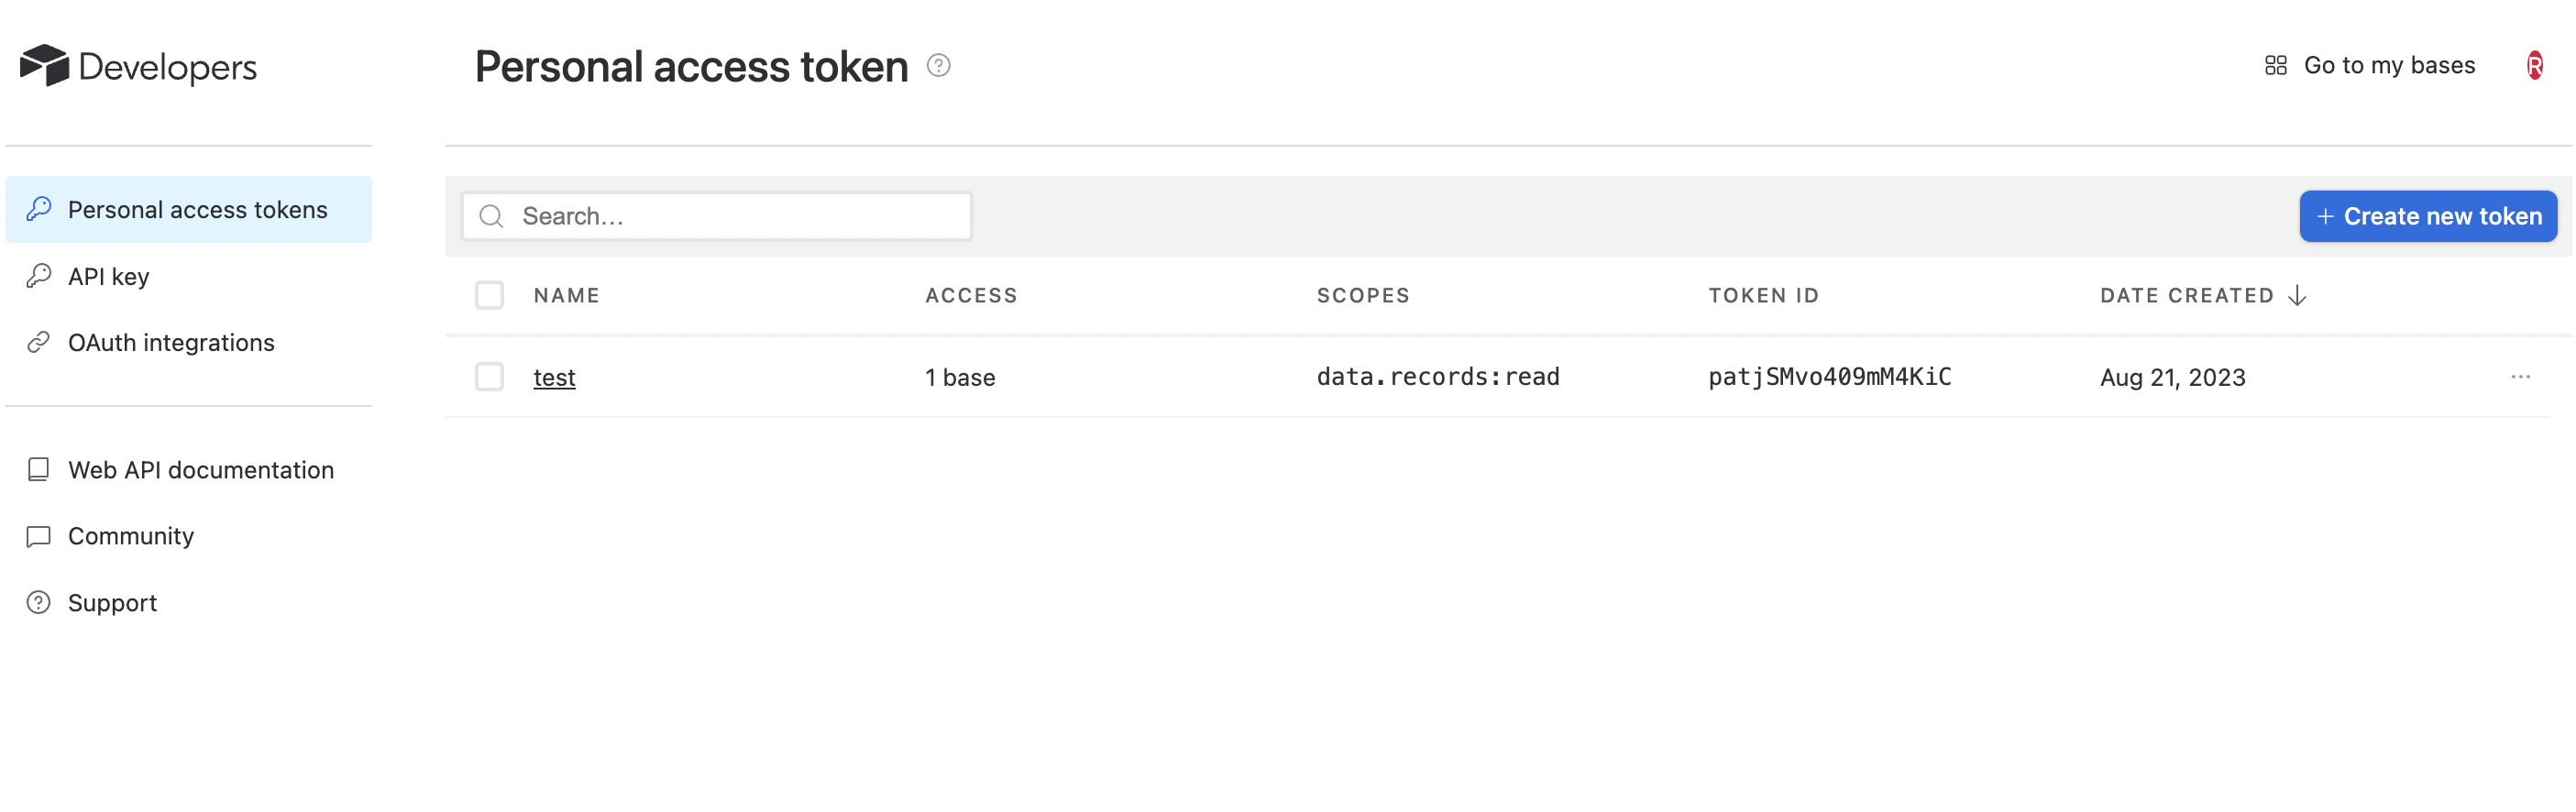
- Name your Personal access token, and define scopes from the dropdown menu.
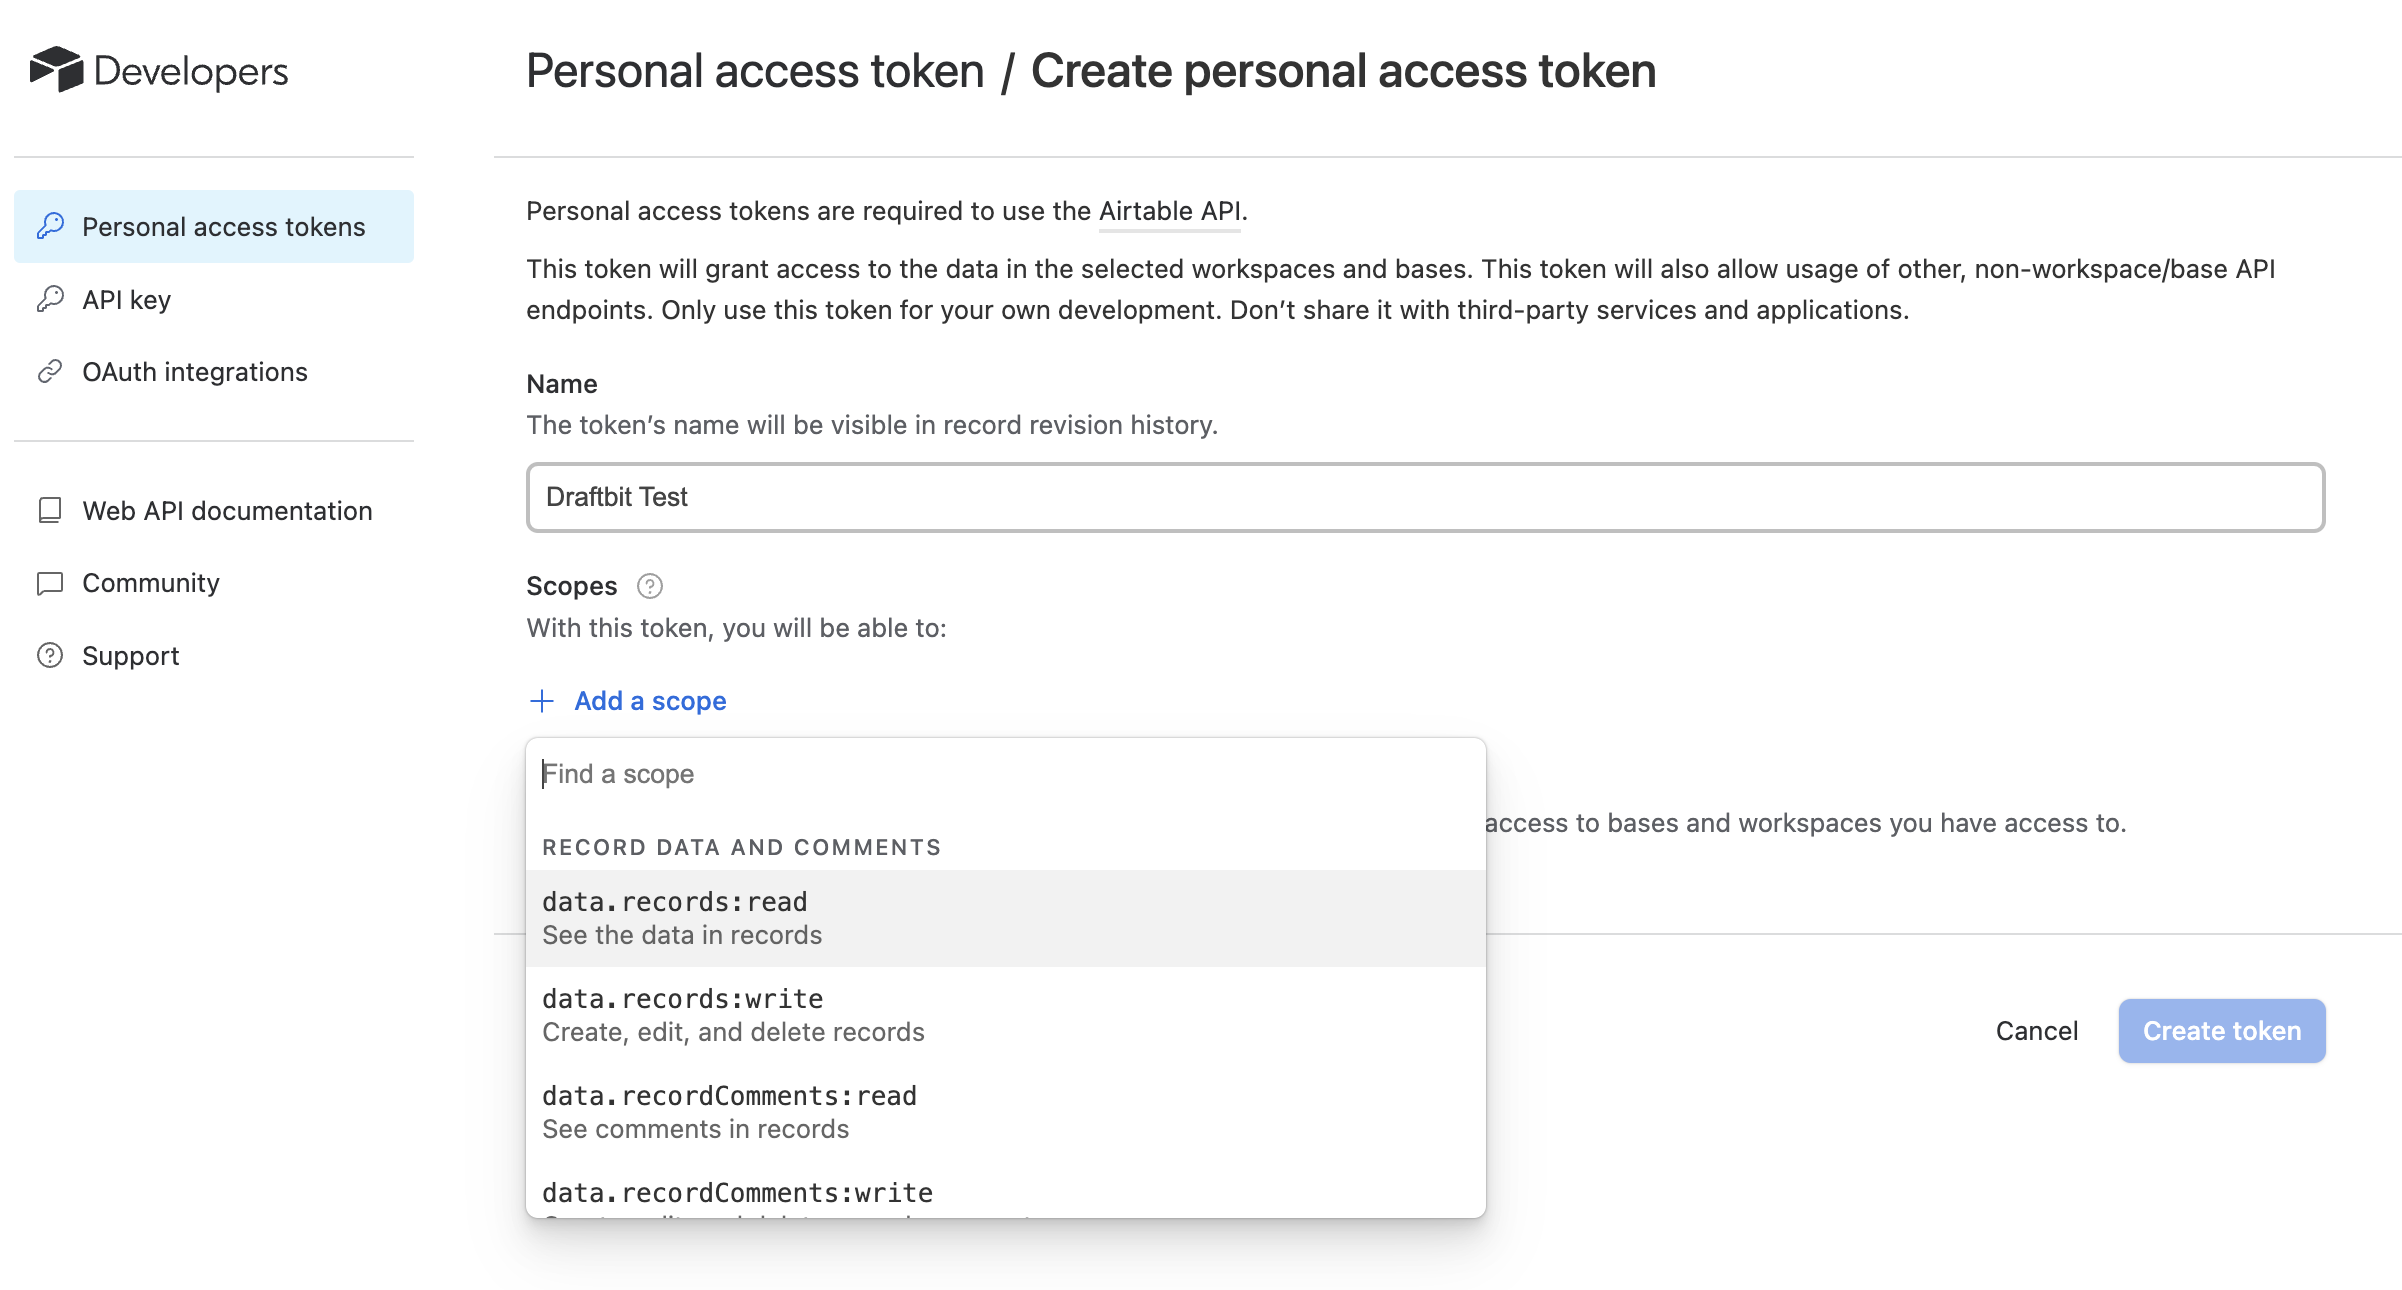
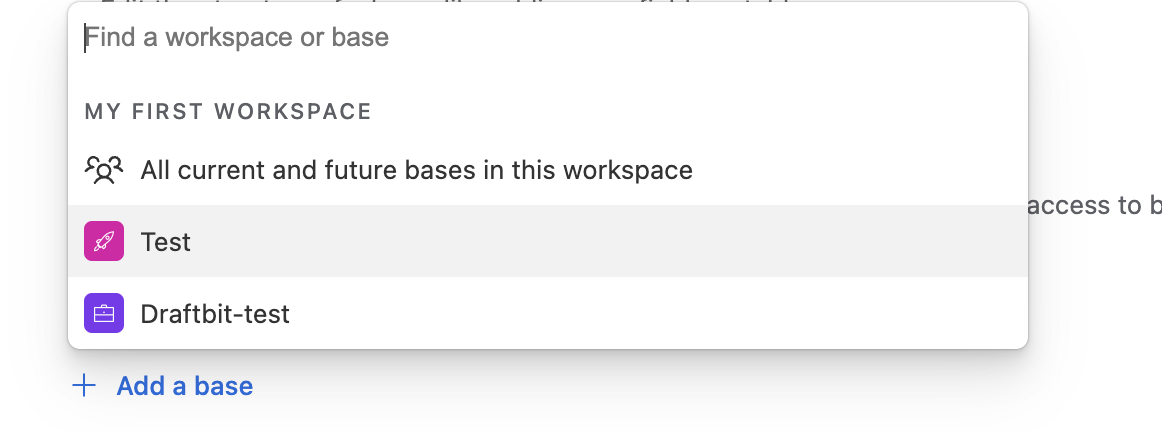
- From Add Base button select your base or if you want that token to be available for all of your bases, you can select All current and future bases in this workspace.
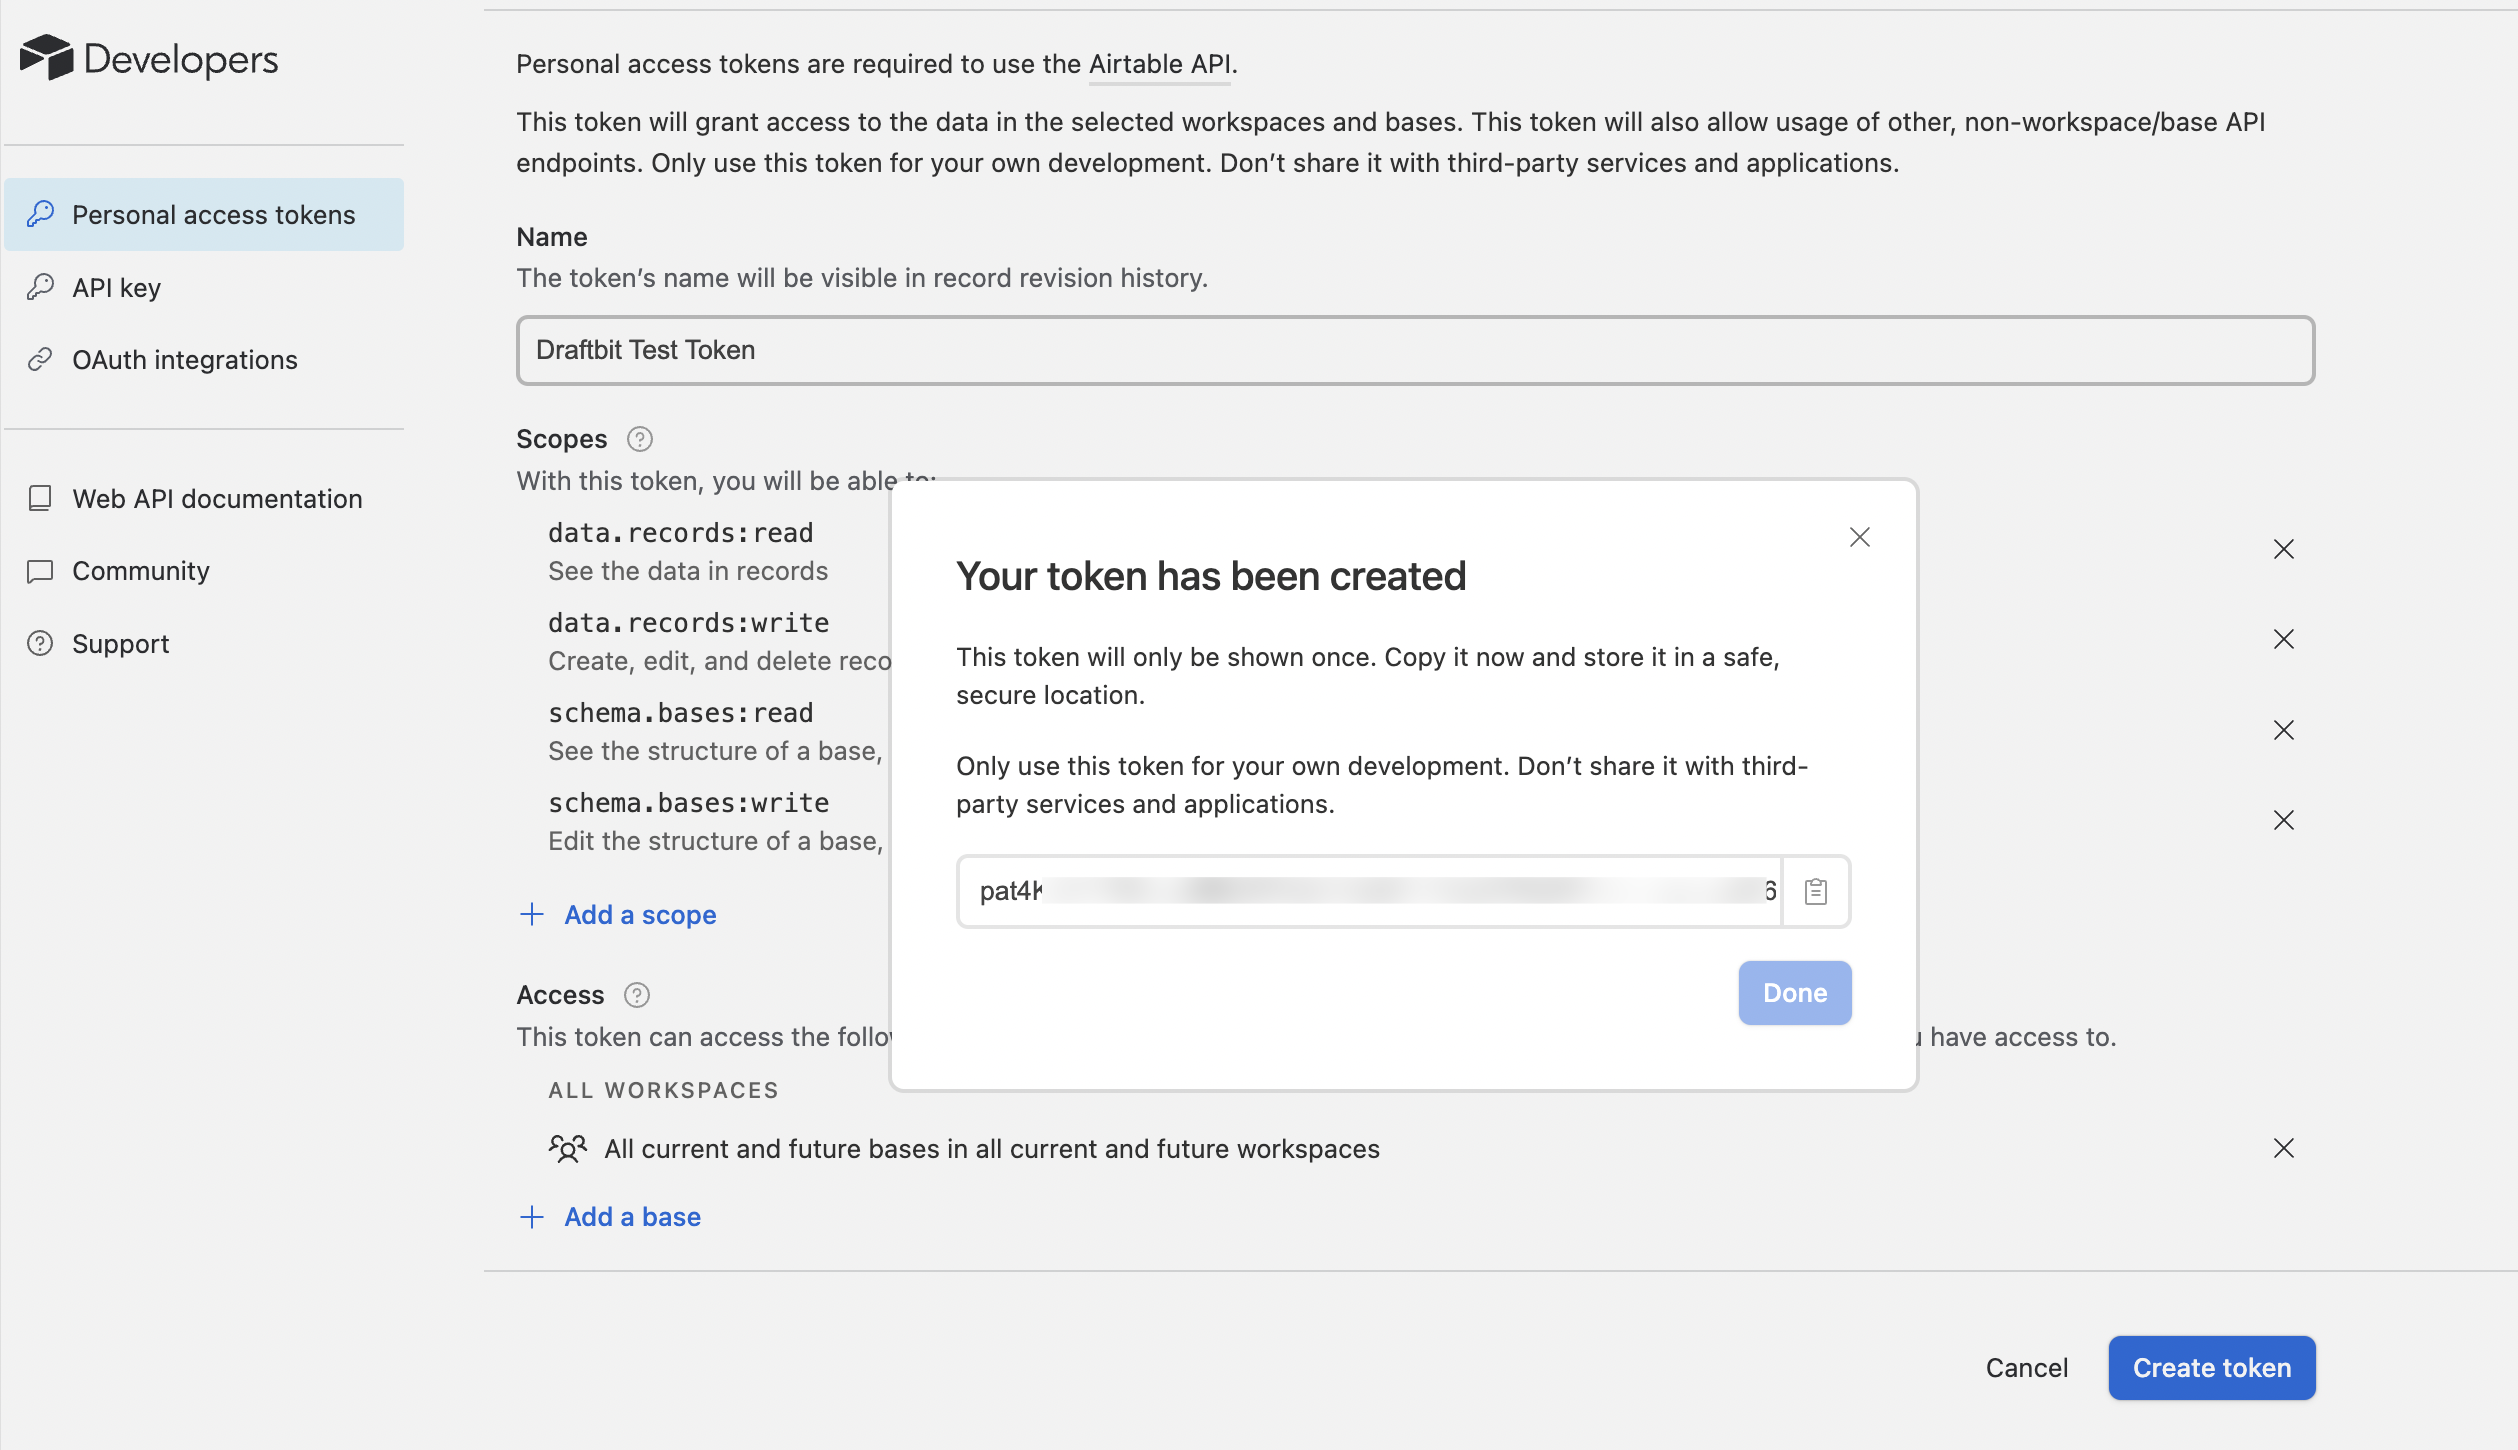
- Once you set all the required fields, click on Create token button to display your token. This will be displayed only once so you would need to store it in a safe location.
Setup steps in Draftbit
Save Airtable Personal Access Token as Authorization Header
Each request sent to Airtable Base requires a valid PAT (Personal Access Token). In the previous step, you learned to get the PAT. To authorize your Draftbit app with Airtable:
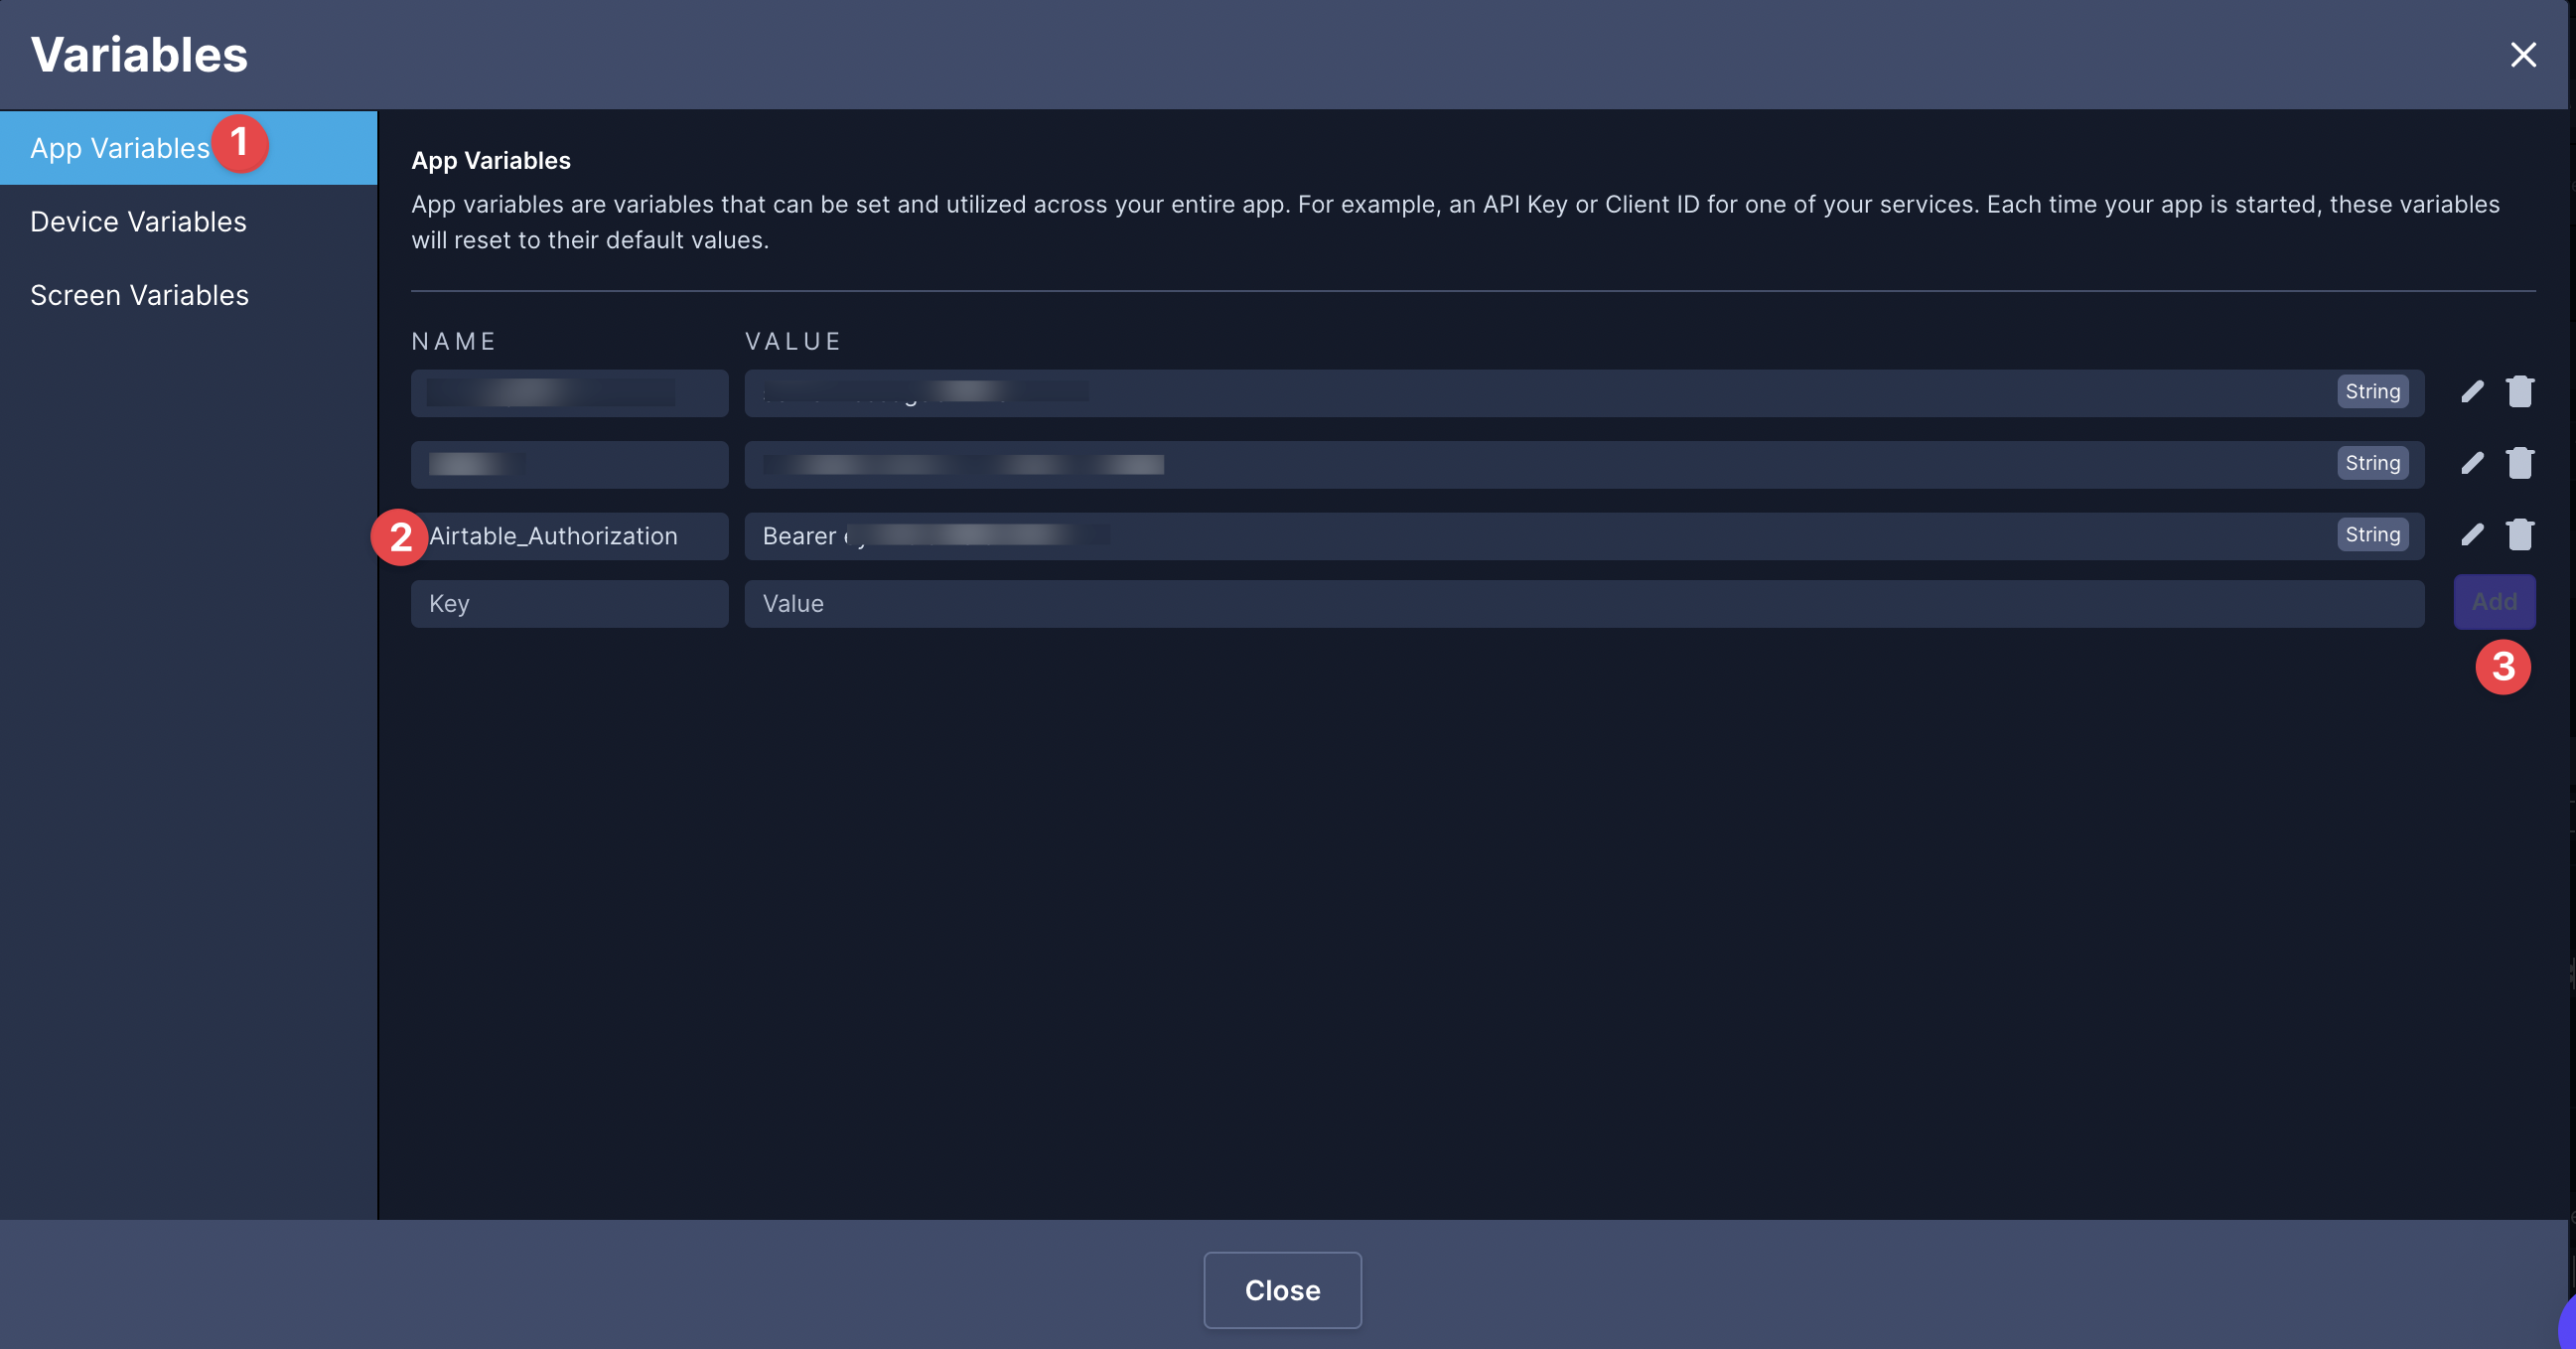
- Open the Variables panel from the left menu bar.
- In Variables, navigate to App Variables.
- Enter a
nameto access the Personal access token and the value for it. For example,Airtable_Authorization. - The value of this key requires you to enter an authorization token that starts with syntax is
Bearer your-personal-access-token(the space betweenBearerandyour-personal-access-tokenis required). - In place of paste your own
your-personal-access-token(from the previous section) and then click Add. - Click Save.
Add Airtable Base URL in Draftbit
- Open the Data modal from the left menu bar
- From the Connect a service menu, click on Airtable.
- In Step 1: Enter a name for your REST API. Then, paste your Base URL (from the previous section) into the
Dev URLorProd URLfield. - In Step 2: Under Key add
Authorization. Under Value, select the global variable (from the previous section) to add the actual value of the Personal access token. - Click Add.
Dev & Prod URLSThe Base URL parameter has been updated to give you the ability to set separate base URLs for Development and Production. When you publish your app, you can set which base URL to use, Dev or Prod. Read more about Environments

Using Airtable with Draftbit
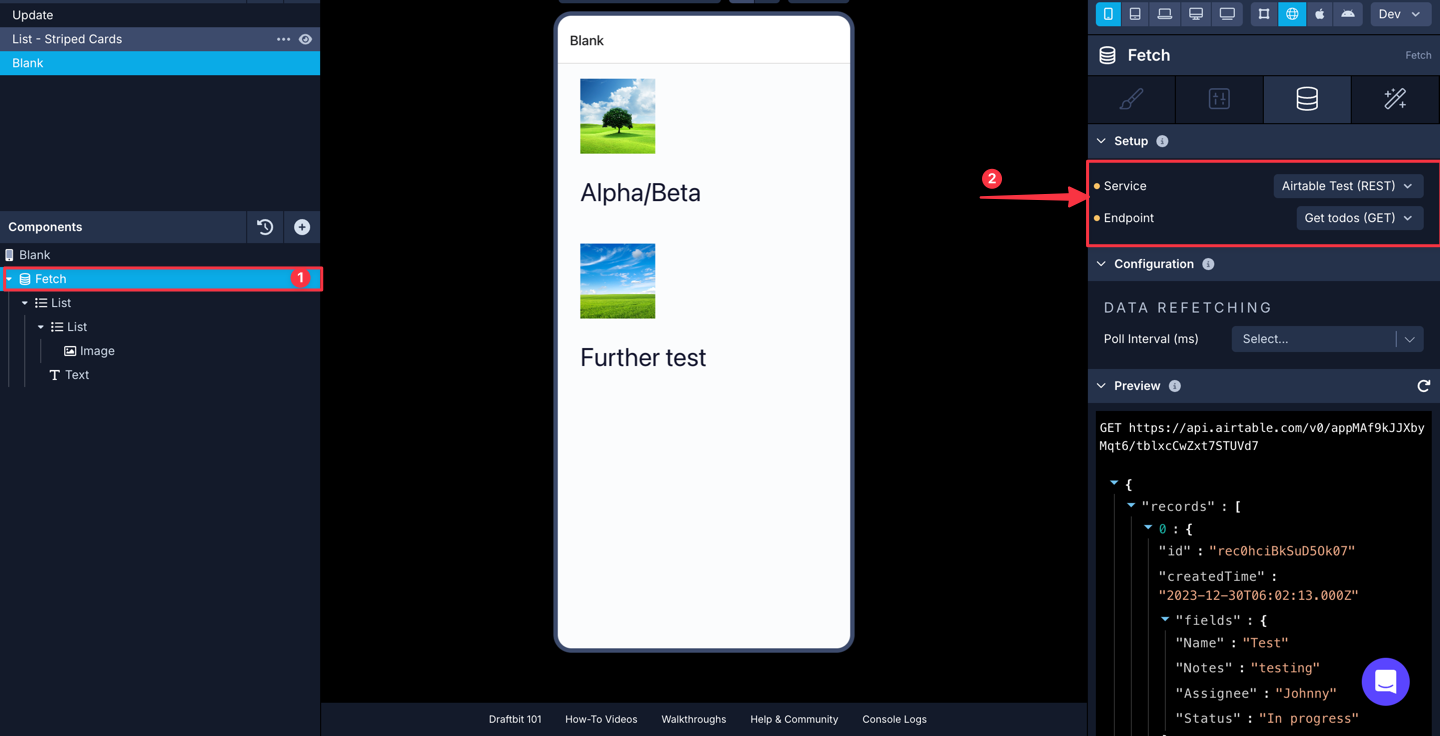
GET request to fetch all records
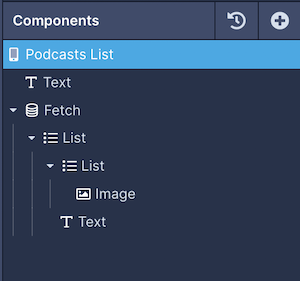
In this section, let's populate a Fetch component with all the data from a table in a simple Airtable Base and then display the data fetched from the Airtable in a List component.
For reference, here is a how the Components tree looks like for this screen:

The next step is to create an endpoint. Let's try fetching the data using a GET HTTP request. Open the API & Cloud Services modal, select the Airtable service, and then:
- Click Add endpoint.
- In Step 1: enter the name for the endpoint. Make sure the Method select is
GET. - Set the Role to
Get Manyas the endpoint is fetching a list of items. Set the Object Type totodofor this example. - In Step 2: add the table ID or table name as a path:
/tableID_or_tableName. For the example below,it's/tblxcCwZxt7STUVd7or/toDo
Table ids and table names can be used interchangeably in API requests when using Airtable. Using table ids means table name changes do not require modifications to your API request.
- In Step 4: click the Test button next to the Endpoint input to verify the response coming from the Airtable Base.
- Click Save.
On app screen:
- Select the Fetch component in the Components tree and go to the Data tab from Properties Panel.
- For Service, select the name of the Airtable Service.
- For Endpoint, select the endpoint you want to fetch the data from.
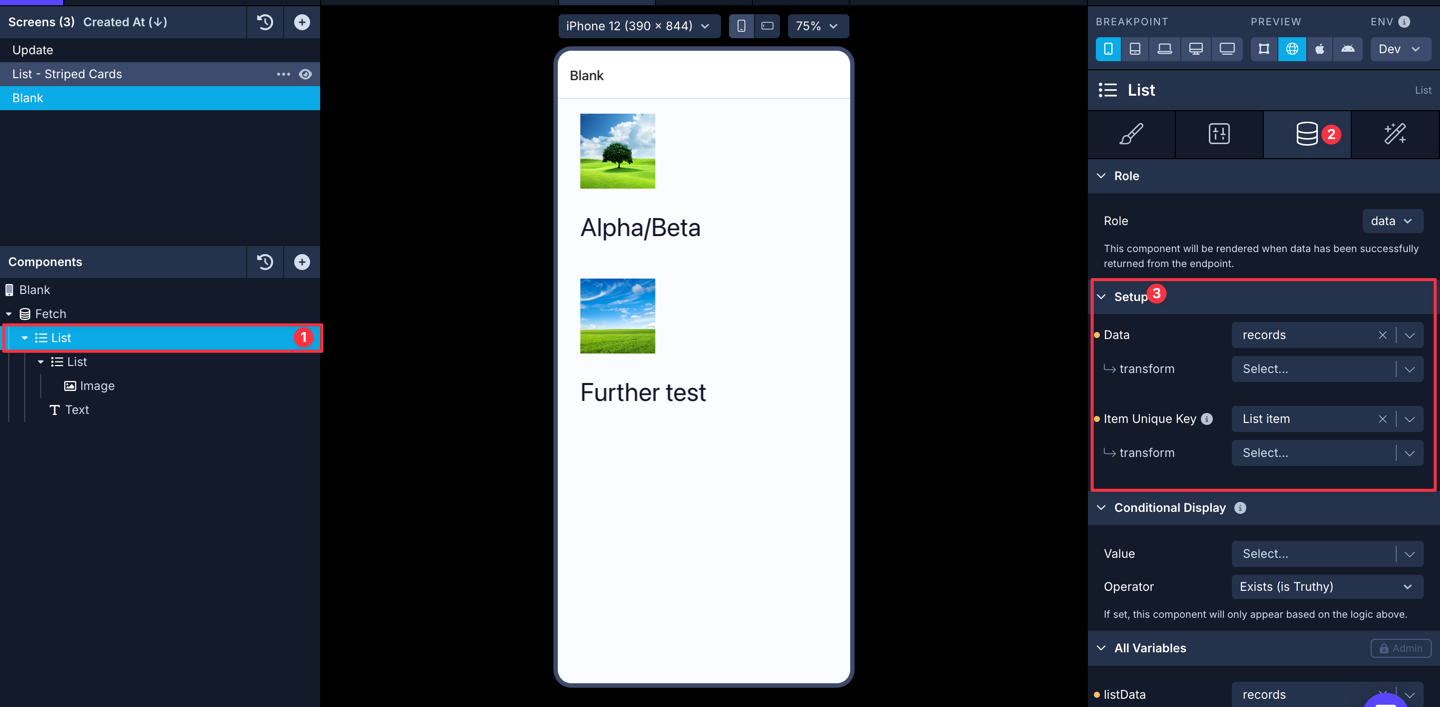
- Select the List component in the Components tree and go to the Data tab from Properties Panel.
- In Data, select
recordsfrom the dropdown menu. - Then, select the Text component in the Components tree and then go to the Data tab from the Properties Panel.
- Add a
{{varName}}value (inside the curly braces) to represent a data field from the Airtable Base. For example, we add{{title}}to represent the column name from the Airtable Base. - Under Variables, you will see the variable name defined in the previous step. From the dropdown menu, select the appropriate field that represents the data field.
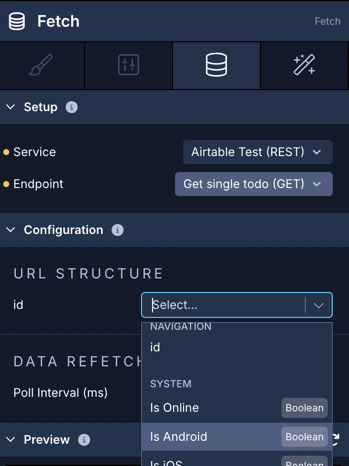
GET request to fetch a single record
In this section, let's populate a Fetch component with a single record from the Airtable Base. For reference, here is a how the Components tree looks like for this screen:

Also, from the List screen, we are sending the id of each list item as a navigation parameter when an action is triggered on the Touchable/Button component. This action will let you navigate to the screen where a single record is fetched and its details are shown.
To fetch a single post from Airtable, you'll have to specify a record id that is coming from the navigation parameters.
Data is fetched using a GET HTTP request. Open the API & Cloud Services modal from the left menu bar, select the Airtable service, and then:
- Click Add endpoint.
- In Step 1: enter the Name for the endpoint and set the Method to
GET. - Set the Role to
Get Oneas the endpoint is fetching a single item. Set the Object Type togroceriesfor this example. - In Step 2: add the
/your-table-name-OR-tableID/{{id}}variable. For the example below, it's/tblxcCwZxt7STUVd7/{{id}}(with table ID) or/toDo/{{id}}(with table name). Then, add a Test value for the{{id}}. - In Step 4: click the Test button next to the Endpoint input to verify the response coming from the Airtable Base.
- Click Save.
On app screen:
- Select the Fetch component in the Components tree and go to the Data tab from Properties Panel.
- For Service, select the name of the Airtable Service.
- For endpoint, select the endpoint you want to fetch the data from.
- Set the value for the
id
Please note that in this example, the id comes from selecting an item on the List screen. On the Interactions tab, we define a 'Navigate' action and create a navigation parameter, passing the id of the selected item to that field. This setup allows us to retrieve the id on the detail screen, which is essential when setting up data fetching. There is a tutorial for this implementation, which you can check out here: Passing Data Between Screens
- Then, select the Text component in the Components tree and then go to the Data tab from the Properties Panel.
- Add a
{{varName}}value (inside the curly braces) to represent the data field from the Airtable Base. For example, we add{{title}}to represent the field and value from the Airtable Base. - Under Variables, you will see the variable name defined in the previous step. From the dropdown menu, select the appropriate field that represents the data field.
POST request to add new data
Submitting new Data from the Draftbit app to a REST API requires the request to be sent using HTTP POST method.
Your component needs to have:
- accepts user input
- has a
Data Sourceprop
You can use any component that contains a Data Source prop to log user input and submit data. This includes any of the Input & Control components.
Once you have the necessary component(s) on your screen, you'll need to create a new endpoint in your Airtable service:
- Click Add endpoint.
- In Step 1: enter a name for the endpoint and select the Method to
POST. - Set the Role to
Createas the endpoint is used to create a new record. Set the Object Type totodosfor this example. - In Step 2: enter the table name / table id as path:
/your-table-name-OR-tableID. For the example below, it's/toDoor/tblxcCwZxt7STUVd7 - In Step 3: add a valid Body structure to submit a
POSTrequest. Add one or many{{variable}}for test values. Click Body Preview to validate the structure of the Body in the request. An example of how Body in a request will look like:
{
  "records": [
    {
      "fields": {
        "fieldName": {{value}}
      }
    }
  ]
}- Check the Create records tab back in your Airtable API documentation to get an idea of how your request is structured.
- In Step 5: click the Test button next to the Endpoint input to verify the response coming from the Airtable Base.
- Click Save.
Using a Touchable/Button component, you can trigger the action API Request to submit the data to the endpoint.
All the textInputValues passed in the above example are the values of the Data Source property on the TextInput components:
PATCH request to update data
The PATCH request is used to update the single entry in the Airtable base record. It accepts similar input components as mentioned in the POST request and the API Request is triggered using a Touchable/Button component.
Your component needs to have:
- accepts user input
- has a
Data Sourceprop to update data using an API Request
You can use any component that contains a Data Source prop to log user input and submit data. This includes any of the Input & Control components.
Once you have the necessary component(s) on your screen, you'll need to create a new endpoint in your Airtable service:
- Click Add endpoint.
- In Step 1: enter a name for the endpoint and select the Method to
PATCH. - Set the Role to
Update. Set the Object Type totodosfor this example. - In Step 2: enter the base name as path:
/your-table-name-OR-tableID. For the example below, it's/toDoor/tblxcCwZxt7STUVd7. - In Step 3: add a valid Body structure to submit a
PATCHrequest. Add one or many{{variable}}for test values. Click Body Preview to validate the structure of the Body in the request. - Below is a general breakdown of what the request's Body structure will look like. Make sure to include the
idof a particular field to update it. This way, Airtable will know what field you are updating in the Base.
{
  "records":
	[
    {
    "id": {{id}},
    "fields":
      {
        "fieldName": {{value}}
    	}
    }
  ]
}- Check the Update records tab back in your Airtable API documentation to get an idea of how your request is structured.
- In Step 5: click the Test button next to the Endpoint input to verify the response coming from the Airtable Base.
- Click Save.
Using a Touchable/Button component, you can trigger the action API Request to update the data to the endpoint.
DELETE request to remove data
The DELETE request is sent with an item's id to remove that particular record from the table.
For example, once you have the necessary component(s) on your screen, you'll need to create a new endpoint in your Airtable service. In the new endpoint you'll need to:
- Click Add endpoint.
- In Step 1: enter a name for the endpoint and select the Method to
DELETE. - Set the Role to
Delete. Set the Object Type totodosfor this example. - In Step 2: enter the base name as path:
/your-table-name-OR-tableID/{{id}}. For the example below, it's/toDo/{{id}}or/tblxcCwZxt7STUVd7/{{id}}. In your app, you will have to pass theidof a single record, for example, as a navigation parameter. - Check the Delete records tab back in your Airtable API documentation to get an idea of how your request is structured.
- In Step 4: click the Test button next to the Endpoint input to verify the response from the Airtable Base.
- Click Save.
Using a Touchable/Button component or an Icon Button, you can add the API Request action to trigger the DELETE request.
Displaying Images from an Airtable Base
Airtable allows storing images as an Attachment field type in a Base. This field type allows attaching images, documents, and any other file type that can be viewed or downloaded.
Consider the example below where each row has a column called Attachments.

You can fetch all the rows in a Draftbit app using a GET request.
Airtable comes with a response array where the data for each row is an object. If there is an image attachment in the row, the individual row object will contain an Attachments array. Inside this sub-array, you will find the URL of the image.
You will also find a thumbnails object that further contains the image URLs in different sizes. These sizes distinguish the size of the image determined by the Airtable after uploading the image to the Base. Each image size is also distinguished by its unique URL.
An example object returned from the previous GET request that contains image data.
{
"fields": {
"Attachaments": [
{
"0": {
"id": "attvrVilwzdi10A9Z",
"width": 1400,
"height": 1400,
"url": "https://dl.airtable.com/.attachments/f74a1ddfcd378f9c13981d49abe10c9d/11a1e03b/0bf83cad4a350e252c64063dc699c7ae52ba8870873a438735fa1c7a0e5af783fc457271e7cbeb6bb5bf44d82cc366a531671980f5d2944a50a74cf4dc36c9af.jpeg",
"filename": "0bf83cad4a350e252c64063dc699c7ae52ba8870873a438735fa1c7a0e5af783fc457271e7cbeb6bb5bf44d82cc366a531671980f5d2944a50a74cf4dc36c9af.jpeg",
"size": 107215,
"type": "image/jpeg",
"thumbnails": {
"small": {
"url": "https://dl.airtable.com/.attachmentThumbnails/bacee8ed8e241ec4571be0ec47def2a2/06a50134",
"width": 36,
"height": 36
},
"large": {
"url": "https://dl.airtable.com/.attachmentThumbnails/f1e826b646c5bbe1e5b55ffa466f9cf2/2eab6346",
"width": 512,
"height": 512
},
"full": {
"url": "https://dl.airtable.com/.attachmentThumbnails/7765845333d721afa33dfe9003a755e5/1890e026",
"width": 3000,
"height": 3000
}
}
}
}
]
}
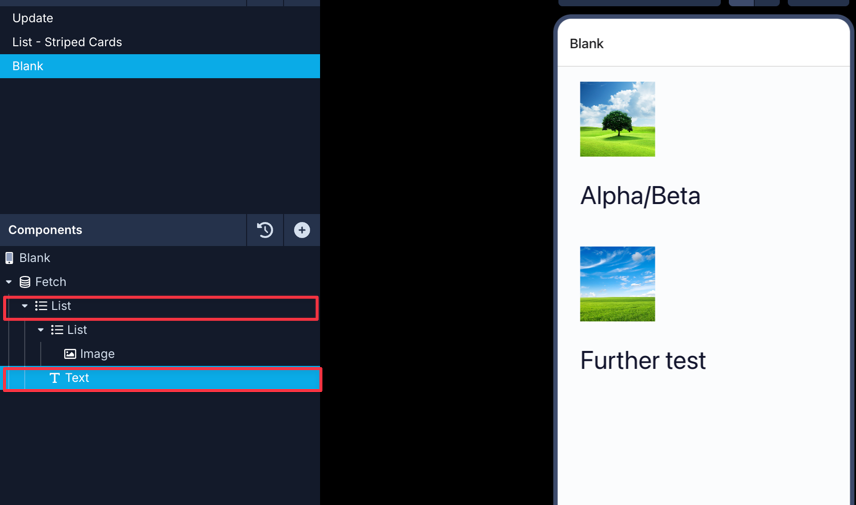
}Let's learn how to map the value of the image URL coming from the Airtable Base to an Image component. Initially, set up your screen Components tree as shown below. The important thing in the Components below is to nest a List component inside another List.
- Configure the GET request URL on the Fetch component.
- Map the Airtable
recordsarray on the List component.
- Map the
fields.Attachmentsarray to the nested List component.
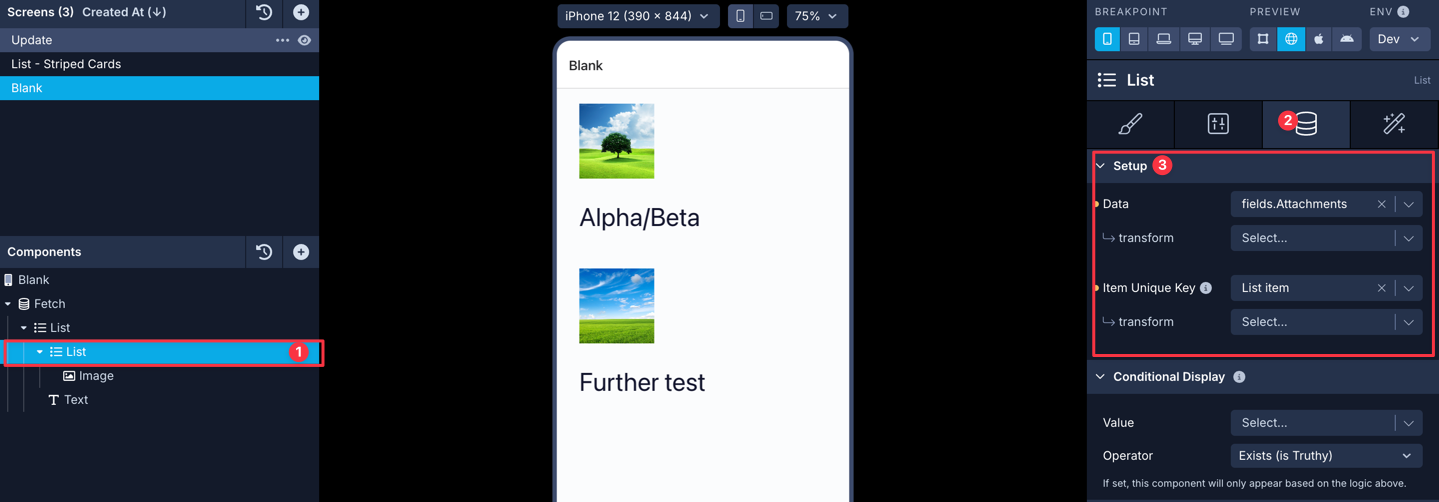
- Select the Image component and go to Properties Panel > Data tab. Set the value of Source Type to Data. Set the value of the Source to one of the
urlfields.
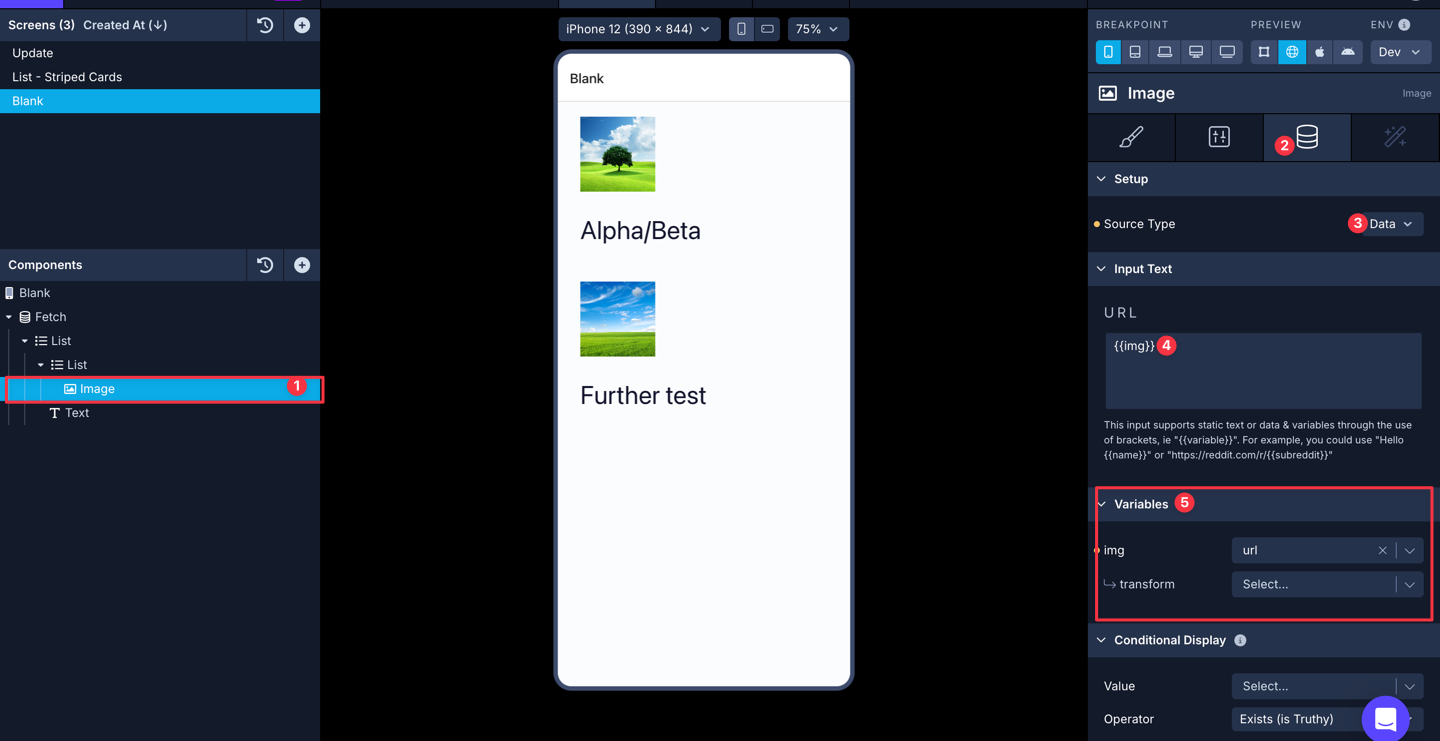
You can nest other components such as Text under the top-level List component in the Components tree.
Additional Resources
- To get familiar with Airtable, check out their handy guides
- Airtable API URL Encoder.