
Fetching Data
Fetching data is an essential function in most apps and Draftbit provides a couple ways for you to pull in data from REST APIs and use that data on your Screens.
Fetch Component
First, make sure you've set up at least one REST API Service and an Endpoint that returns some data. See below for an example.
The Fetch component is a component that you add to your Screen in the components tree. Once added to the Screen, you can nest other components inside of it and any child components you add that are data-enabled - such as a List - will have access to the data returned by the Fetch component.
The Fetch component lets you select on of your configured API services and endpoints. There's also several Triggers available on the Fetch component that allow you to take Actions based on different conditions, such as the status code of the response (e.g. 404).
Check out the Fetch component doc for more details.
API Request Action
First, make sure you've set up at least one REST API Service and an Endpoint that returns some data. See the example below.
The API Request Action lets you make an API request in reaction to Triggers. You can use the API Request Action to also make an API request to fetch data. This is often done using the Screen's On Screen Focus Trigger, or with a Button's On Pressed Trigger, where you can then pass the response data to a Variable, for example.
Check out the Action Editor and Actions docs for more details.
Data-Enabled Components
Many components in Draftbit are data-enabled, which means you can pass data into them for specific purposes. For example, the Text component lets you pass data to display as the rendered text, a List component accepts an array of data to render its items, and you can pass a URL to the Image component.
A component's data props are set under the Data tab in the right panel of the Builder. Props that accept data will have a dropdown where you can select the data to pass. Refer to a specific component's doc for more details about its data props.
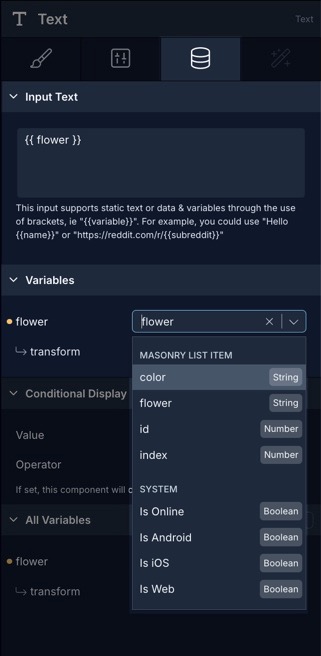
Below is an example of the Input Text of a Text component where variable syntax ({{ flower }}) is being used to create a variable prop named 'flower' and then a value is being selected from the dropdown.
Configure an endpoint to Fetch a list of items
For an example, consider a REST API endpoint that returns the following array of items:.
{
    "records": [
        {
            "id": "rec1VCM4FYcnc0NDz",
            "fields": {
                "item": "Notebook"
            },
            "createdTime": "2021-11-12T07:44:52.000Z"
        },
        {
            "id": "recBusEqFIfm3JzKY",
            "fields": {
                "item": "Apples"
            },
            "createdTime": "2021-11-12T07:44:52.000Z"
        },
        {
            "id": "recz5WRdCMYyedKPt",
            "fields": {
                "item": "Bananas"
            },
            "createdTime": "2021-11-12T07:44:52.000Z"
        }
    ],
}
Once you've created a Service in the API & Cloud services modal, you'll be prompted to add a new endpoint.
Let's consider the above endpoint example to fetch a list of items from an Airtable base. You will add a new endpoint to fetch data using a GET HTTP method by following these steps:
- Click Add endpoint.
- In Step 1: enter the Name for the endpoint. Make sure the Method select is
GET. - Set the Role to
Get Manysince the endpoint is fetching a list of items, not just a single item. Set the Object Type totodos. - In Step 2: add the base name path and/or any query parameters to the API's base URL. Currently, the endpoint has no query parameters or additional endpoint-specific paths so just enter
/. - In Step 4: click the Test button next to the Endpoint input to verify the response coming from the API service.
- The last step is to save the endpoint. Click the Save button.
Display a list of data with Fetch Component
After adding the endpoint to fetch a list of items, the next step is to display it on an app screen. The Fetch component is used to get data from a REST API service directly into your app using the HTTP GET request.
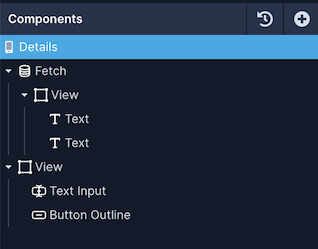
Typically, when a Fetch component is used to display a list of data, the Components tree for a screen is generally structured as shown below:

To populate the list of components (as mentioned above) with the external data, a series of steps are required:
- Select the Fetch component from the Components tree.
- Navigate to the Fetch component’s Data tab.
- Select the REST API service name from the Service dropdown.
- Select the endpoint from the Endpoint dropdown.

The next step is to configure the List component nested inside the Fetch component to map the list of items.
- Select the List component in the Components tree.
- Navigate to the List component’s Data tab.
- Select the value from the dropdown for the Data property.

The next step is to display the list item name. Map the field of the item name to a Text component.
- Select the data-enabled component (for example, in the Components tree below, Text is a data-enabled component).
- Go to the component’s Data Tab
- Add a
{{variable}}in the Input Text. - Then, map the value for
{{variable}}from the dropdown under Variables.

You can repeat these steps for any other data-enabled component such as Image Background, Image components, etc.
Configure an endpoint to Fetch a single item
For an example, consider an endpoint that requires an id as the query parameter to fetch a record of a single item. When provided a value for id, it returns the following:
{
    "id": "rec1VCM4FYcnc0NDz",
    "fields": {
        "item": "Notebook"
    },
    "createdTime": "2021-11-12T07:44:52.000Z"
}
Let's consider the above endpoint example to fetch the single item record from an Airtable base. You will add a new endpoint to fetch data using a GET HTTP method by following these steps:
- Click Add endpoint.
- In Step 1: enter the Name for the endpoint. Make sure the Method select is
GET. - Set the Role to
Get Onesince the endpoint is configured to get a single item. Set the Object Type totodos. - In Step 2: add the base name path and/or any query parameters to the API's base URL. Currently, the endpoint uses a dynamic variable
/{{id}}to fetch the record based on the value of theidprovided. - Provide an
idof the existing record under Path Test Values. - In Step 4: click the Test button next to the Endpoint input to verify the response coming from the API service.
- The last step is to save the endpoint. Click the Save button.
Display single data object using Fetch Component
When a Fetch component is used to render a single data object, the Components tree for a screen is generally structured as shown below:
To populate the Components tree with the external data, a series of steps are required:
- Select the Fetch component from the Components tree.
- Navigate to the Fetch component’s Data tab (third tab on the right-hand side Properties Panel).
- Select the REST API service name from the Service dropdown.
- Select the endpoint from the Endpoint dropdown.
- Under Configuration, from the dropdown, select the Navigation Parameter (ideally, coming from a List screen) such as Navigation > id.

Navigation ParametersNavigation Parameters are variables passed from one screen to another when navigating. Learn more on how to pass data in the Passing Data doc.
The next step is to display the list item name. Map the field of the item name a Text component.
- Select the data-enabled component (for example, in the Components tree below, Text is a data-enabled component).
- Go to the component’s Data Tab.
- Add a
{{variable}}in the Input Text. In the example below, the item's id and name are displayed so there are two separate Text components, each with its own variable. - Then, map the value for
{{variable}}from the dropdown under Variables.

Here is how the details of an item are displayed when Navigating from List to an item's Details screen:

Additional Resources
- Learn more about Role and Object Type when configuring an endpoint and why they are necessary for caching.