
Bubble
Authentication is the way Bubble backend handles adding users and allows them access to certain areas or endpoints of the app. The process of authenticating a user typically needs the following steps in a mobile app:
- Sign Up: Provide a form for a user to enter credentials to create a new account.
- Log In: Provide a form for a user to enter credentials to authenticate their identity and login into the app.
- Save the Authentication Token when a user's credential verifies with the backend service. Authentication Token is received as a response from the REST API service and is used to make authenticated API requests.
- Log Out: An action to reset authentication and return the client to an unauthenticated state.
Implementing Authentication in a Draftbit app requires familiarity with features like Variables, Actions, Navigation Params, etc.
Learn more at what are the requirements when implementing a user authentication process in a Draftbit app at Intro to Authentication.
To create a Bubble CMS REST service, please go through the REST API Integration documentation.
Dev & Prod URLSThe Base URL parameter has been updated to give you the ability to set separate base URLs for Development and Production. When you publish your app, you can set which base URL to use, Dev or Prod. Read more about Environments
Setup Database in Bubble
Before you start integrating authentication using Bubble's RESTful API with an app in Draftbit, you will need to make sure that you have set up everything on Bubble's end. The initial step in this setup is to start with Database in Bubble. from your Bubble Dashboard,
- Go to Data tab from the left menu bar.
- Bubble automatically creates a
Usertable within each app so you don't. - This default
Usertable has four fields:email,Modified Date,Created dateandSlug.
There is no
passwordfield created by Bubble in theUsertable. However, there ispasswordfield that Bubble hides for security reasons.
- We will add a new field to the
Usertable calledName. To do this, clickCreate a new fieldand enterNameand selecttextas the data type.
The three fields
Slug,Modified DateandCreated Dateare default table fields that Bubble automatically adds for every table so you don't need to create or update the values of these three fields.
You can add some initial data for testing purposes as shown below:

It is recommended to protect your Bubble app and backend by defining some privacy rules. These rules define who can access information. You can do this by using the Privacy tab (next to App Data). Our focus for this guide is authentication with Draftbit so we will try to keep things to the point.
Enable Bubble API and Workflow
The next step is to enable the API and Workflow endpoints in Bubble. To connect any external application such as your Draftbit app to Bubble, you will need two types of endpoints from Bubble:
- Workflow API - endpoints under this type of API will allow you to set up complex workflows such as Signup, Login, etc.
- Data API - endpoints under this type of API will allow you to perform Create, Read, Update and Delete (CRUD) operations on the database.
In your Bubble dashboard,
- Go to Settings > API. Under Public API endpoints.
- Make sure you expose the Workflow API and the Data API for
User.

Create Backend Workflows in Bubble
Navigate to the Workflows tab in the left menu bar. This is where you will set up endpoints for Signup, Login and Logout.
Setting up Signup endpoint
To set the endpoint, click on Click here to add an endpoint and then click General > New API endpoint.
- Add API workflow name. For example,
signup. - Check all the three options to run the endpoint without authentication.
- Add three keys:
email,passwordandnameand select their type to betext. - Make sure the
Response typeis set toJSON Object.

Then, add an action under the endpoint:
- Select Click here to add an action.
- Select Account > Sign the user up.
- Select the
emailandpasswordparameters. - Click
Change another fieldand select theNamefield.


Setting up Login endpoint
Using a similar process as did in the previous section, set up a login endpoint.
To set the endpoint, click on Click here to add an endpoint and then click General > New API endpoint.
- Add API workflow name. For example,
login. - Check the first two options to run the endpoint without authentication.
- Add two keys:
email, andpassword, and select their type to betext. - Make sure the
Response typeis set toJSON Object.

Then, add an action under the endpoint:
- Select Click here to add an action.
- Select Account > Log the user in.
- Select the
emailandpasswordparameters. - You can also enable the option Stay Logged in to have the value
yes. By default, this option will cause a user to be logged in to your app for one year until they log out. If you do not enable this option, the user will remain logged in for 24 hours.


Setting up Logout endpoint
Using a similar process as did in the previous section, set up a logout endpoint.
To set the endpoint, click on Click here to add an endpoint and then click General > New API endpoint.
- Add API workflow name. For example,
logout. - Check the first option only. This endpoint can not run without authentication.
- Make sure the
Response typeis set toJSON Object.

Then, add an action under the endpoint:
- Select Click here to add an action.
- Select Account > Log the user out.


Checking Swagger Documentation for API endpoints and getting Base URL
Bubble generates a Swagger API specification file for the application. This file describes the structure of your API endpoints. A Bubble app with a Swagger API specification can be viewed by:
- Go to the URL editor.swagger.io which is a free swagger editor.
- Then, in the editor, click File > Import URL and add the swagger specification URL of your Bubble app. It will be of the following format:
https://your-app-name.bubbleapps.io/version-test/api/1.1/meta/swagger.jsonwhere your-app-name is the name of your Bubble app. By default, every bubble app will have the bubbleapps.io domain suffix. If you have moved your app to your own domain, then remove the bubbleapps.io suffix and use yours.
Here is how your Swagger specification will look:

In the Swagger editor, on the right-hand side, you will find the API endpoints for your Bubble Backend Workflow (auth related), User datatable, and any other data table. The workflow endpoints start with the prefix /wf/. You can also test these endpoints by providing the test values in the Swagger editor.
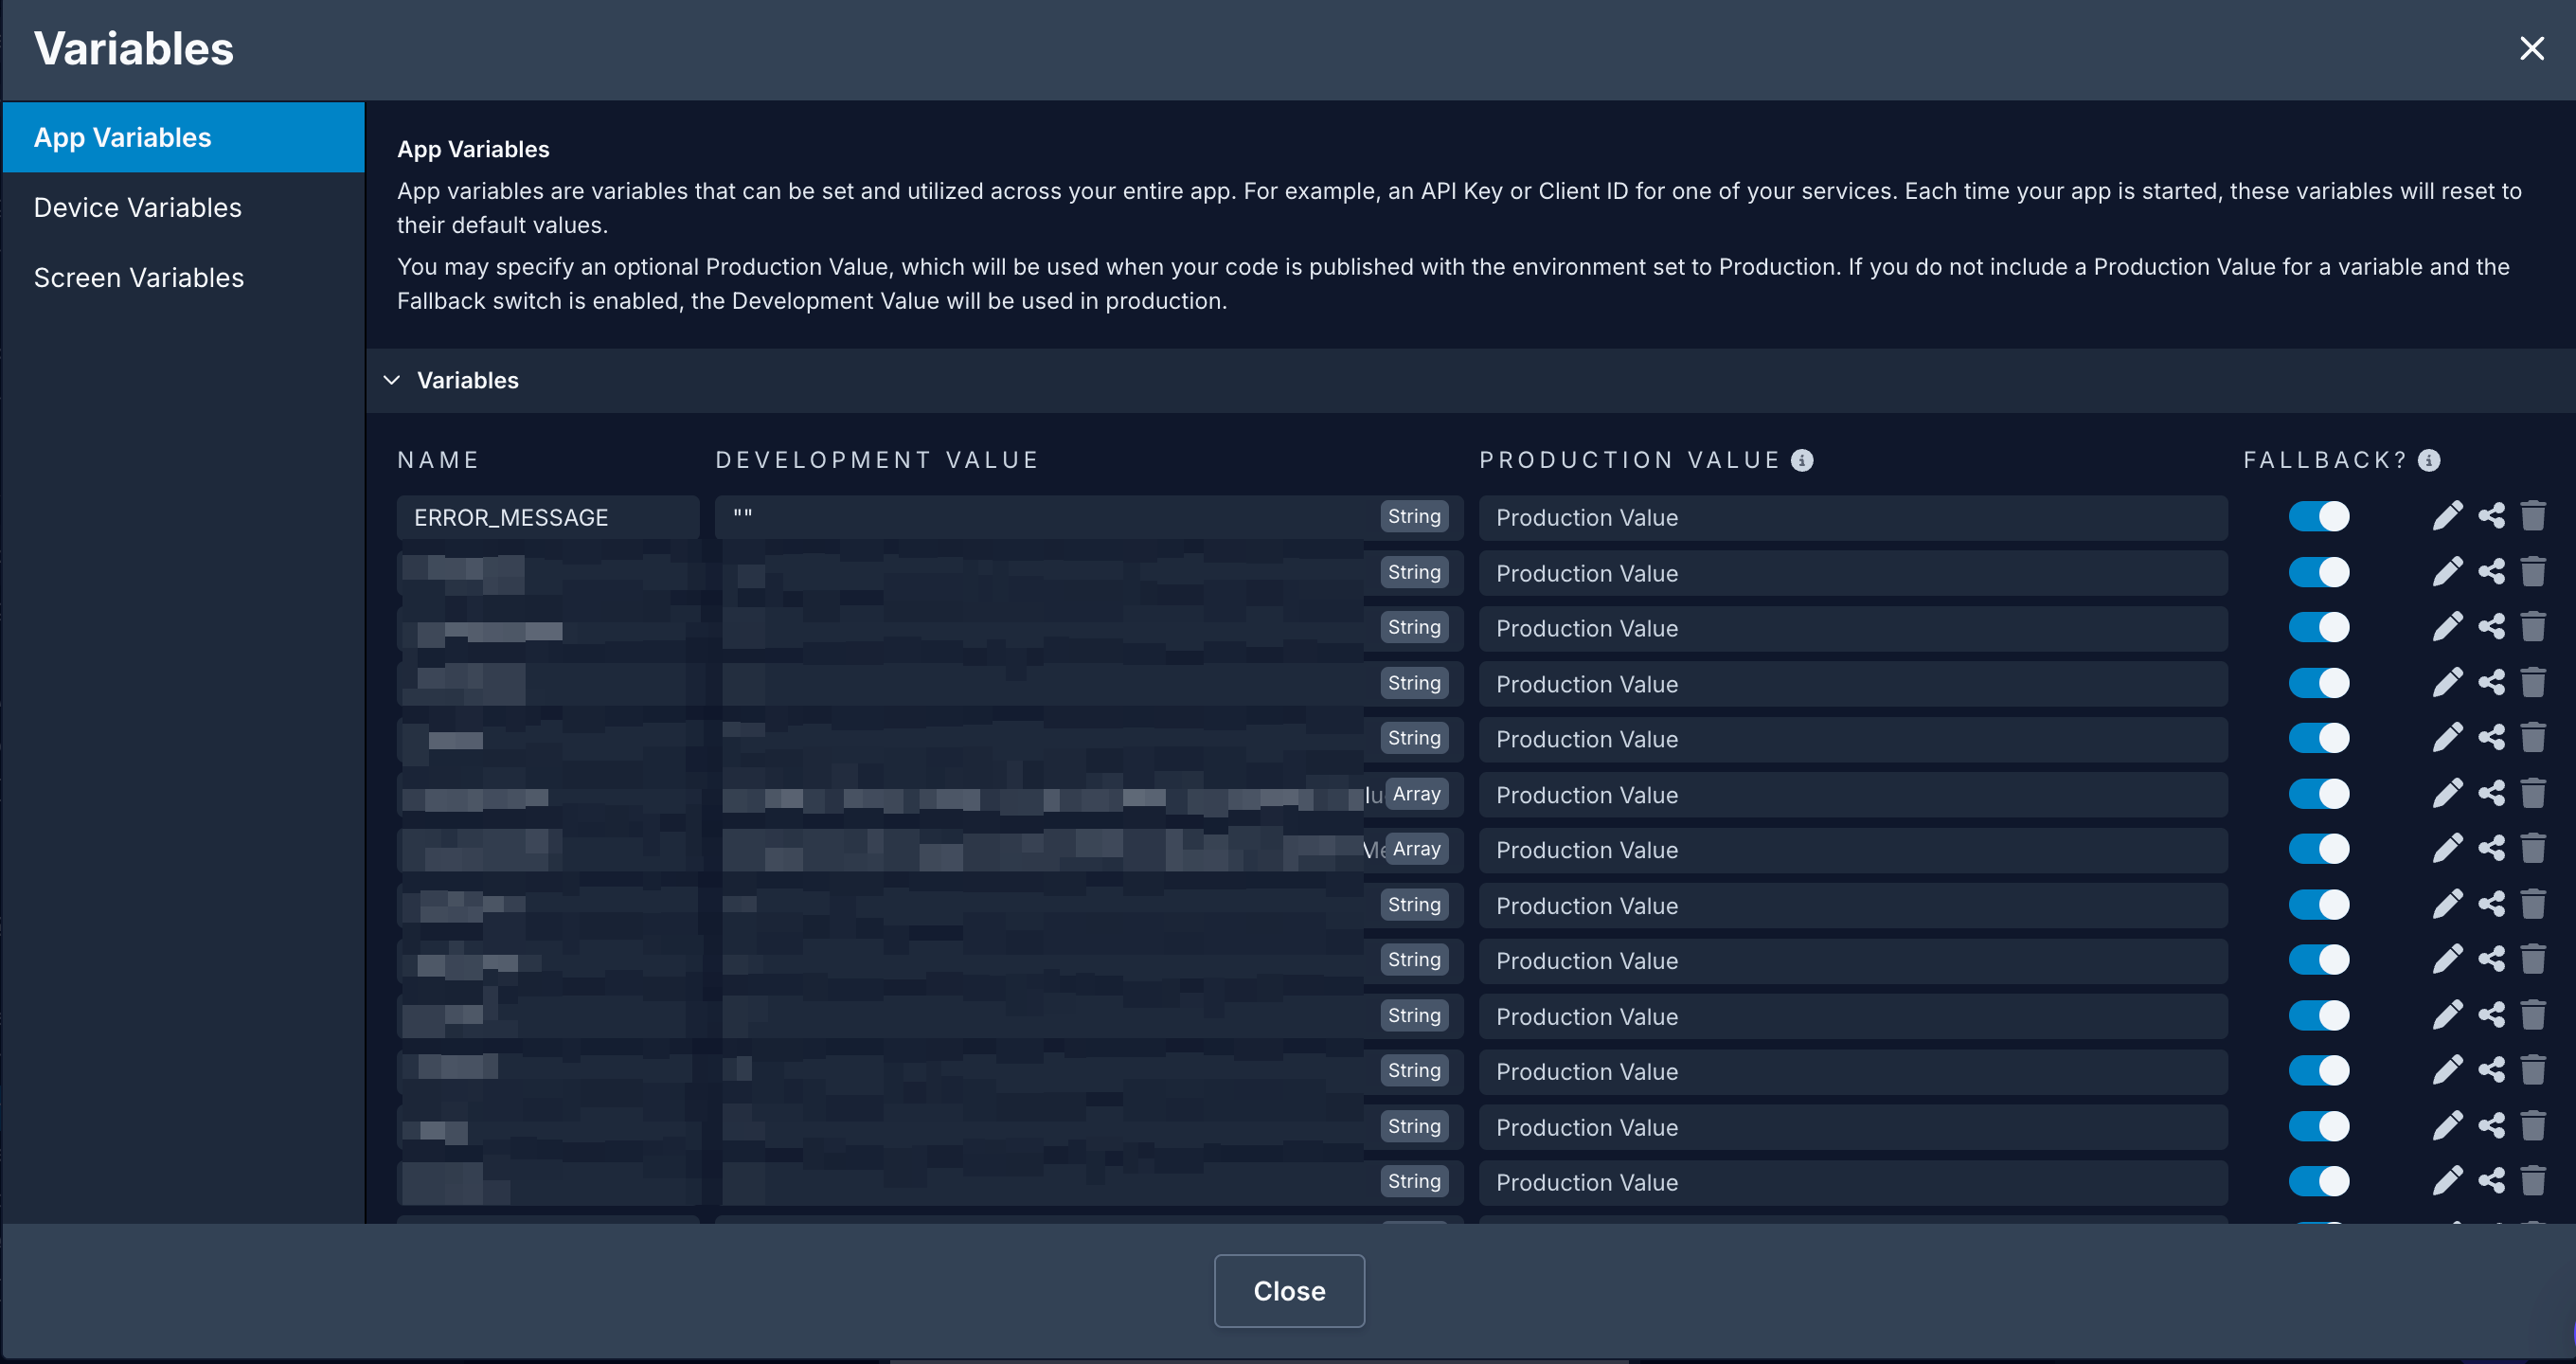
Before implementing endpoints for authentication (from the sections below), refer to the documentation on how to add Global Variables for saving the auth token as a Device Variable and error messages as an App Variable.
You are required to define ERROR_MESSAGE as the App Variable:
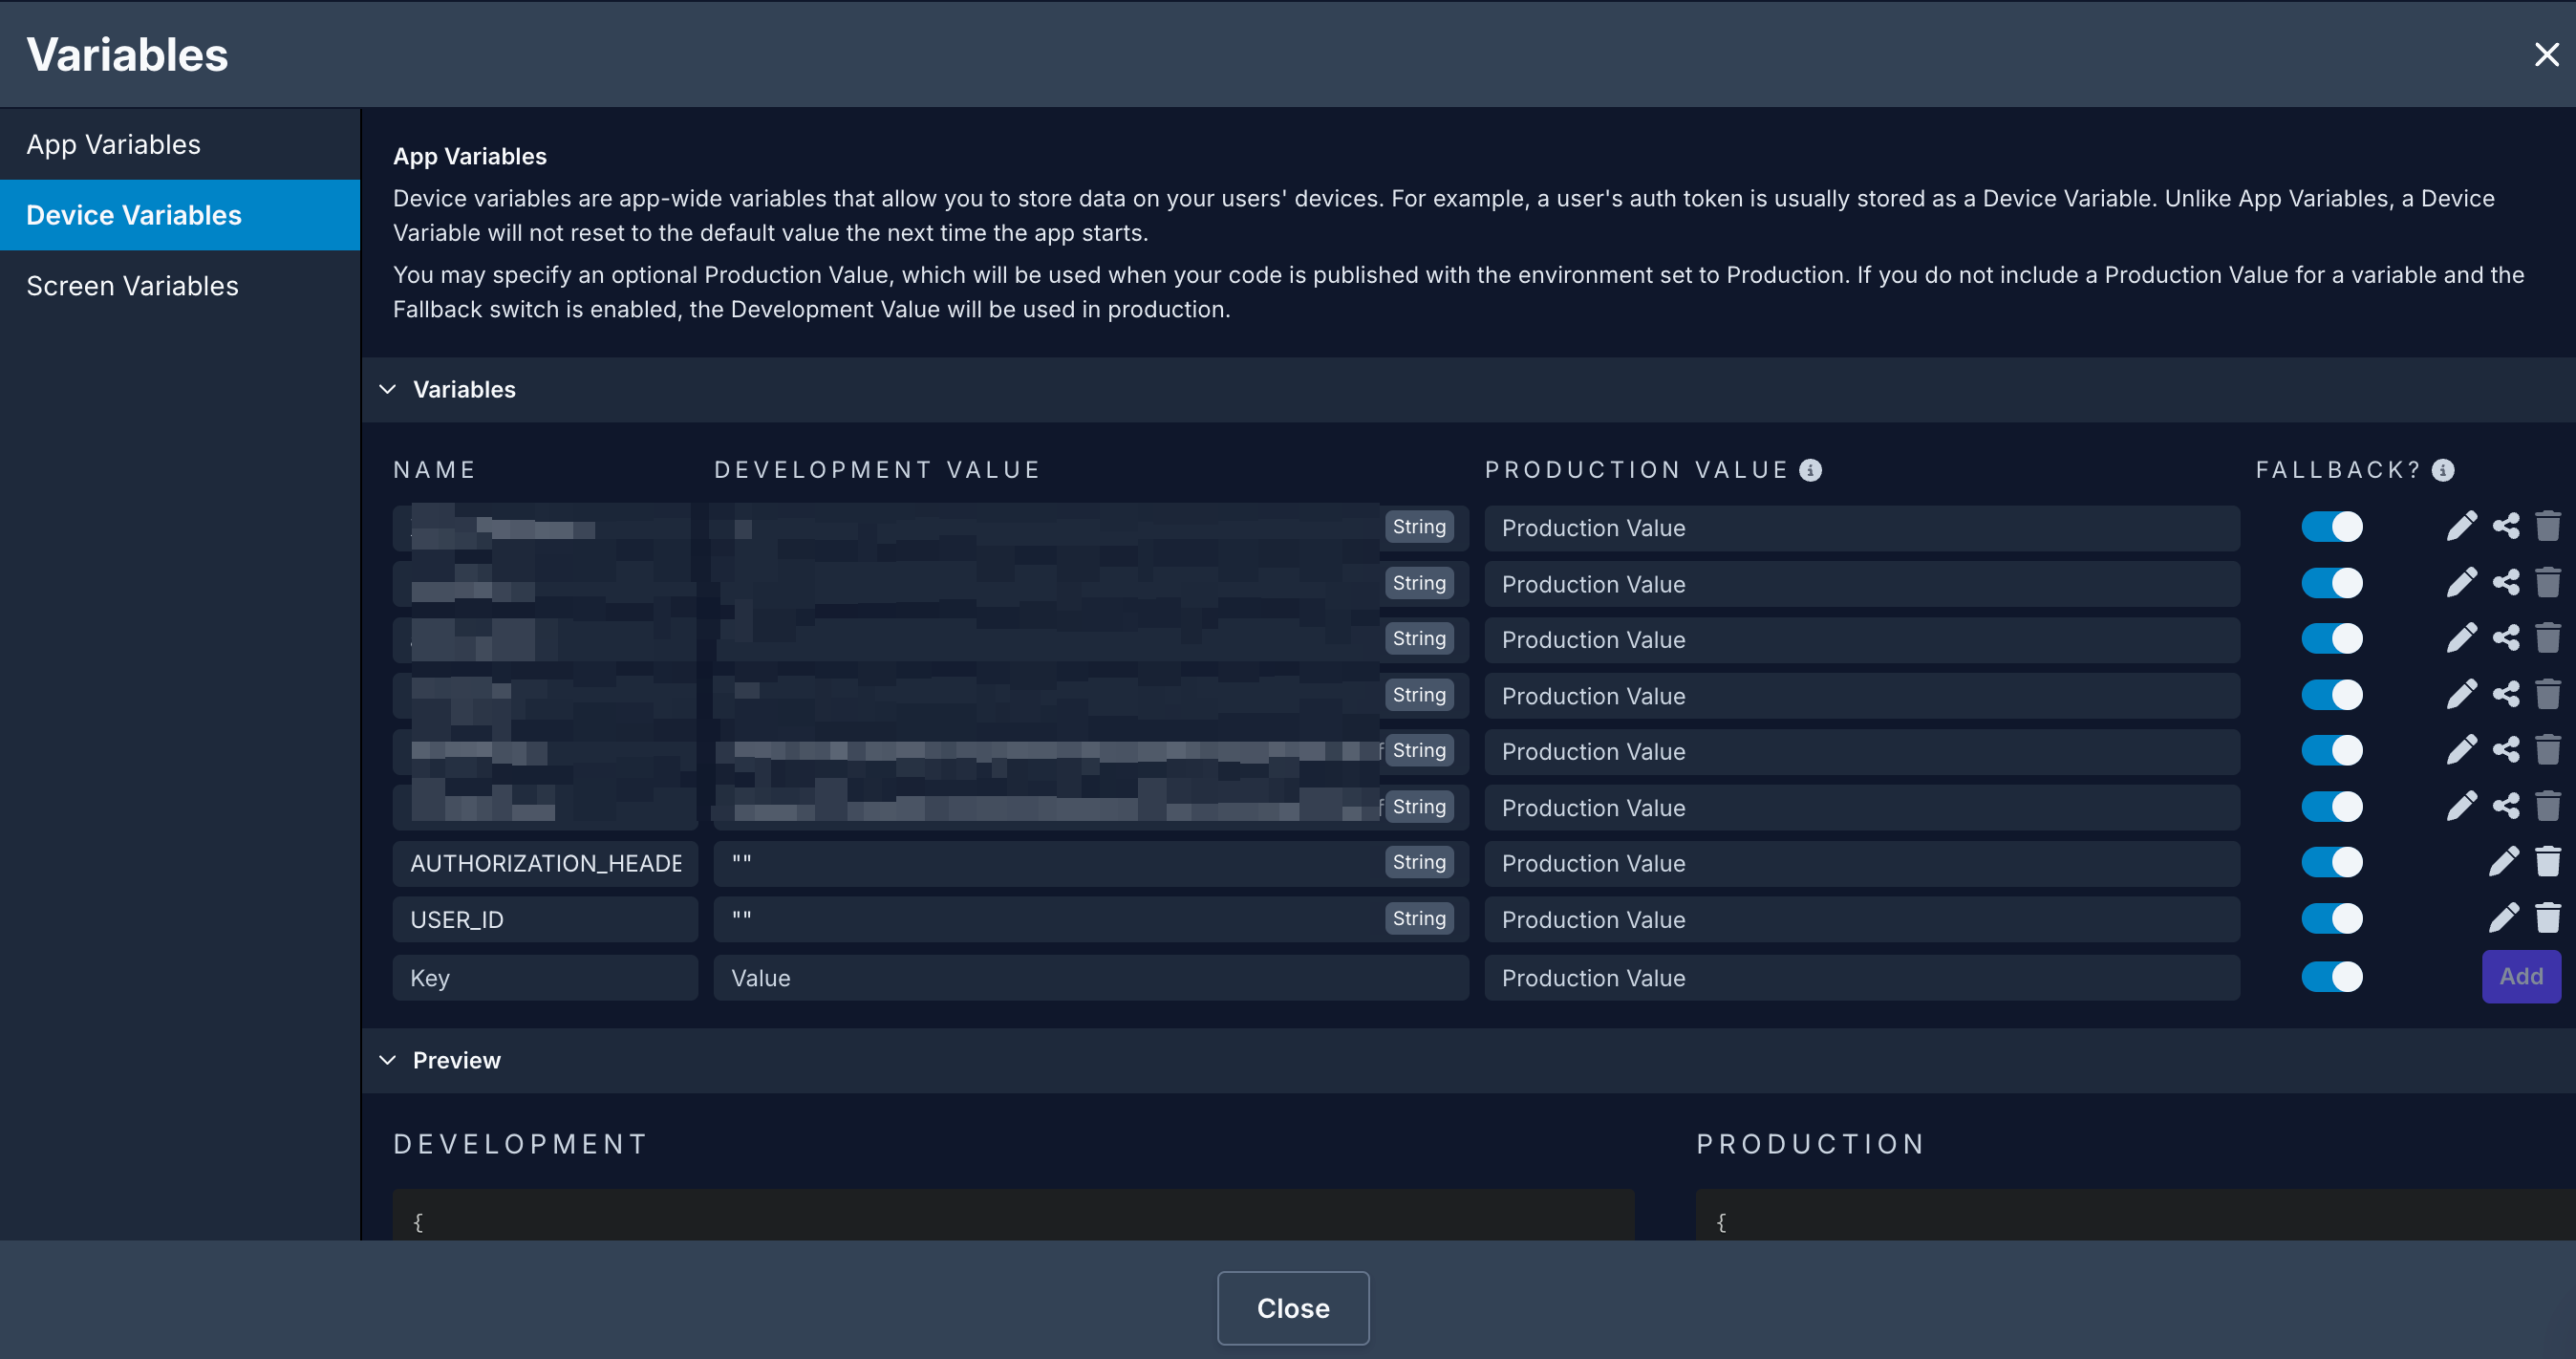
Also, add two Device Variables:
AUTHORIZATION_HEADERUSER_ID
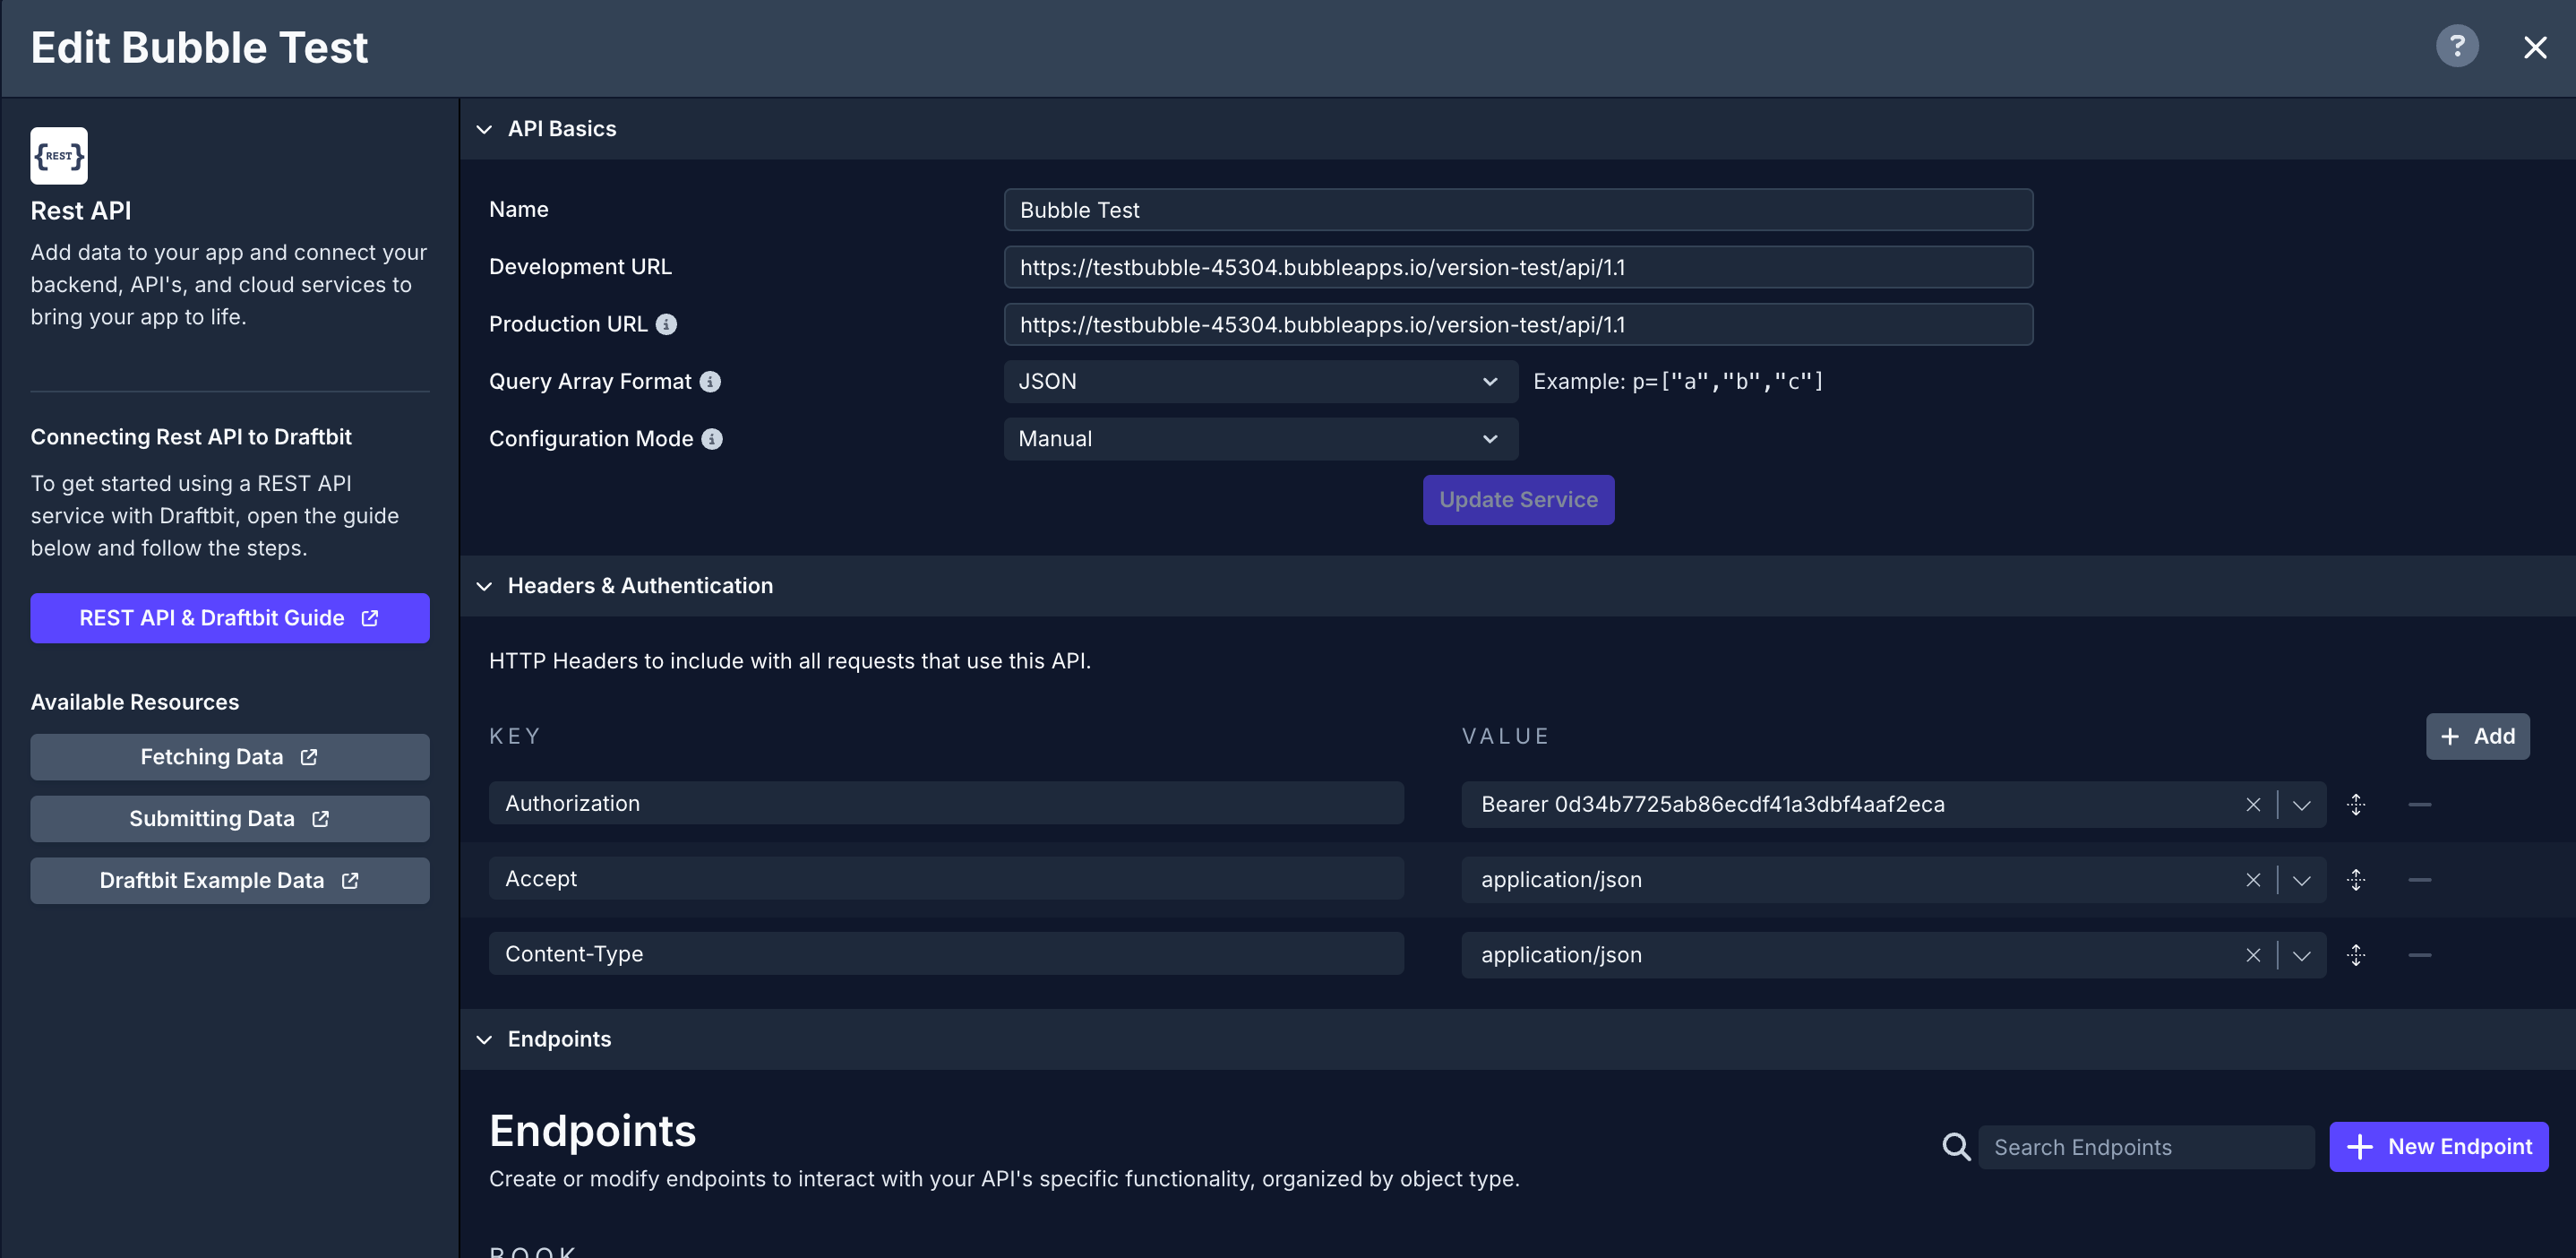
Add Base URL in Draftbit app
To perform authentication operations on a Bubble CMS add the Base URL in Draftbit by creating a new service in Data modal. The Base URL is of the following format:
https://your-app-name.bubbleapps.io/version-test/api/1.1
Dev & Prod URLSThe Base URL parameter has been updated to give you the ability to set separate base URLs for Development and Production. When you publish your app, you can set which base URL to use, Dev or Prod. Read more about Environments
Signup
To implement the signup process with Bubble REST API service, you need to add the endpoint /wf/signup.
- Click Add Endpoint.
- In Step 1: enter a name for the endpoint and select the Method to
POST. - In Step 2: enter the base name as path:
/wf/signup. - In Step 3: define the structure of the Body object that will be sent through the
POSTrequest. It's a JSON object that requires a key and a value. The key should associate with the name of the field in the BubbleUserdatatable. For the signup route, here is how we have defined the body structure for thisPOSTrequest:
{
  "email": {{signupEmail}},
  "password": {{signupPassword}},
  "name": {{signupName}}
}
In the above snippet, using {{variable}} names to test the endpoint before using it in the rest of the app. You can provide test values for each of the {{variable}}. The more fields you have while signing up a new user in your app design, the more key and value pairs you can add to the Body structure.
Once you have created the body structure, click on the Body Preview to verify if the structure you have defined is valid to be sent with the POST request or not.
- In Step 5: click the button Test. On success, it will return with status of
successand a response body that contains thetoken. - Click Save.
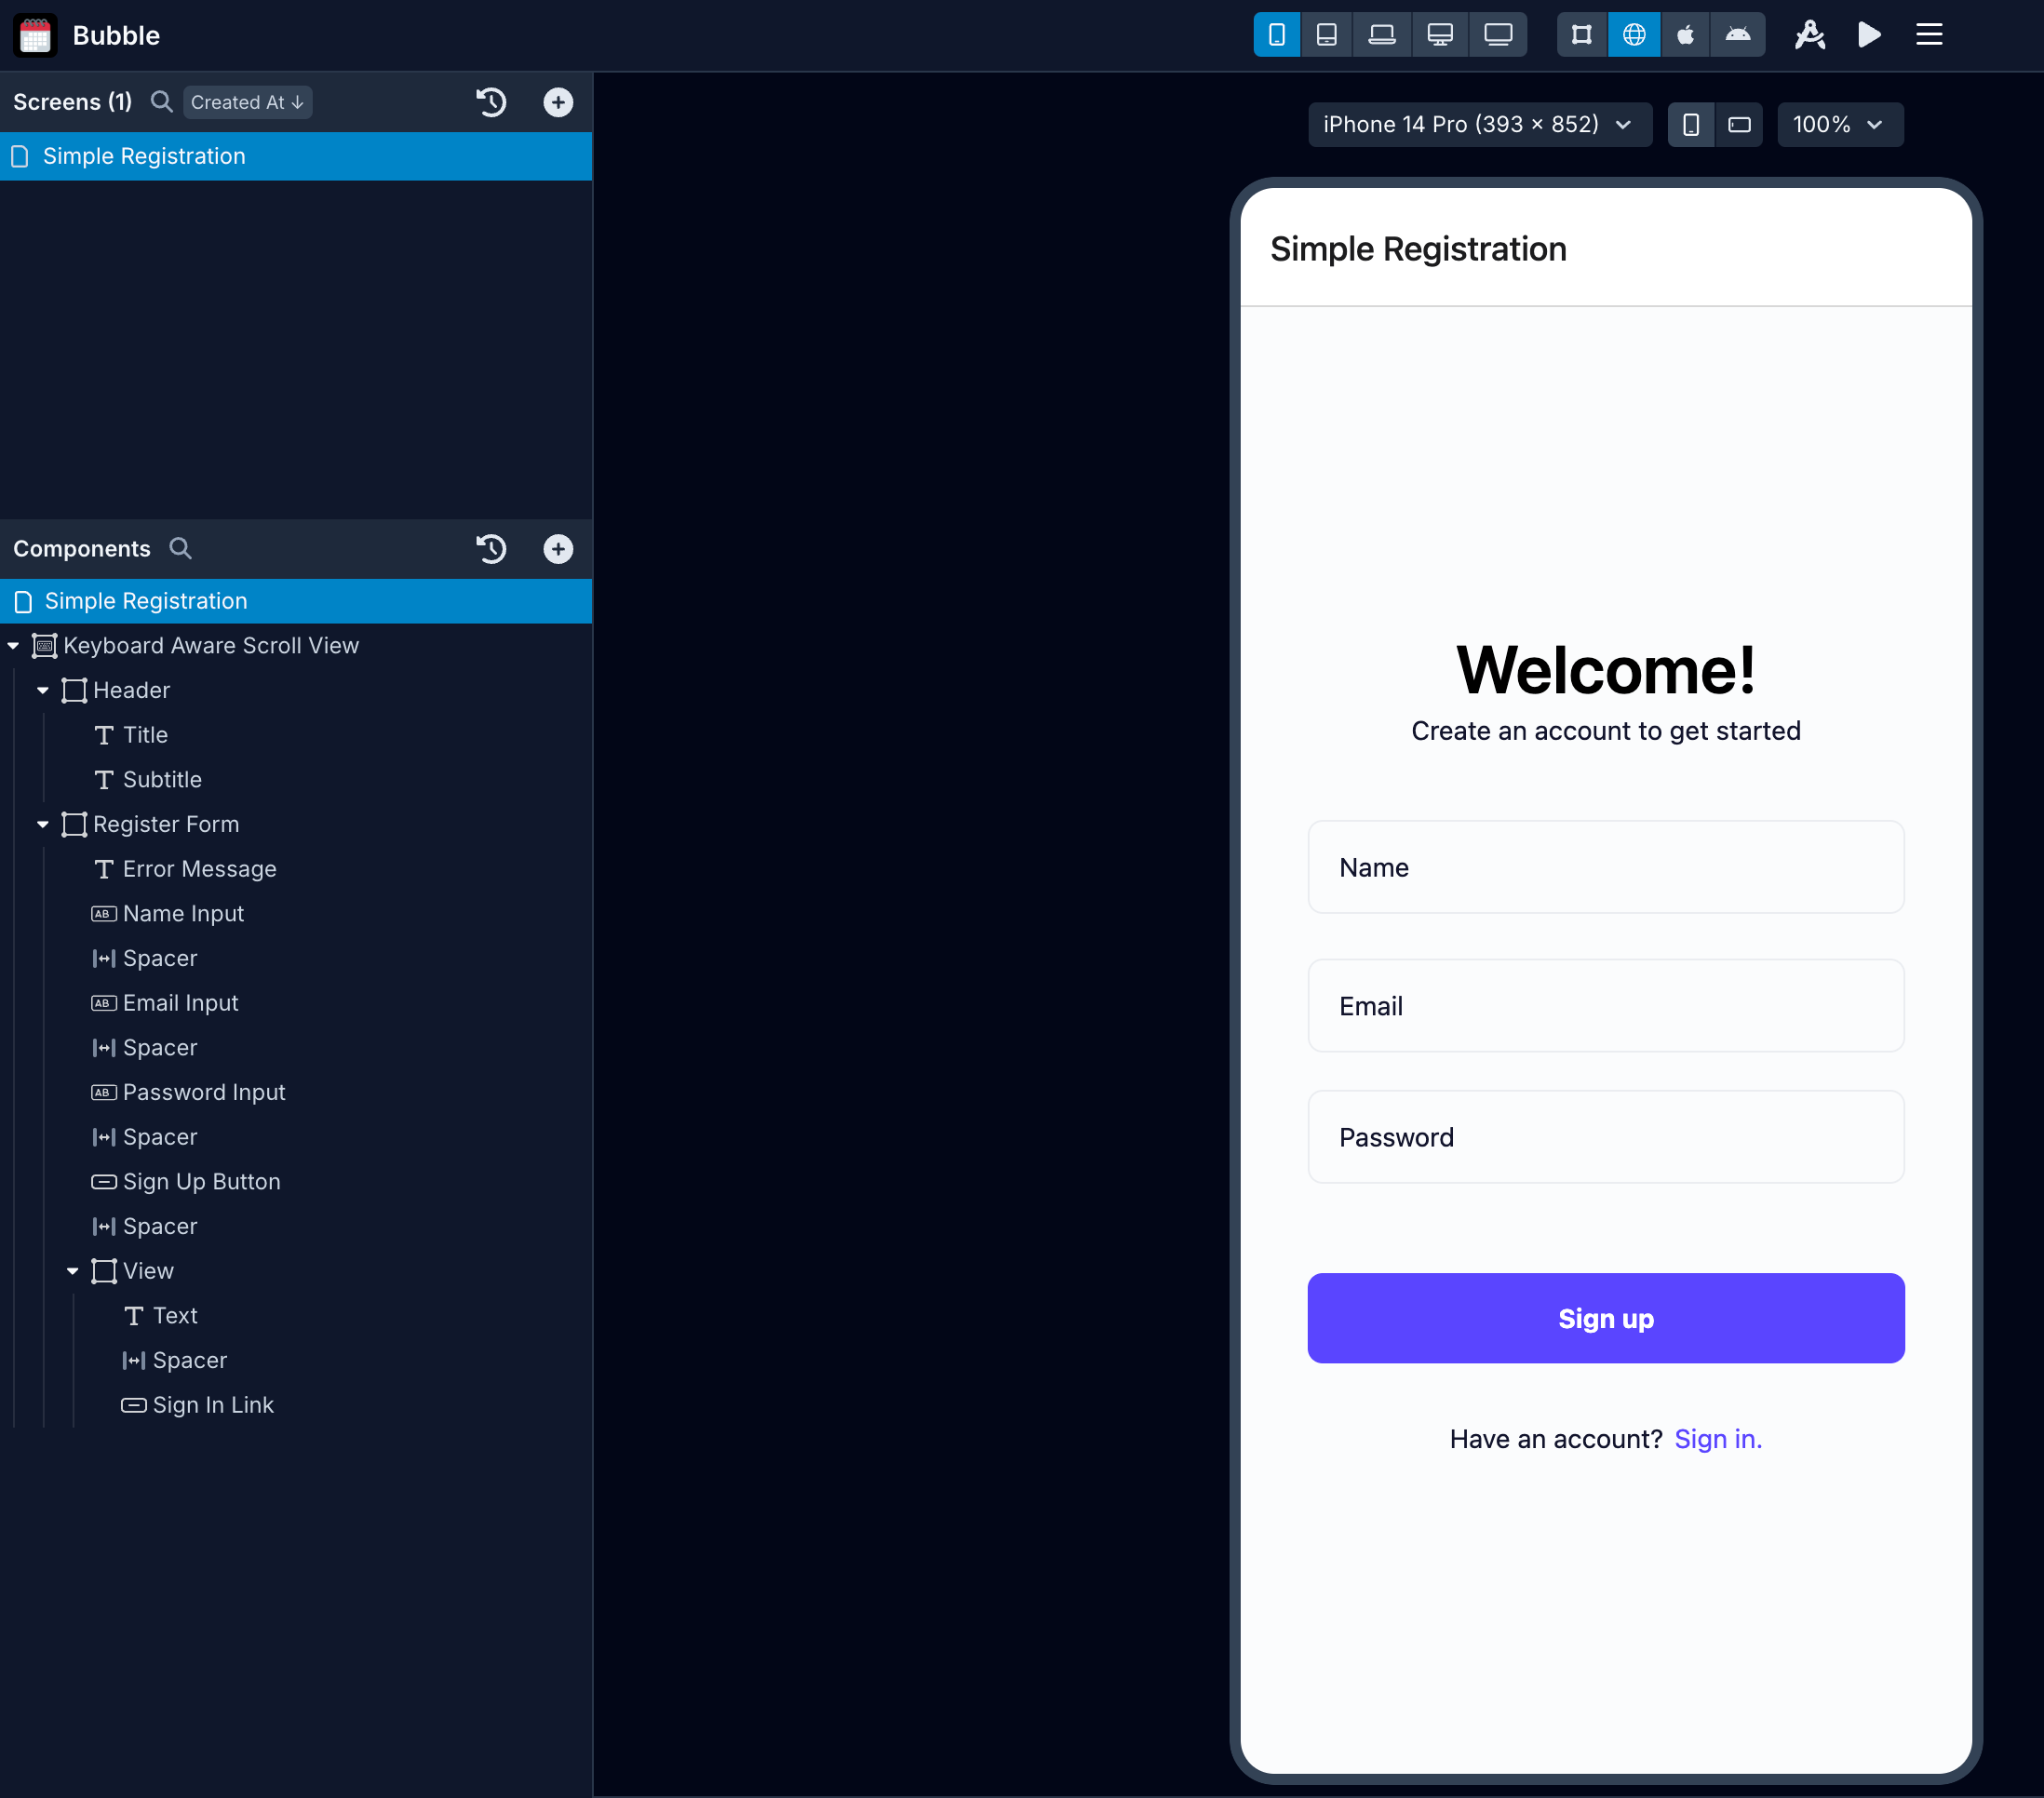
A typical Signup screen (see the image below) will have a Button/Touchable component in its Components tree to send the API request.
Action Workflow
When sending an API request to signup a user using the endpoint created in the previous step, you will need to stack the following actions on a Button/Touchable.
Following actions will be stacked on the Signup screen.
- To add an action, select the Button/Touchable component from the Components tree.
- Then, in the Properties Panel, go to the Interactions tab.
- Click the
OnPressbutton to open the Action Editor. - In the Action Editor, search for the actions in the left panel.
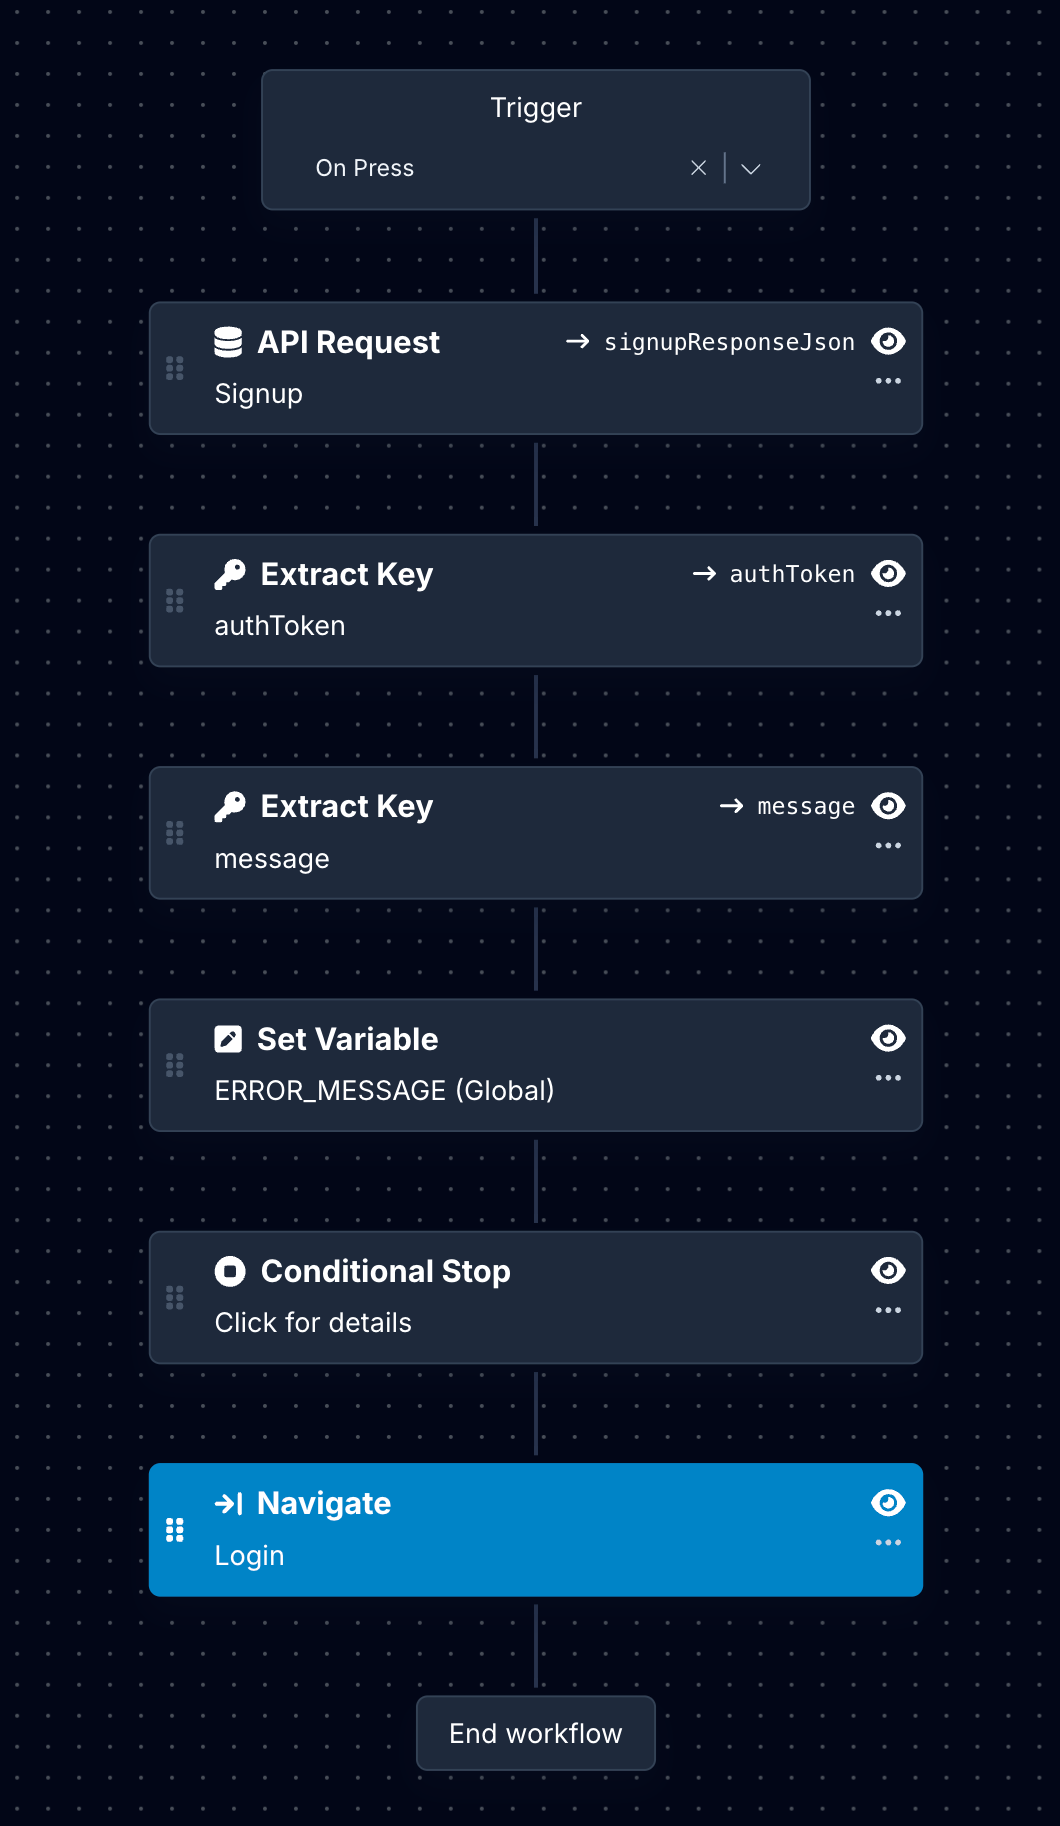
Here is the description of each action:
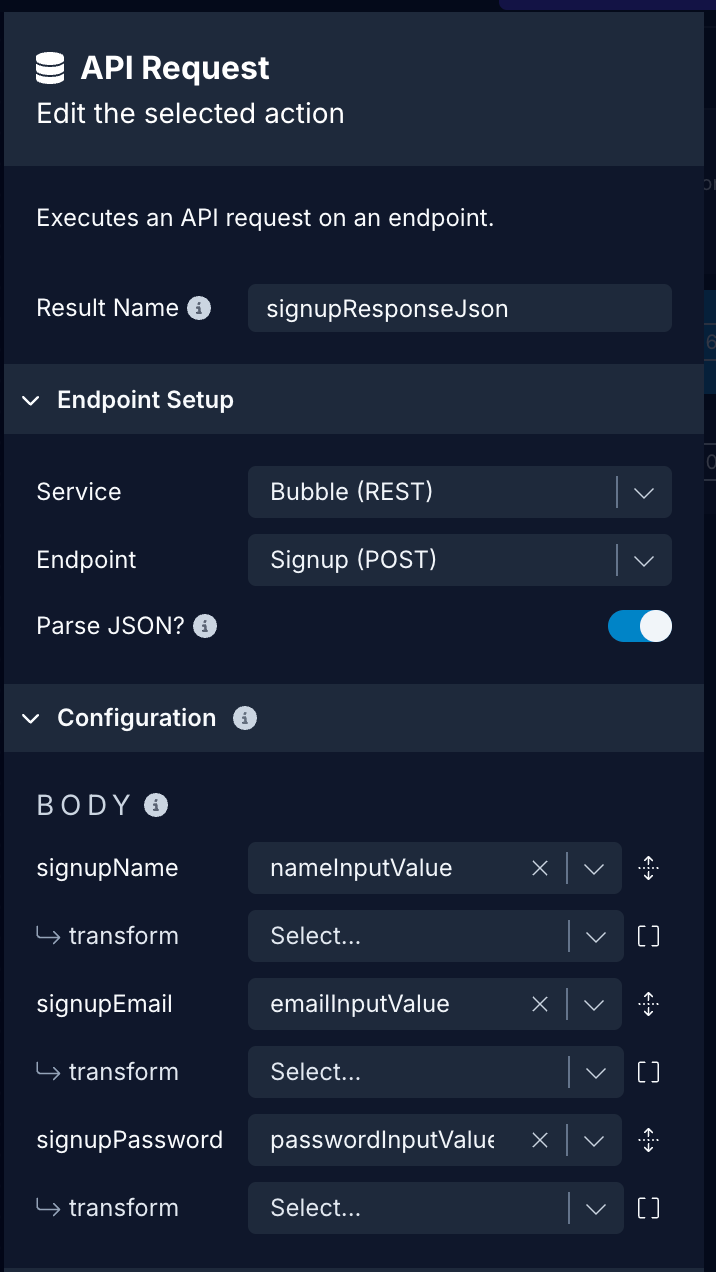
1. API Request
API Request is used to send the POST request to the endpoint /wf/signup. It comes back with a token from the Bubble REST API in case of success or an error message in case of failure both in a JSON response. On success when signing up, we will navigate the app user to the Login screen instead of logging in directly.
In the action:
- Select the Service name.
- Select the Endpoint. In this case, it's Signup.
- Add a variable to store the Result Name. The variable assigned here will enable it to be used by subsequent actions. For example, in this case, the Result Name is assigned to
signupRespnseJson. - In the Body, select the appropriate
Data Sourceproperty for each variable defined in the Body when setting up the endpoint, from the dropdown menu.
2. Extract Key: authToken
Using the signupResponseJson value from the previous action, let's extract the authToken. In the action:
- Select the value of the Input to be Result Name of the previous action. For example,
signupResponseJson. - Add the Path value:
.response?.token. - Add the Result Name:
authToken.

3. Extract Key: error message
In the action:
- Select the value of the Input to be Result Name of the previous action. For example,
signupResponseJson. - Add the Path value:
.message. - Add the Result Name:
message.

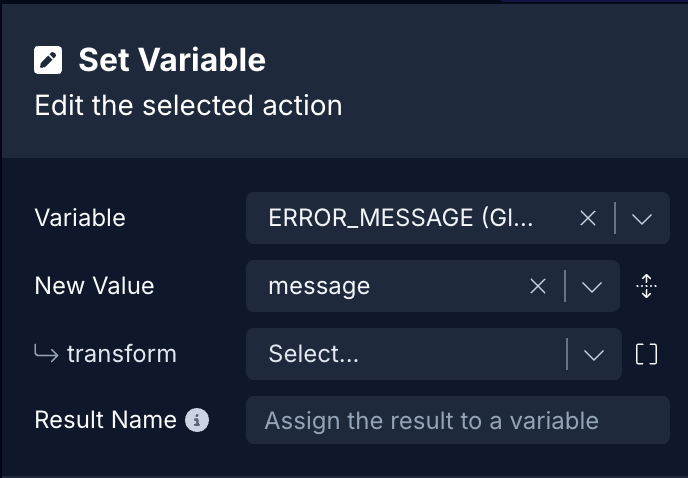
4. Set Variable: Error Message
In the action:
- In the Variable, select the Global Variable assigned for Error Message from the dropdown menu.
- In the Value, select the Action Result
messageextracted from the previous action.
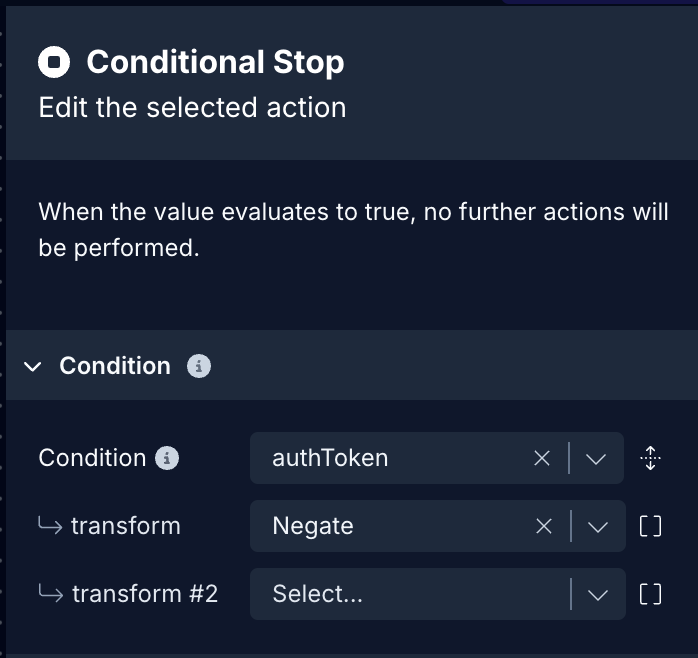
5. Conditional Stop
This action will stop the execution of any actions defined after it. It will check if the auth token value is present or not and if not, the action will stop the execution. Useful to implement after handling errors. In the action:
- In Check value, select
authTokenfrom the dropdown and a transform functionnegate.
6. Navigate
This action helps to navigate to a screen for the user to enter their login credentials(for example, a Login screen). In the action:
- In Destination, select the screen name from the dropdown menu.
Login
To implement the login process with Bubble REST API service, you need to add the endpoint /wf/login.
- Click Add Endpoint.
- In Step 1: enter a name for the endpoint and select the Method to
POST. - In Step 2: enter the base name as path:
/wf/login. - In Step 3: define the structure of the Body object that will be sent through the
POSTrequest. It's a JSON object that requires a key and a value. The key should associate with the name of the field in the BubbleUserdata table. For the signup route, here is how we have defined the body structure for thisPOSTrequest:
{
  "email": {{loginEmail}},
  "password": {{loginPassword}},
}
In the above snippet, using {{variable}} names to test the endpoint before using it in the rest of the app. You can provide test values for each of the {{variable}}. The more fields you have while signing up a new user in your app design, the more key and value pairs you can add to the Body structure.
Once you have created the body structure, click on the Body Preview to verify if the structure you have defined is valid to be sent with the POST request or not.
- In Step 5: click the button Test. On success, it will return with the status of
successand a response body that contains thetoken. - Click Save.
A typical Log in screen (see the image below) will have a Button/Touchable component in its Components tree to send the API request.
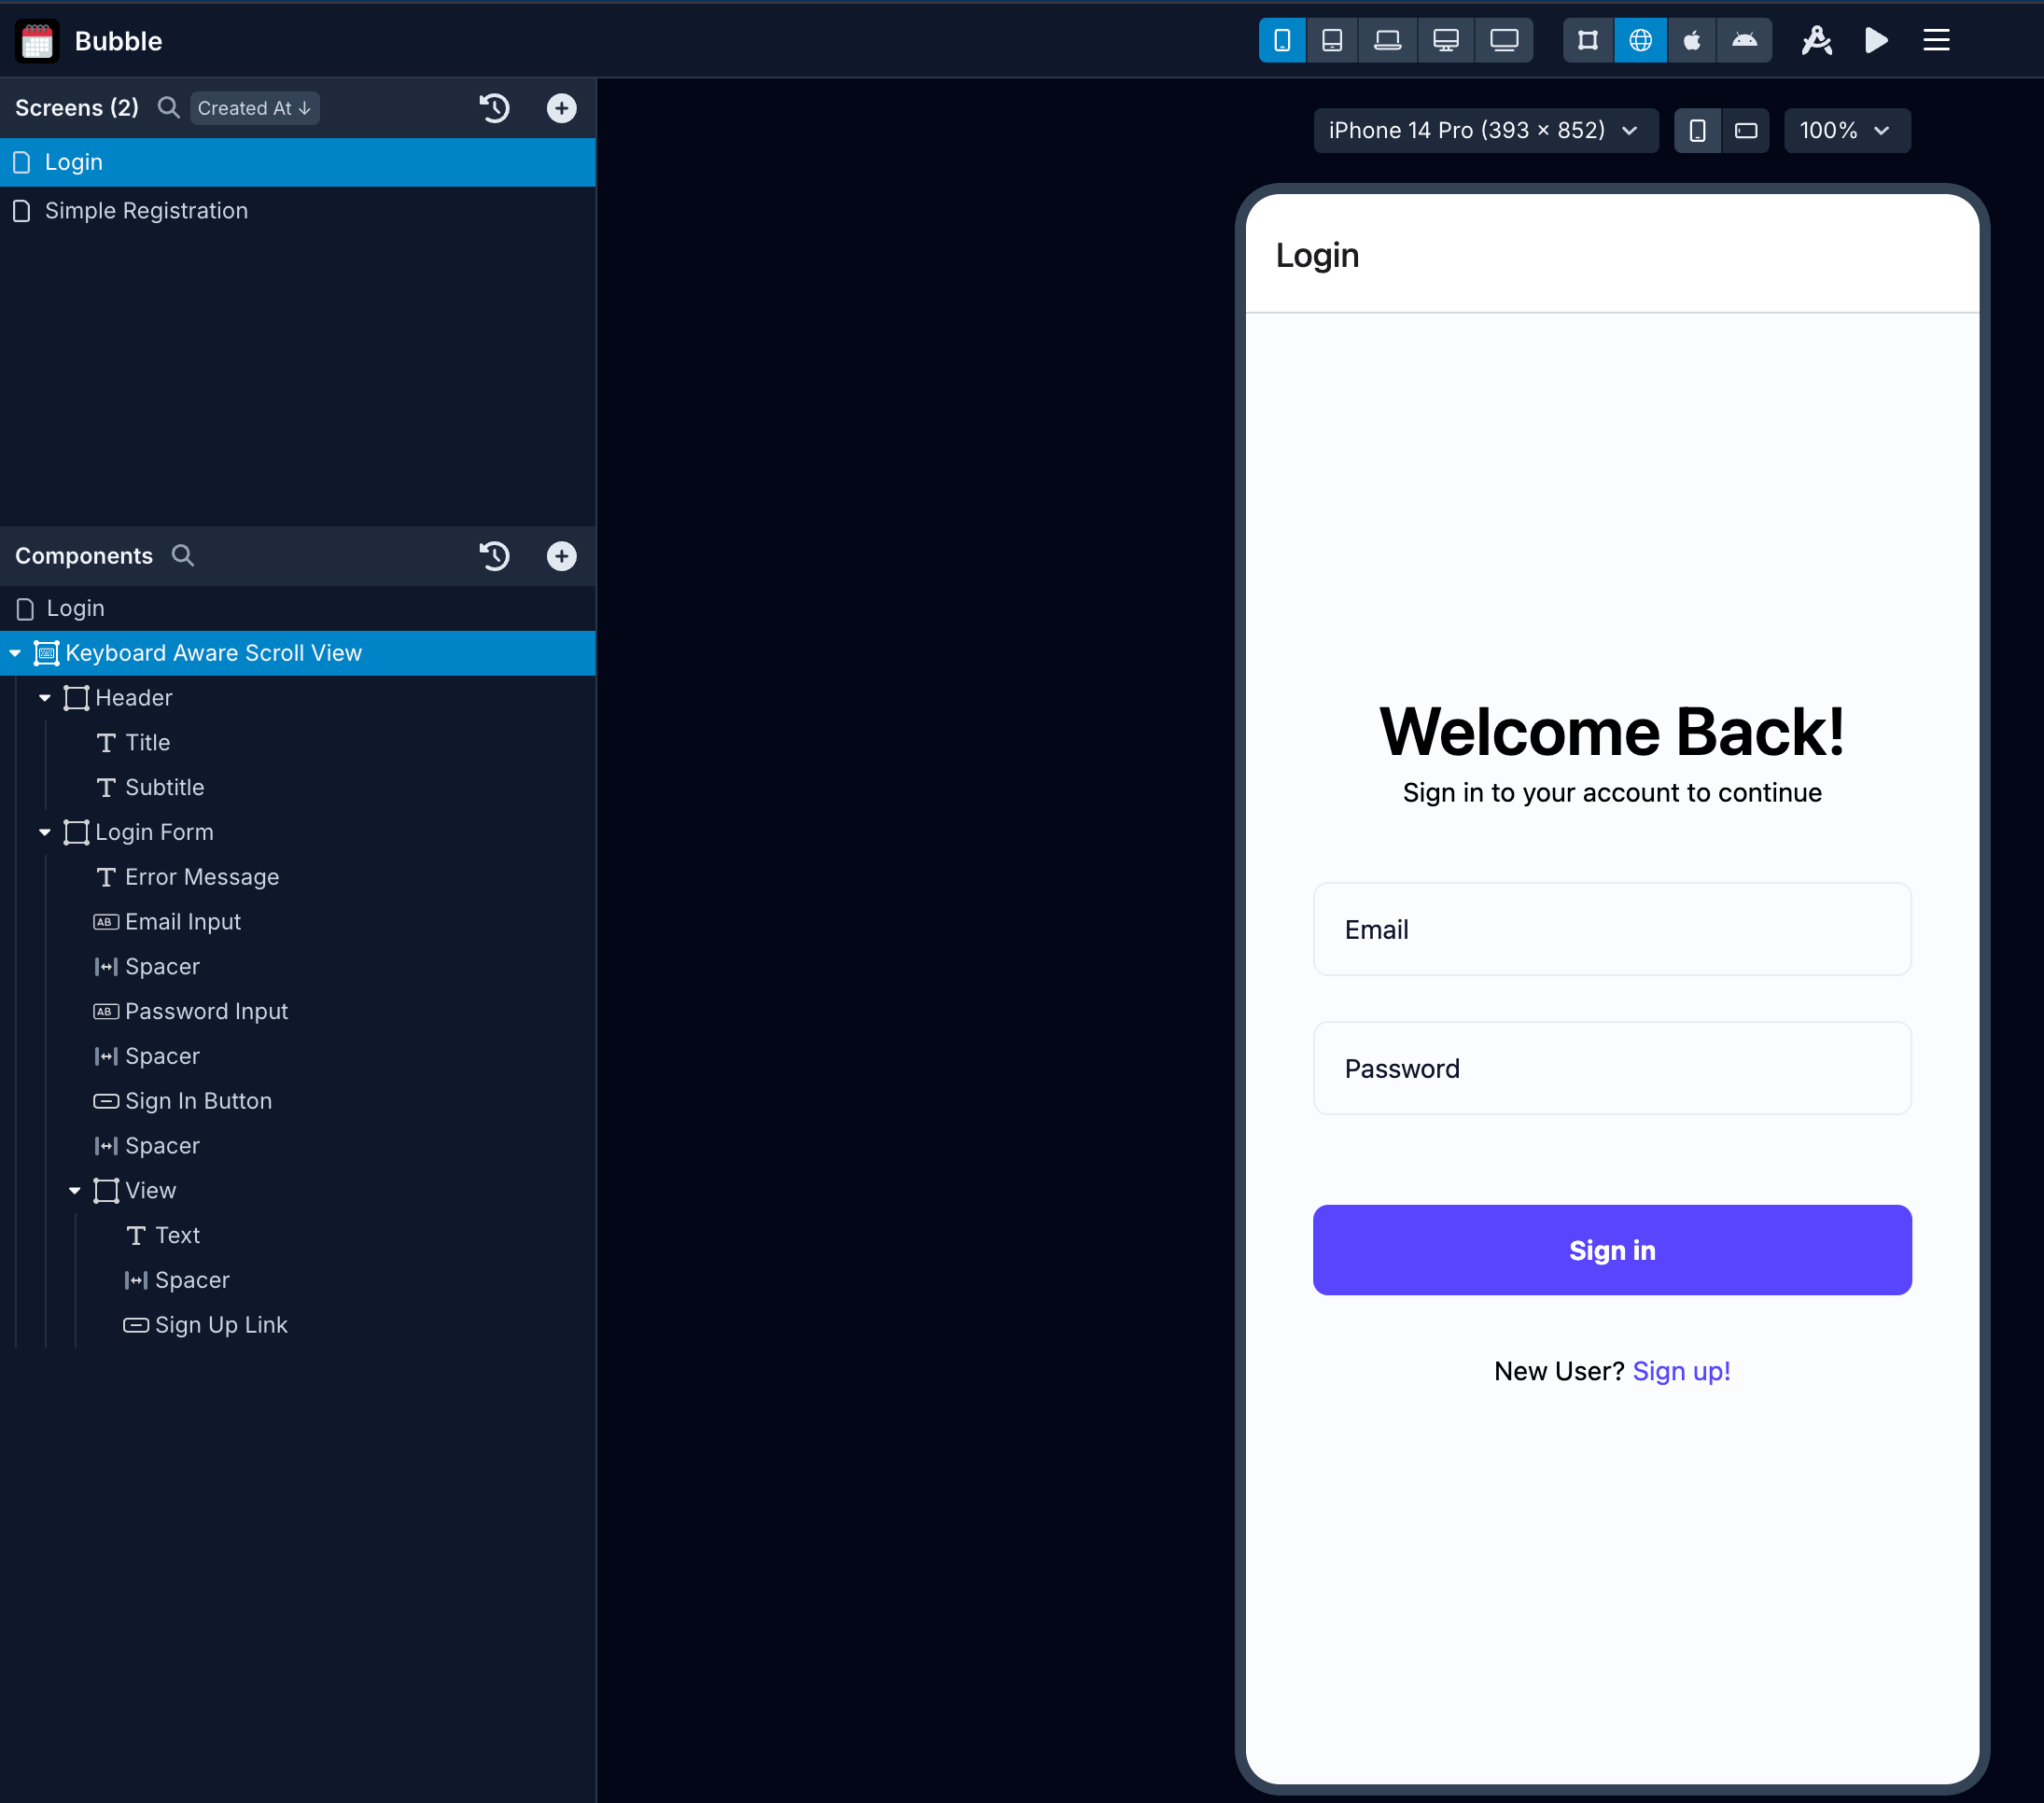
Action Workflow
When sending an API request to log in a user using the endpoint created in the earlier step, you will need to stack the following actions on a Button/Touchable.
Following actions will be stacked on the Login screen.
- To add an action, select the Button/Touchable component from the Components tree.
- Then, in the Properties Panel, go to the Interactions tab.
- Click the
OnPressbutton to open the Action Editor. - In the Action Editor, search for the actions in the left panel.
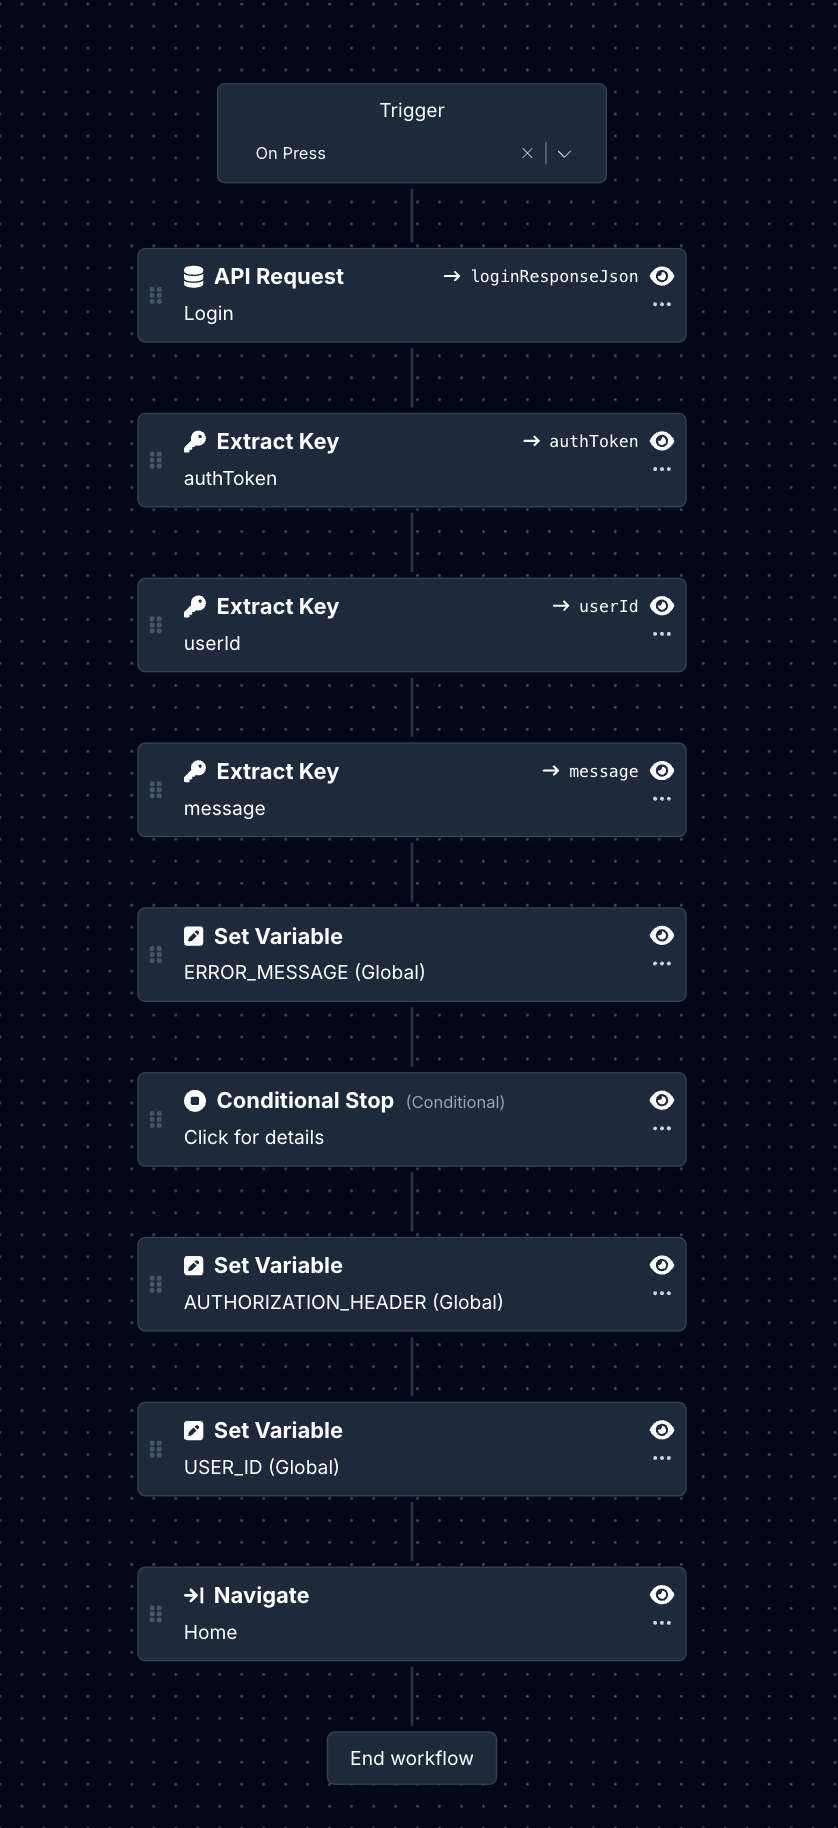
Here is the description of each action:
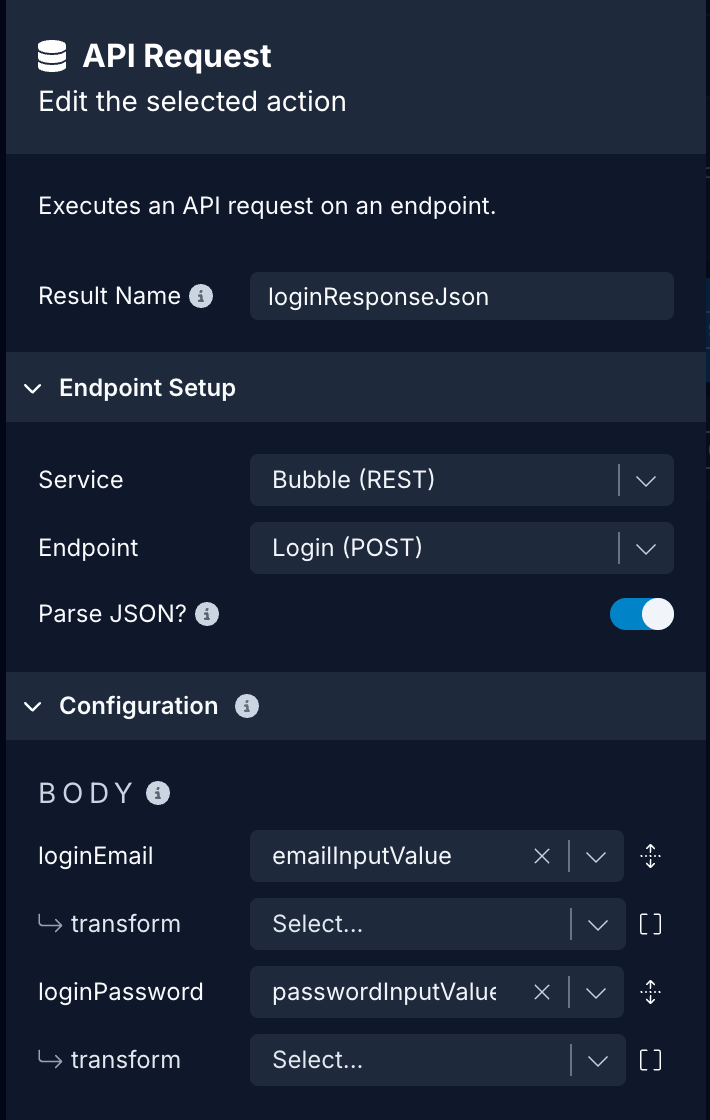
1. API Request
API Request is used to send the POST request to the endpoint /wf/login. It comes back with a token, user_id from the Bubble REST API service. In the action:
- Select the Service name.
- Select the Endpoint. In this case, it's Login.
- Add a variable to store the Result Name. The variable assigned here will enable it to be used by subsequent actions. For example, the variable name here assigned is
loginResponseJson. - In the Body, select the appropriate
Data Sourceproperty for each variable defined in the Body when setting up the endpoint, from the dropdown menu.
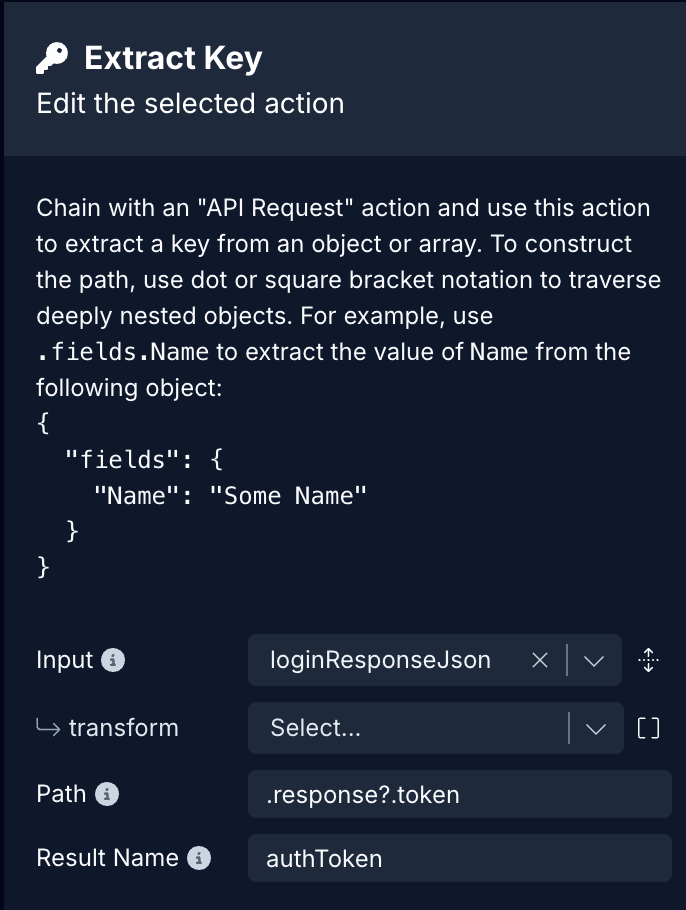
2. Extract Key:authToken
Using the loginResponseJson value from the previous action, let's extract the authToken. In the action:
- Select the value of the Input to be Result Name of the previous action.
- Add the Path value:
.response?.token. - Add the Result Name:
authToken.
3. Extract Key:userId
Using the loginResponseJson, let's extract the userId. In the action:
- Select the value of the Input to be Result Name of the previous action.
- Add the Path value:
.response?.user_id. - Add the Result Name:
userId.

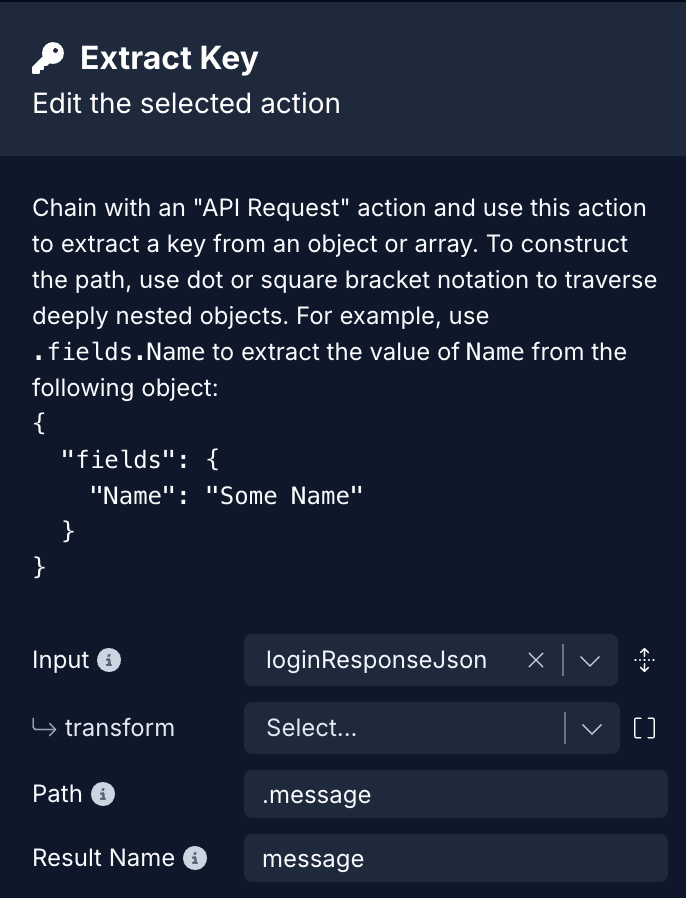
4. Extract Key: error message
In the action:
- Select the value of the Input to be Result Name of the previous action. For example,
loginResponseJson. - Add the Path value:
.message. - Add the Result Name:
message.
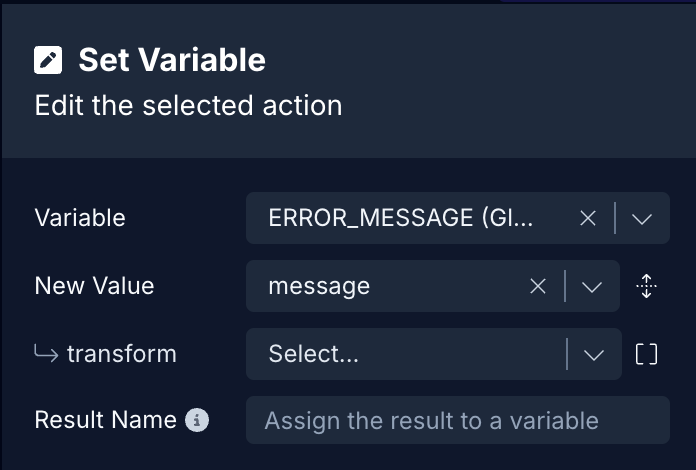
5. Set Variable: Error Message
In the action:
- In the Variable, select the Global Variable assigned for Error Message from the dropdown menu.
- In the Value, select the Action Result
messageextracted from the previous action.
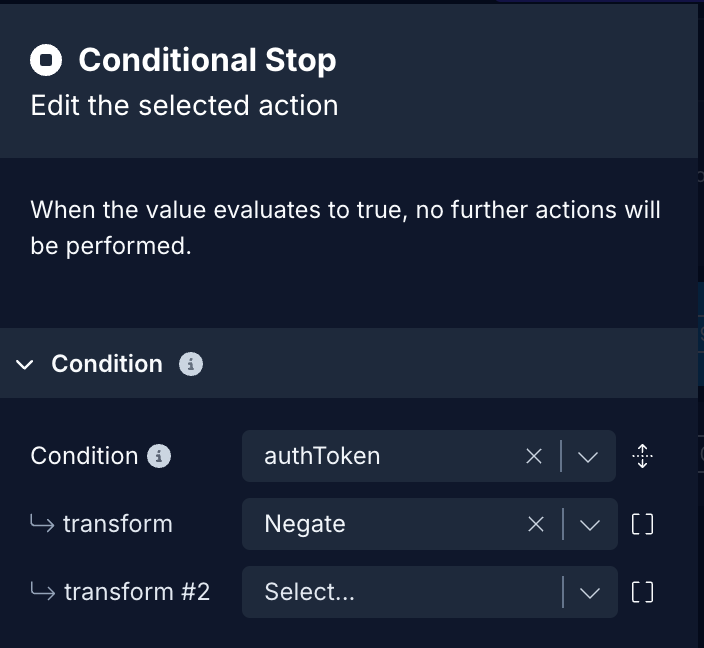
6. Conditional Stop
This action will stop the execution of any actions defined after it. It will check if the authToken value is present or not and if not, the action will stop the execution. Useful to implement after handling errors. In the action:
- In Check value, select
authTokenfrom the dropdown and a transform functionnegate.
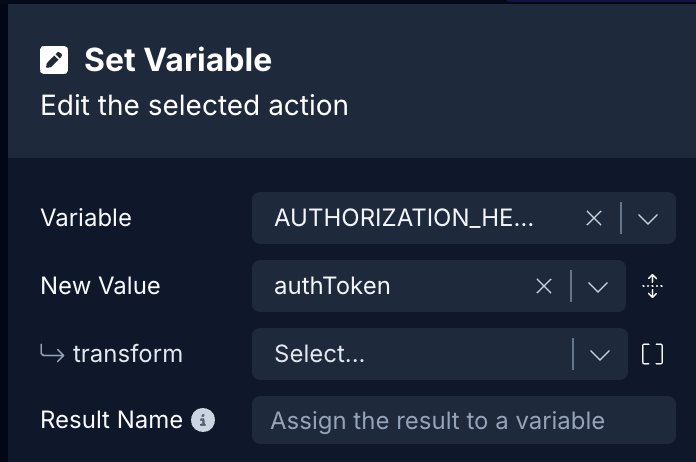
7. Set Variable: Authorization Header
In the action:
- In the Variable, select the Global Variable assigned for Auth Token from the dropdown menu.
- In the Value, select the Action Result
authTokenextracted from the previous action.
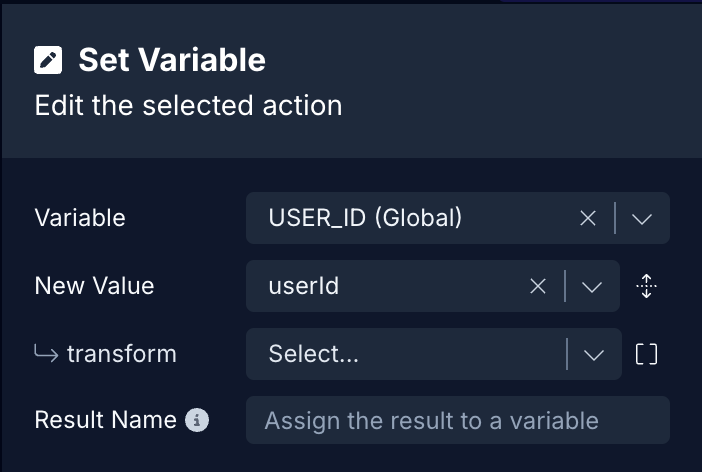
8. Set Variable: User Id
In the action:
- In the Variable, select the Global Variable assigned for User Id from the dropdown menu.
- In the Value, select the Action Result
userIdextracted from the previous action. We will use this value of theobjectIdin the Home screen to fetch the authenticated user's data from the Bubble'sUserdata table. It will be passed as a query parameter.
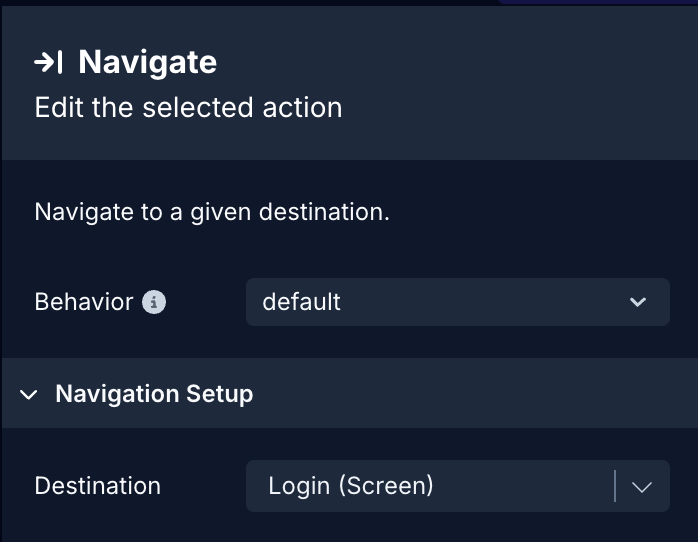
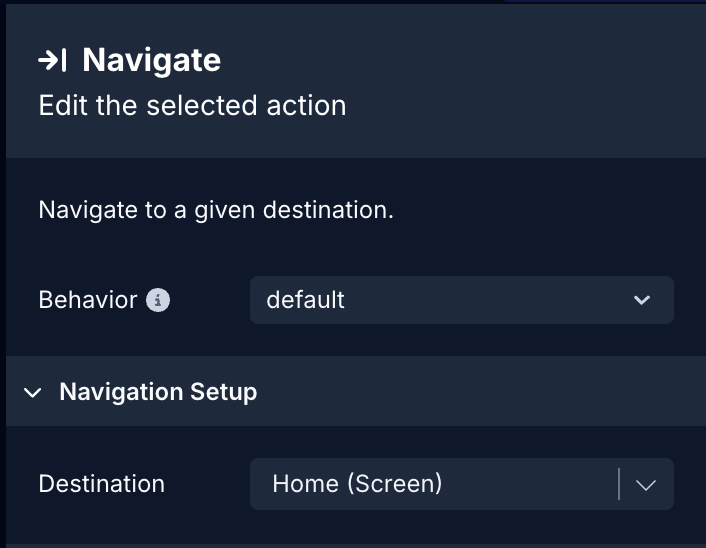
9. Navigate
This action helps an authenticated user (when the API request is successful) to navigate to a screen that is only visible to authenticated users (for example, a Home screen). In the action:
- In Destination, select the screen name from the dropdown menu.
Authenticated API Requests: Fetching Logged-in User's Data
Authenticated API requests are those requests where your app sends a unique identifier to fetch the data from the REST API's database. In Bubble, to fetch a logged-in user's data, you will have to make an API request on the Fetch component. The component will require the userId and api_token as query parameters. The value of both query parameters is stored in Global Variables on successful login.
To implement the login process with Bubble REST API service, you need to add the endpoint /wf/login.
- Click Add Endpoint.
- In Step 1: enter a name for the endpoint and select the Method to
GET. - In Step 2: enter the path as:
/obj/user/{USERID}.This will automatically create a variable nameduserIdin the Variables section below. - In the Query Parameters section, add
api_tokenas a parameter and update the corresponding variable name as desired. In this example, we renamed it totoken. This will create another variable in the Variables section below. - To verify and save the endpoint, you will have to enter a test value for both
userIdandtoken. You can find these test values when creating a Login endpoint. - In Step 4: click the button Test. On success, it will return with the status of
successand a response body that contains thetoken. - Click Save.
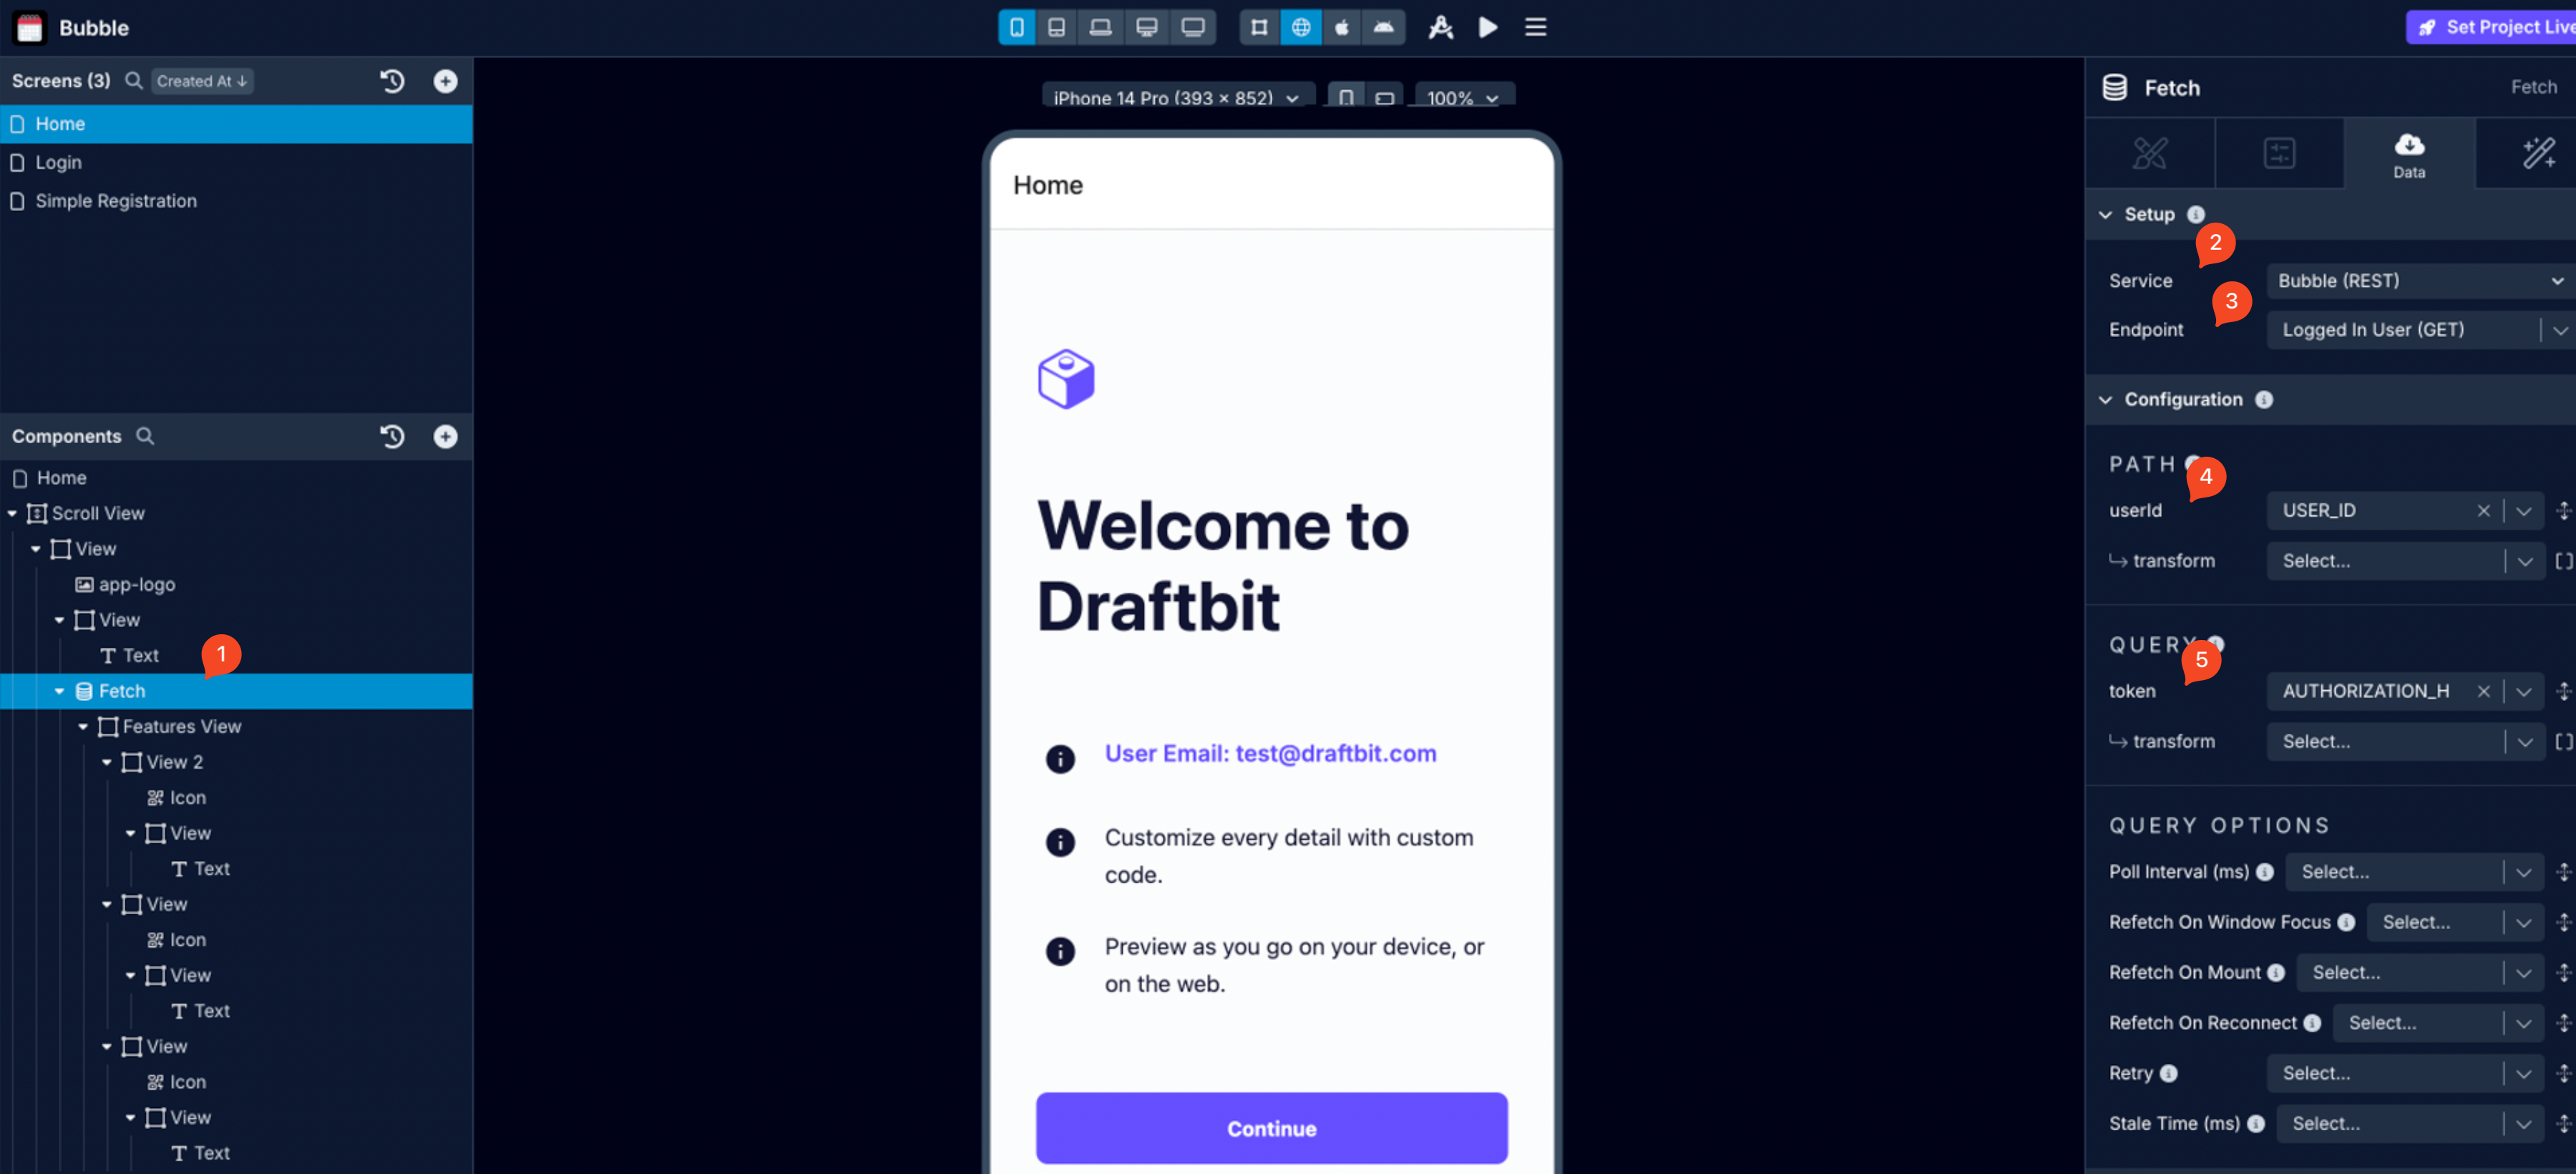
In the example below, an API request of method type GET is constructed to get the logged-in user's data.
Using the Fetch component on the logged-in screen the above endpoint can be used to display the information.
- Select the Fetch component from the Components tree.
- In the Properties Panel of the Fetch component, select the Service name and then select the Endpoint to fetch the user's data.
- Then in the URL Structure, for the value of
userIdandtoken, select the Global Variables from the dropdown menu for corresponding parameters.
Here is an example of a user logging into the app. After being logged in, their data from the Bubble's User table is displayed on the screen.
Logout
To implement the logout process with Bubble REST API service, you need to add the endpoint: wf/logout?api_token={{token}}.
- Click Add Endpoint.
- In Step 1: enter a name for the endpoint and select the Method to
GET. - In Step 2: enter the base name as path:
wf/logout?api_token={{token}}. - To verify and save the endpoint, you will have to enter a test value
token. You can find these test values when creating a Login endpoint. - In Step 5: click the button Test and click Save.
When sending an API request to log out a user using the endpoint created in the earlier step, you will need to stack the following actions on a Button/Touchable.
Action Workflow
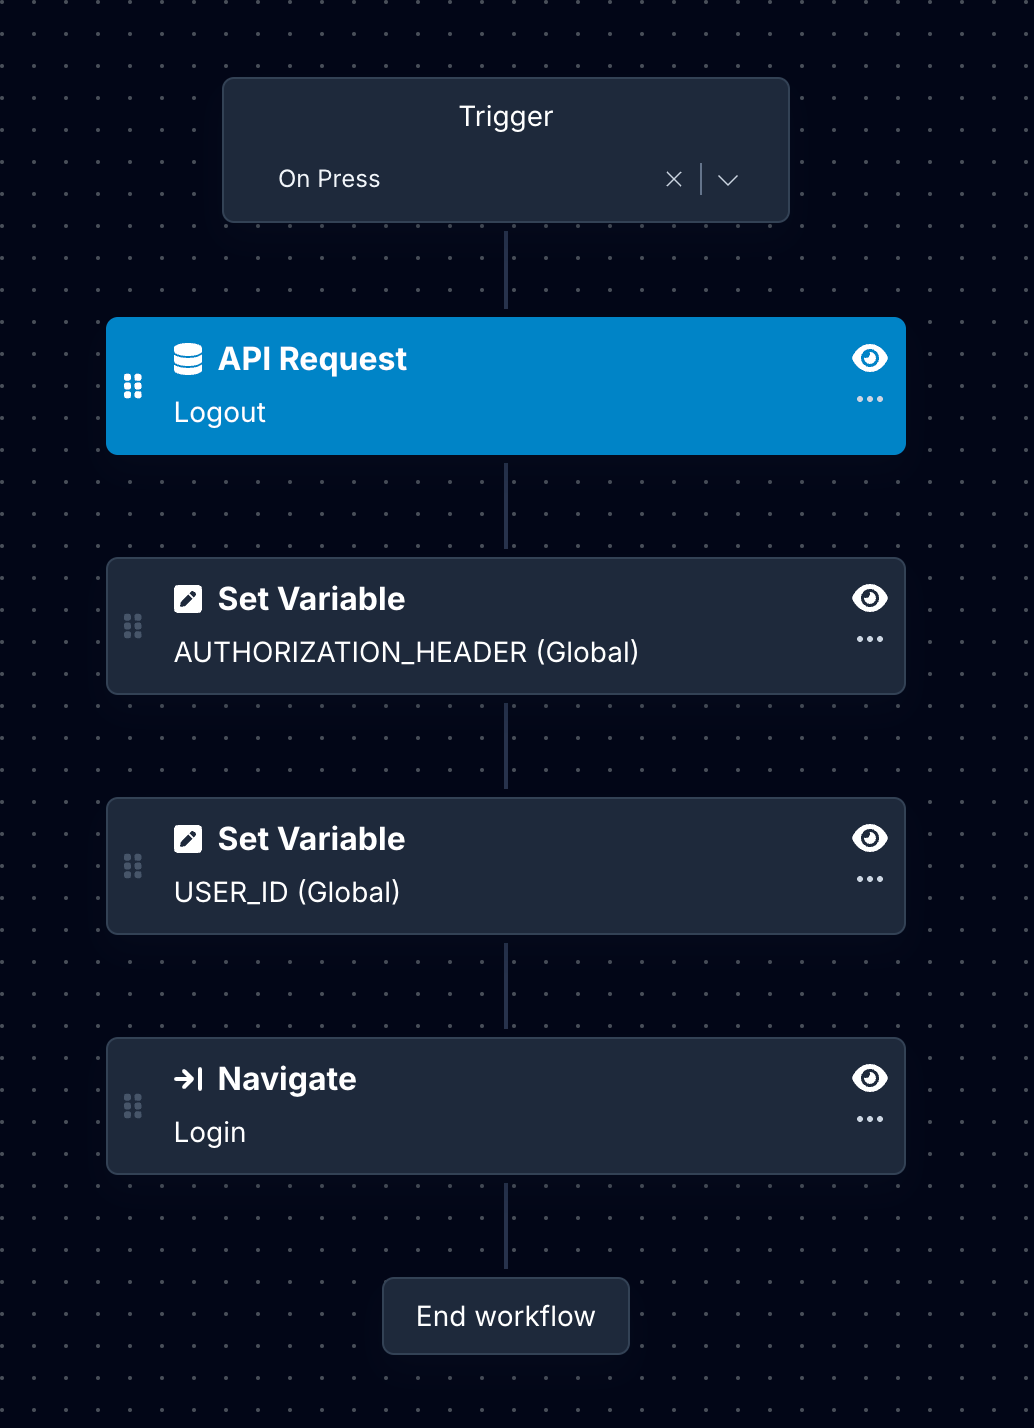
Following actions will be stacked on the Logout Button.
- To add an action, select the Button/Touchable component from the Components tree.
- Then, in the Properties Panel, go to the Interactions tab.
- Click the
OnPresstrigger button to open the Action Editor. - In the Action Editor, search for the actions in the left panel.
Here is the description of each action:
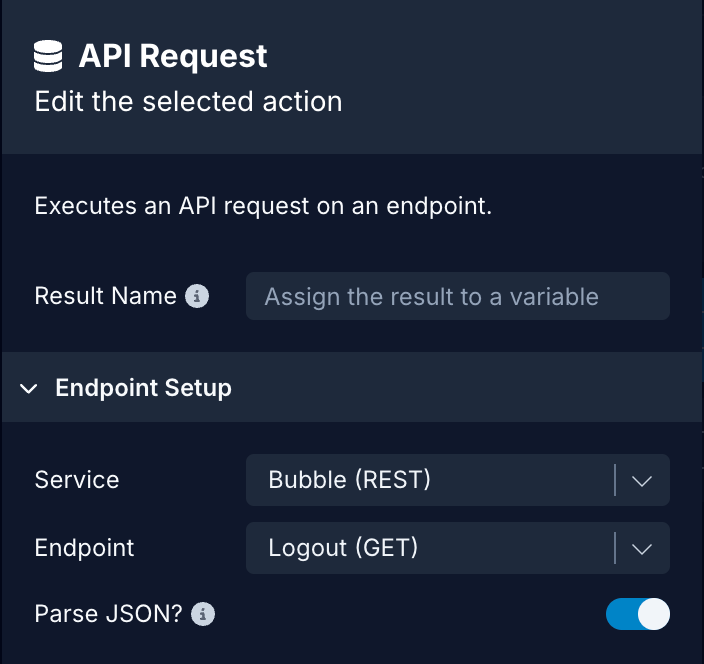
1. API Request
API Request is used to send the POST request to the endpoint wf/logout?api_token={{token}}. In the action:
- Select the Service name.
- Select the Endpoint. In this case, it's Logout.
- In the Body, select the appropriate
Data Sourceproperty for each variable defined in the Body when setting up the endpoint, from the dropdown menu.
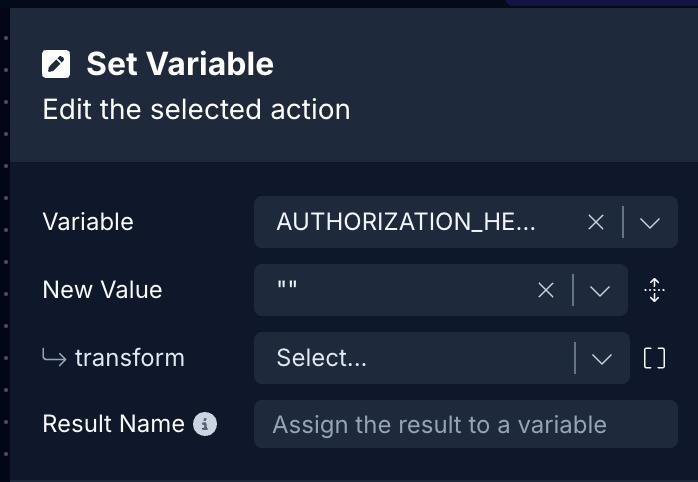
2: Set Variable: Token
In the action:
- In the Variable, select the Global Variable assigned for
tokenfrom the dropdown menu. - In the Value, add an empty string
"".
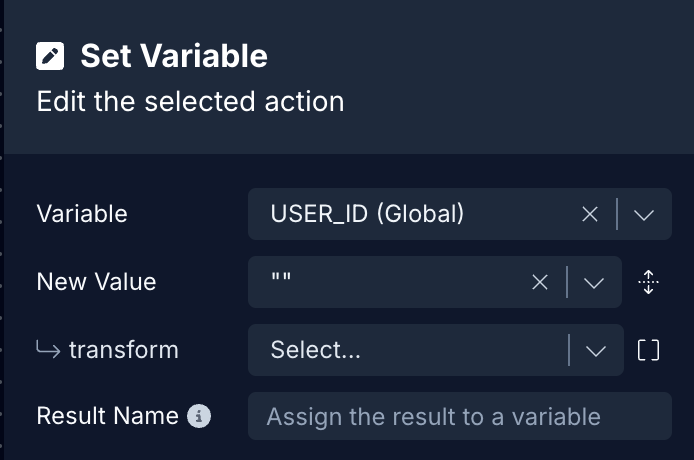
3: Set Variable: User ID
In the action:
- In the Variable, select the Global Variable assigned for
userIdfrom the dropdown menu. - In the Value, add an empty string
"".
4. Navigate
This action redirects the user (when the API request is successful) to navigate to a screen that is only visible to non-authenticated users (for example, a Login screen). In the action:
- In Destination, select the screen name from the dropdown menu.

