
Backendless
Authentication is the way for the backend to handle app user registration and login and allows them access to certain areas or endpoints of the app. The process of authenticating a user typically needs the following steps in a mobile app:
- Sign Up: Provide a form for a user to enter credentials to create a new account.
- Log In: Provide a form for a user to enter credentials to authenticate their identity and login into the app.
- Save the Authentication Token when a user's credential verifies with the backend service. Authentication Token is received as a response from the REST API service and is used to make authenticated API requests.
- Log Out: An action to reset authentication and return the client to an unauthenticated state.
Implementing Authentication in a Draftbit app requires familiarity with features like Variables, Actions, Navigation Params, etc.
Learn more at what are the requirements when implementing a user authentication process in a Draftbit app at Intro to Authentication.
To create a Backendless REST service, please go through the REST API Integration documentation.
Dev & Prod URLSThe Base URL parameter has been updated to give you the ability to set separate base URLs for Development and Production. When you publish your app, you can set which base URL to use, Dev or Prod. Read more about Environments
Backendless provides a User Registration API that creates a user account in your application. A registration request must provide a user object as a collection of key/value properties.
The collection must have one property marked as identity to identify the primary field for the authentication. For example, in the collection representation below, email is marked as identity.

When defining up Global Variables, make sure to define the following:
ERROR_MESSAGE: To handle and display error messages on form screens. Define it as an App Variable.USER_TOKEN: To obtain and save the value ofuser-tokenfrom Backendless. This identifies the user session initiated by the Login operation in Backendless. Define it as a Device Variable.USER_OBJECT_ID: To obtain and save the value ofobjectIdfrom Backendless. This is a unique identifier assigned by Backendless to the user account. Define it as a Device Variable.
Note: Both user-token and objectId are required to update for updating a user in the Backendless database.
Before implementing endpoints for authentication (from the sections below), refer to the documentation on how to add Global Variables for saving the auth token and error messages
Sign up
To implement the signup process with the Backendless REST API service, you need to add the endpoint:
/users/registerOpen the Backendless service you have previously created and follow the steps below to add the endpoint:
- Click Add Endpoint.
- In Step 1: enter a name for the endpoint and select the Method to
POST. - In Step 2: enter the base url as the Dev URL or Prod URL:
/users/register. - In Step 3: define the structure of the Body object that will be sent through the
POSTrequest. It's a JSON object that requires a key and a value. There are built-in user properties in the Backendless collection, such asemail,nameandpassword. For the sign-up route, here is how we have defined the body structure for thisPOSTrequest:
{
  "name": {{signupName}},
  "email": {{signupEmail}},
  "password": {{signupPassword}}
}
In the above snippet, using {{variable}} names to test the endpoint before using it in the rest of the app. You can provide test values for each of the {{variable}}. The more fields you have while signing up a new user in your app design, the more key and value pairs you can add to the Body structure.
Once you have created the body structure, click on the Body Preview to verify if the structure you have defined is valid to be sent with the POST request or not.
- In Step 5: click the button Test. On success, the Backendless service will return an object with details related to the record.
- Click Save.
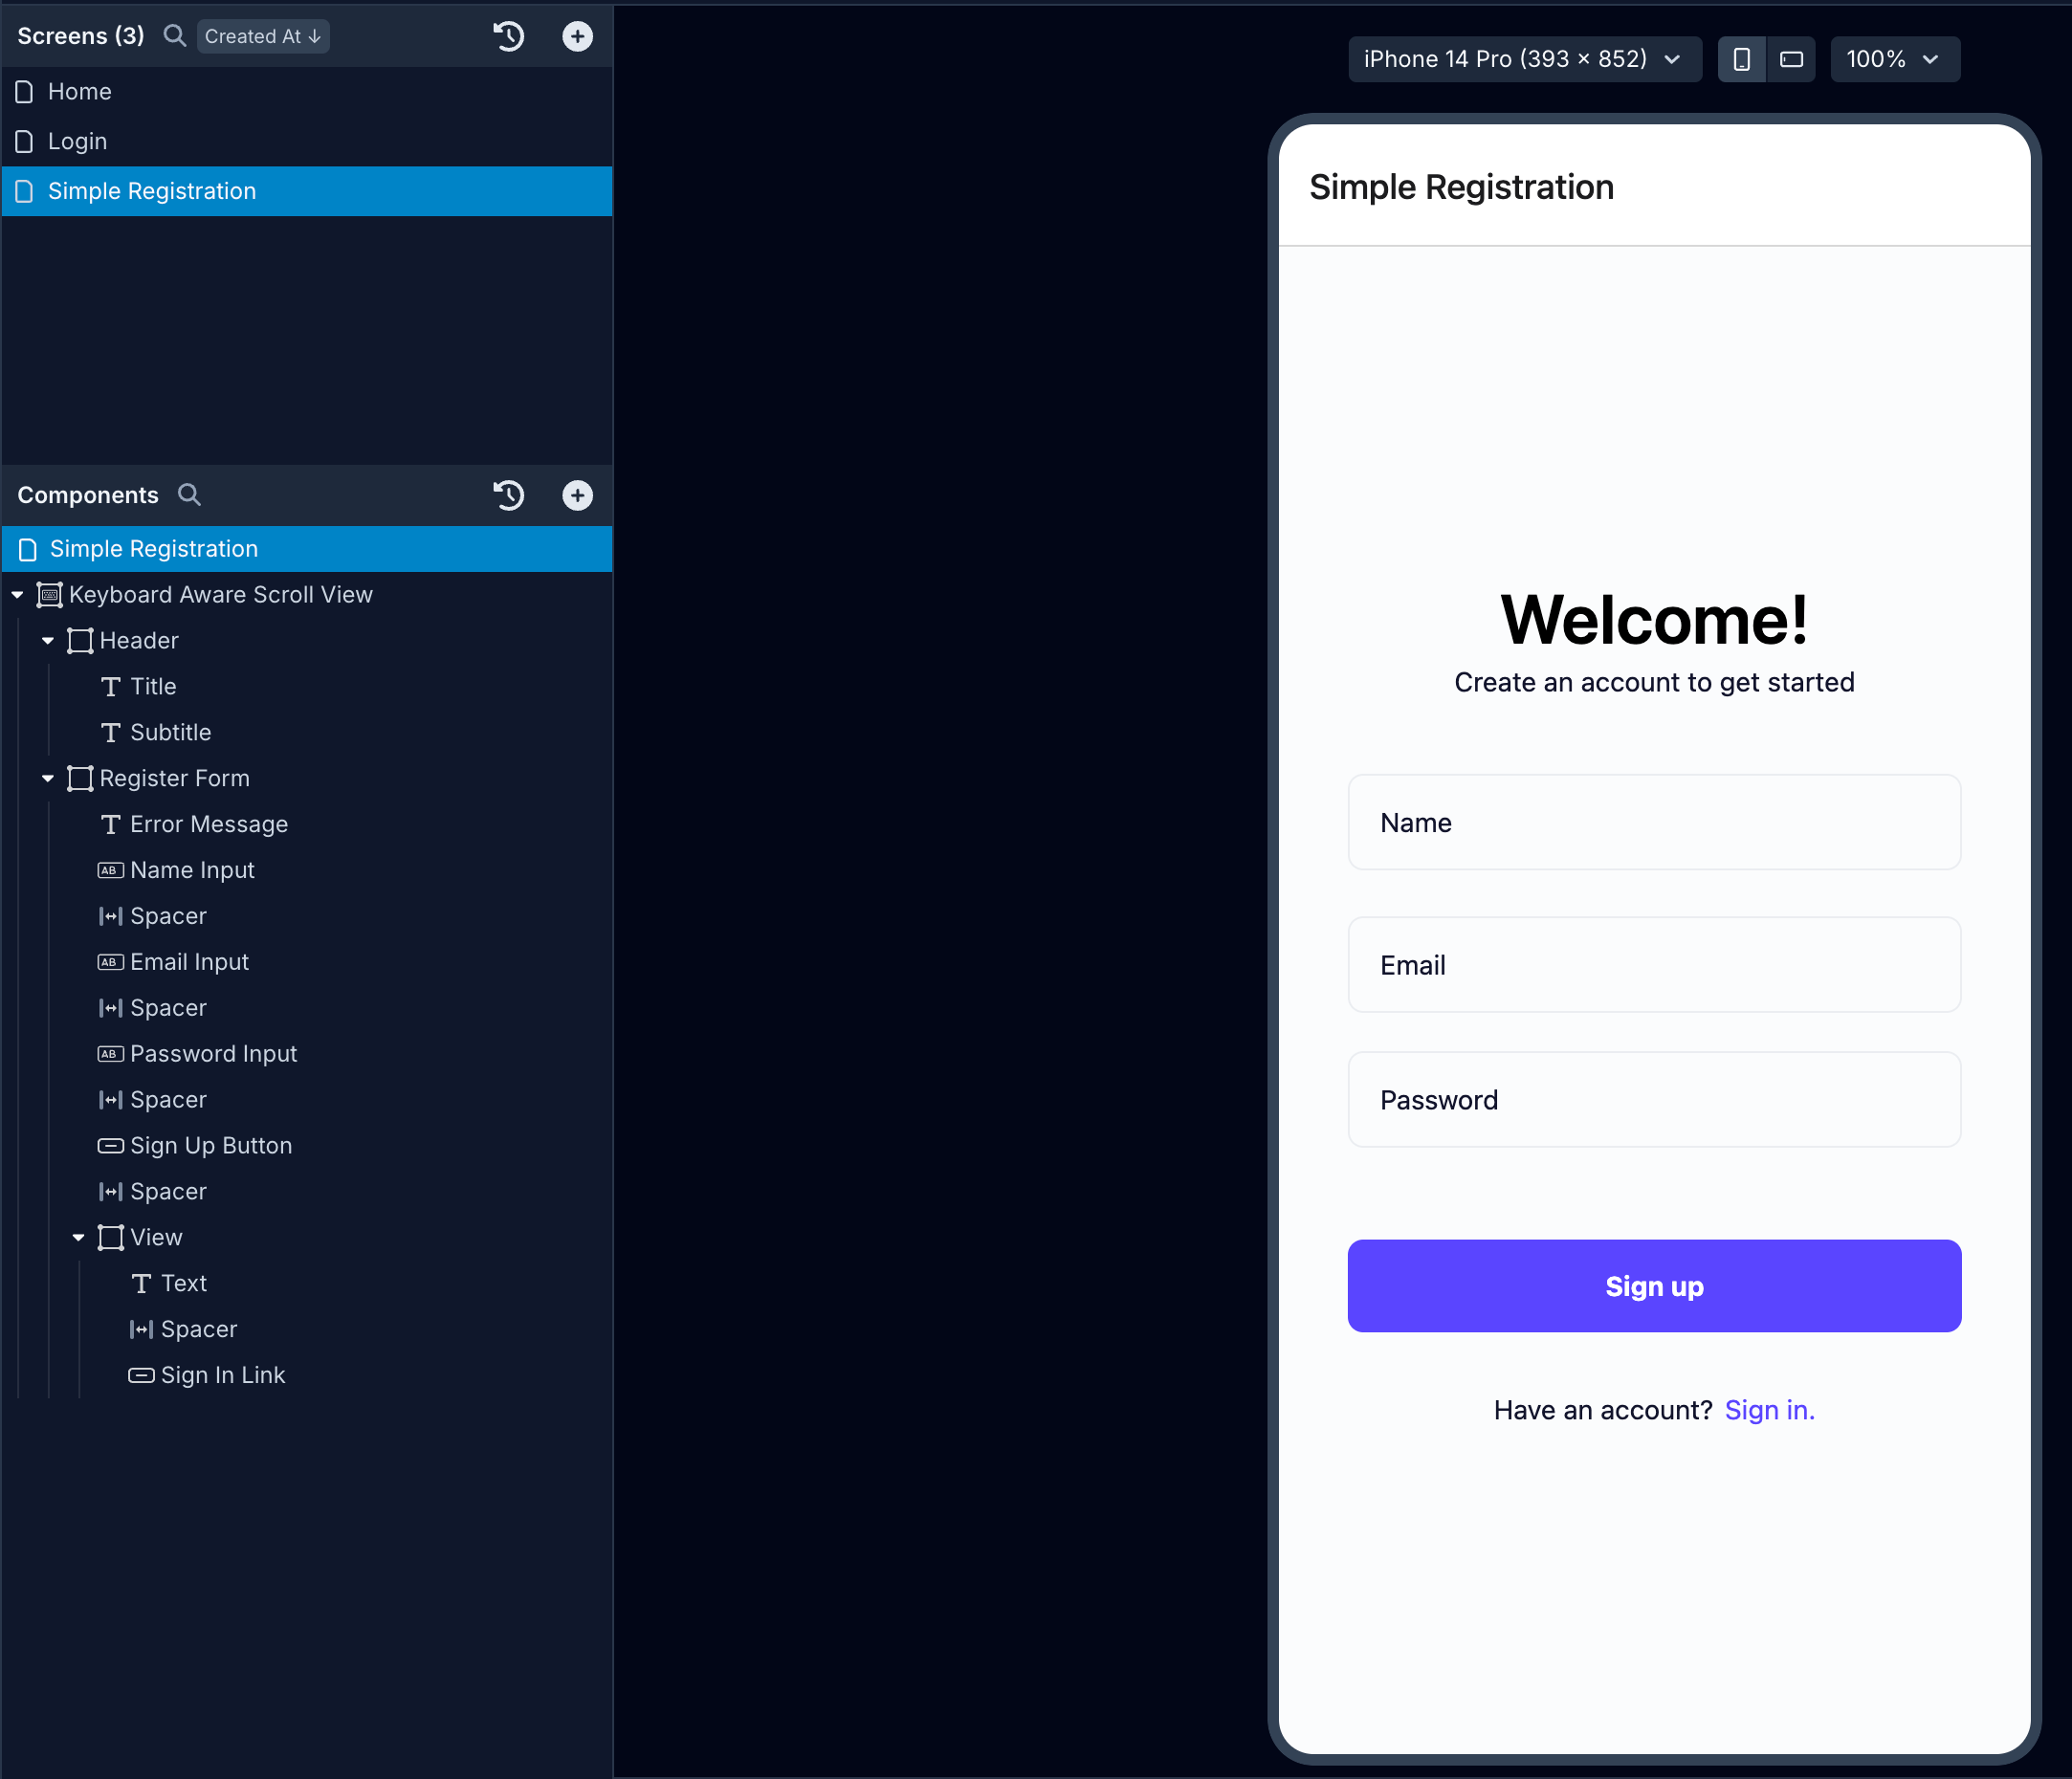
A typical Signup screen (see the image below) will have a Button/Touchable component in its Components tree to send the API request.
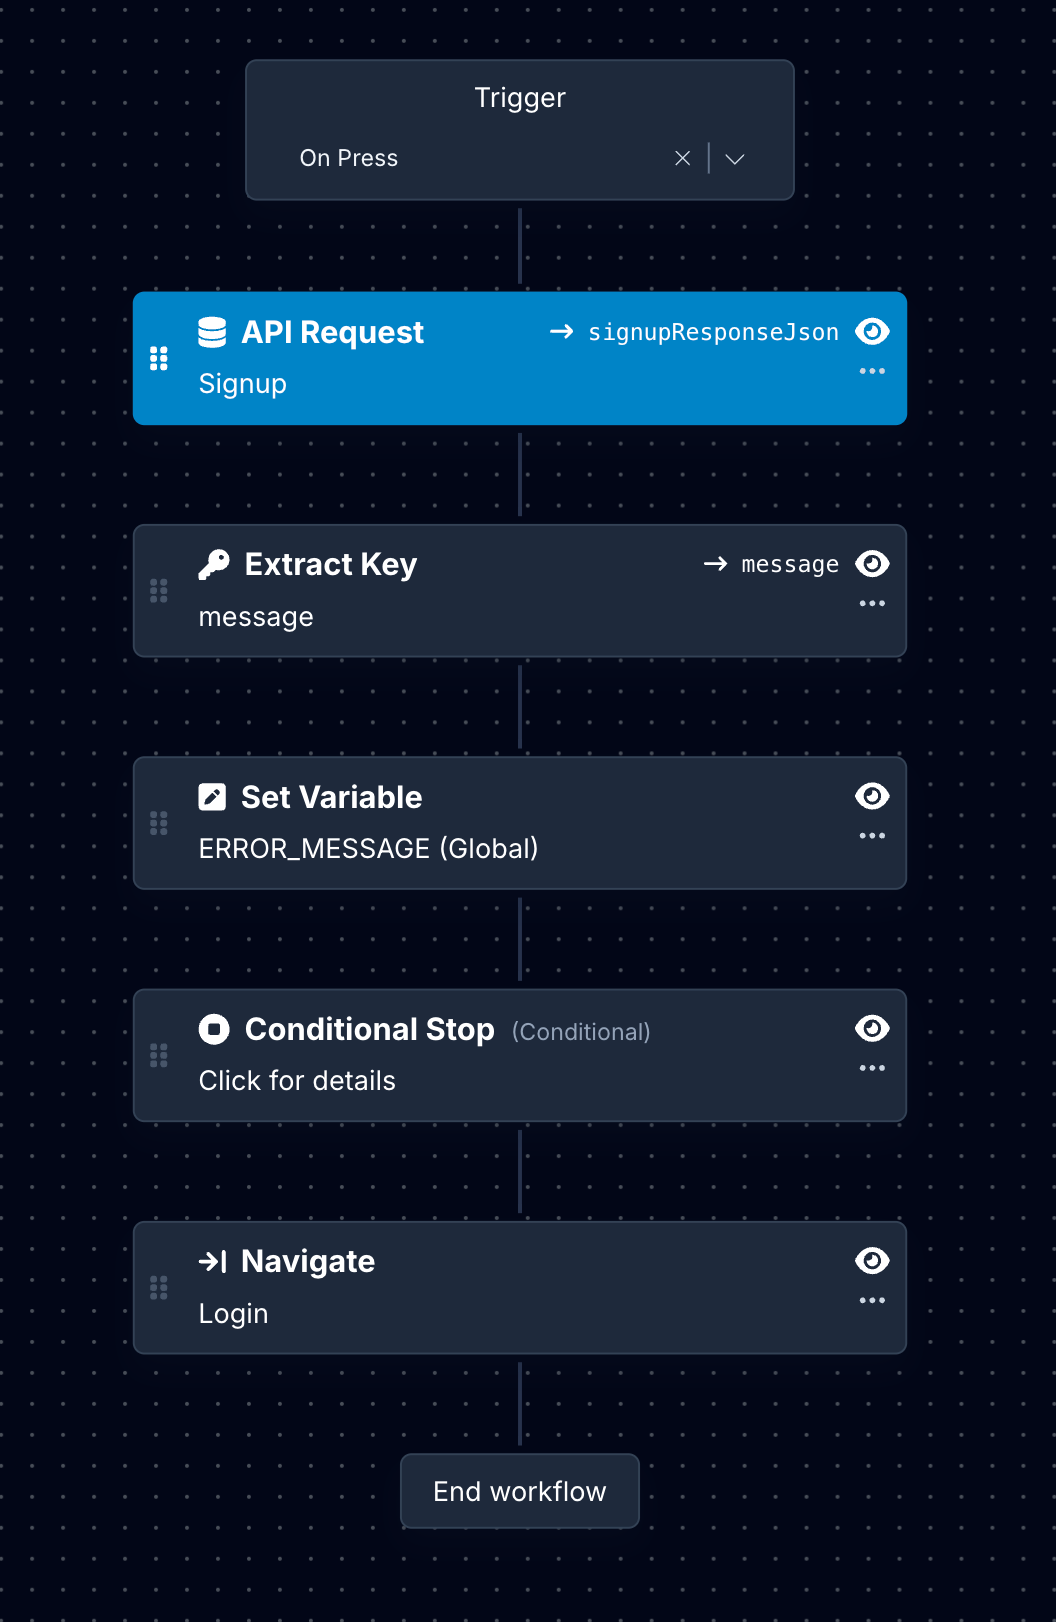
Action Workflow
When sending an API request to signup a user using the endpoint created in the previous step, you will need to stack the following actions on a Button/Touchable.
Following actions will be stacked on the Signup screen.
- To add an action, select the Button/Touchable component from the Components tree.
- Then, in the Properties Panel, go to the Interactions tab.
- Click the
OnPressbutton to open the Action Editor. - In the Action Editor, search for the actions in the left panel.
Here is the description of each action:
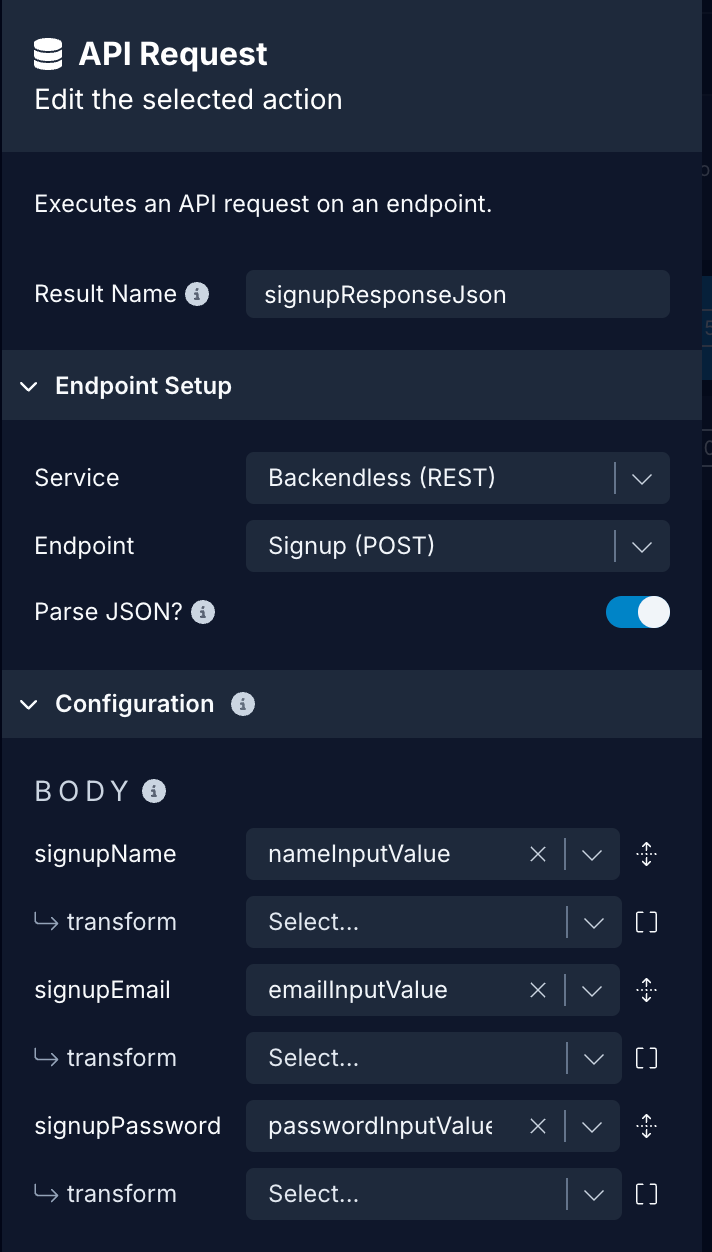
1. API Request
This API request comes back with an object in the response that contains the detail of the newly created user object.
- Select the Service name.
- Select the Endpoint. In this case, it's Signup.
- Add a variable to store the Result Name. The variable assigned here will enable it to be used by subsequent actions.
- In the Body, select the appropriate
Data Sourceproperty for each variable defined in the Body when setting up the endpoint, from the dropdown menu.
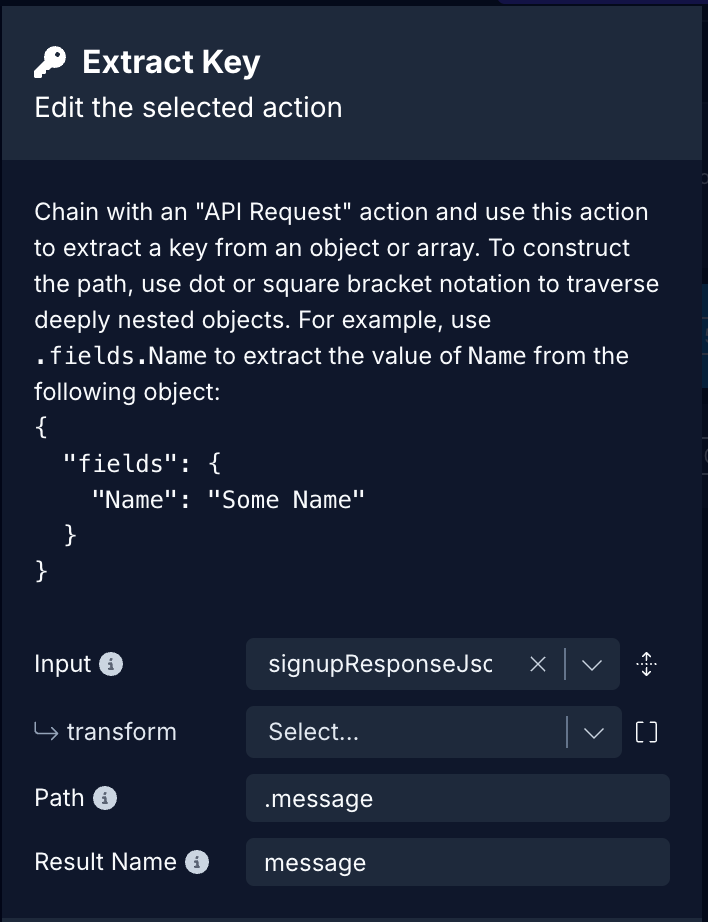
2. Extract Key: error message
In the action:
- Select the value of the Input to be Result Name of the previous action. For example,
signupResponseJson. - Add the Path value:
.message. - Add the Result Name:
message.
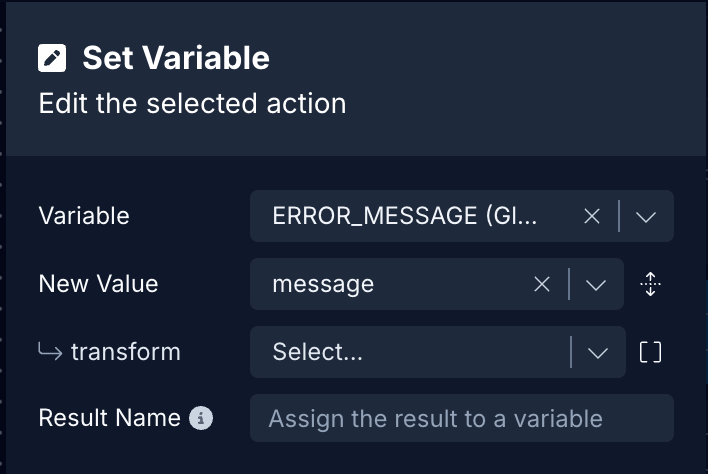
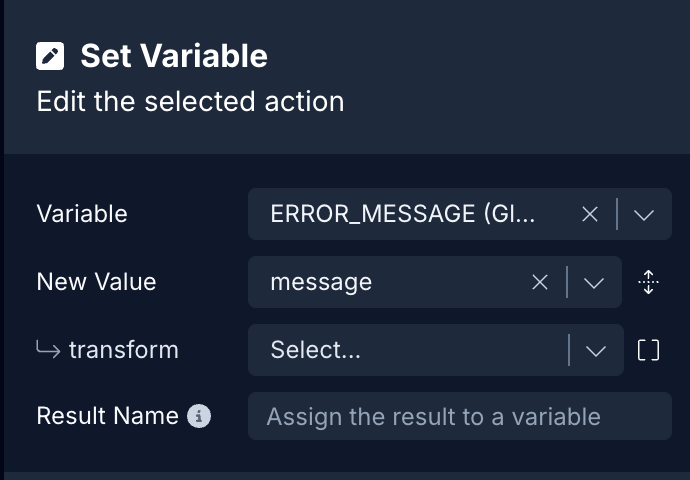
3. Set Variable: Error Message
In the action:
- In the Variable, select the Global Variable assigned for Error Message from the dropdown menu.
- In the Value, select the Action Result
messageextracted from the previous action.
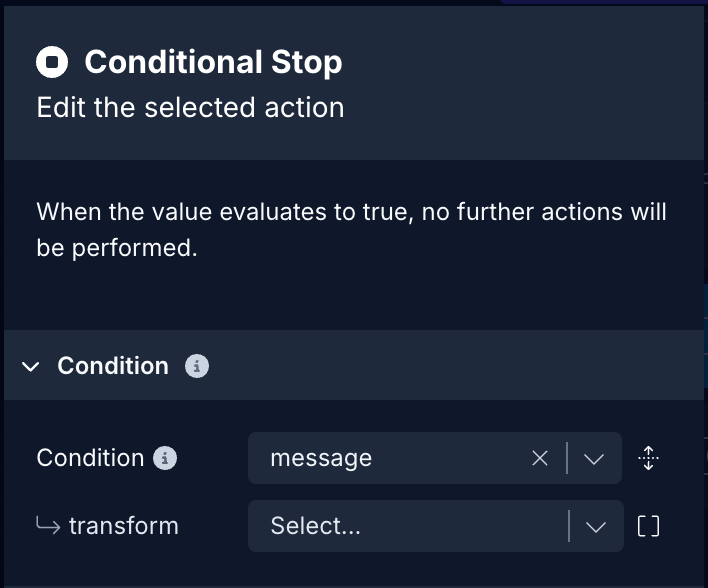
4. Conditional Stop
This action will stop the execution of any actions defined after it. It will check message field is present in the signupResponseJson. If it is, then the execution of the action will stop here. If it is not, the next action in the stack will be triggered. In the action:
- In Check value, select
messagefrom the dropdown.
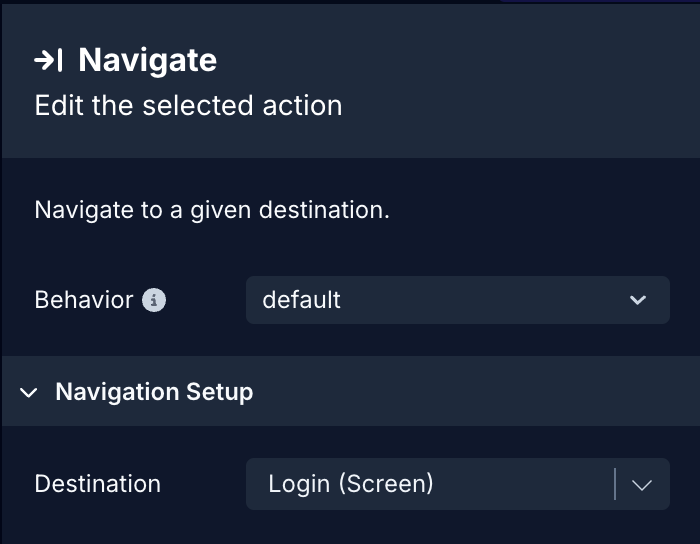
5. Navigate
This action helps to navigate to a screen for the user to enter their login credentials(for example, a Login screen). In the action:
- In Destination, select the screen name from the dropdown menu.
Log in
To implement the signup process with Backendless REST API service, you need to add the endpoint:
/users/loginOpen the Backendless service you have previously created in the Draftbit app and follow the steps below:
- Click Add Endpoint.
- In Step 1: enter a name for the endpoint and select the Method to
POST. - In Step 2: enter the base name as path:
/users/login. - In Step 3: define the structure of the Body object that will be sent through the
POSTrequest. It's a JSON object that requires a key and a value. The key should associate with the name of the field in the Backendless database. For the login route, here is how we have defined the body structure for thisPOSTrequest:
{
  "login": {{loginEmail}},
  "password": {{loginPassword}}
}
In the above snippet, using {{variable}} names to test the endpoint before using it in the rest of the app. You can provide test values for each of the {{variable}}. The more fields you have while signing up a new user in your app design, the more key and value pairs you can add to the Body structure.
Once you have created the body structure, click on the Body Preview to verify if the structure you have defined is valid to be sent with the POST request or not.
- In Step 5: click the button Test. On success, the Backendless service will return an encoded
user-token. Using the value of this token you can make the authenticated API requests. - Click Save.
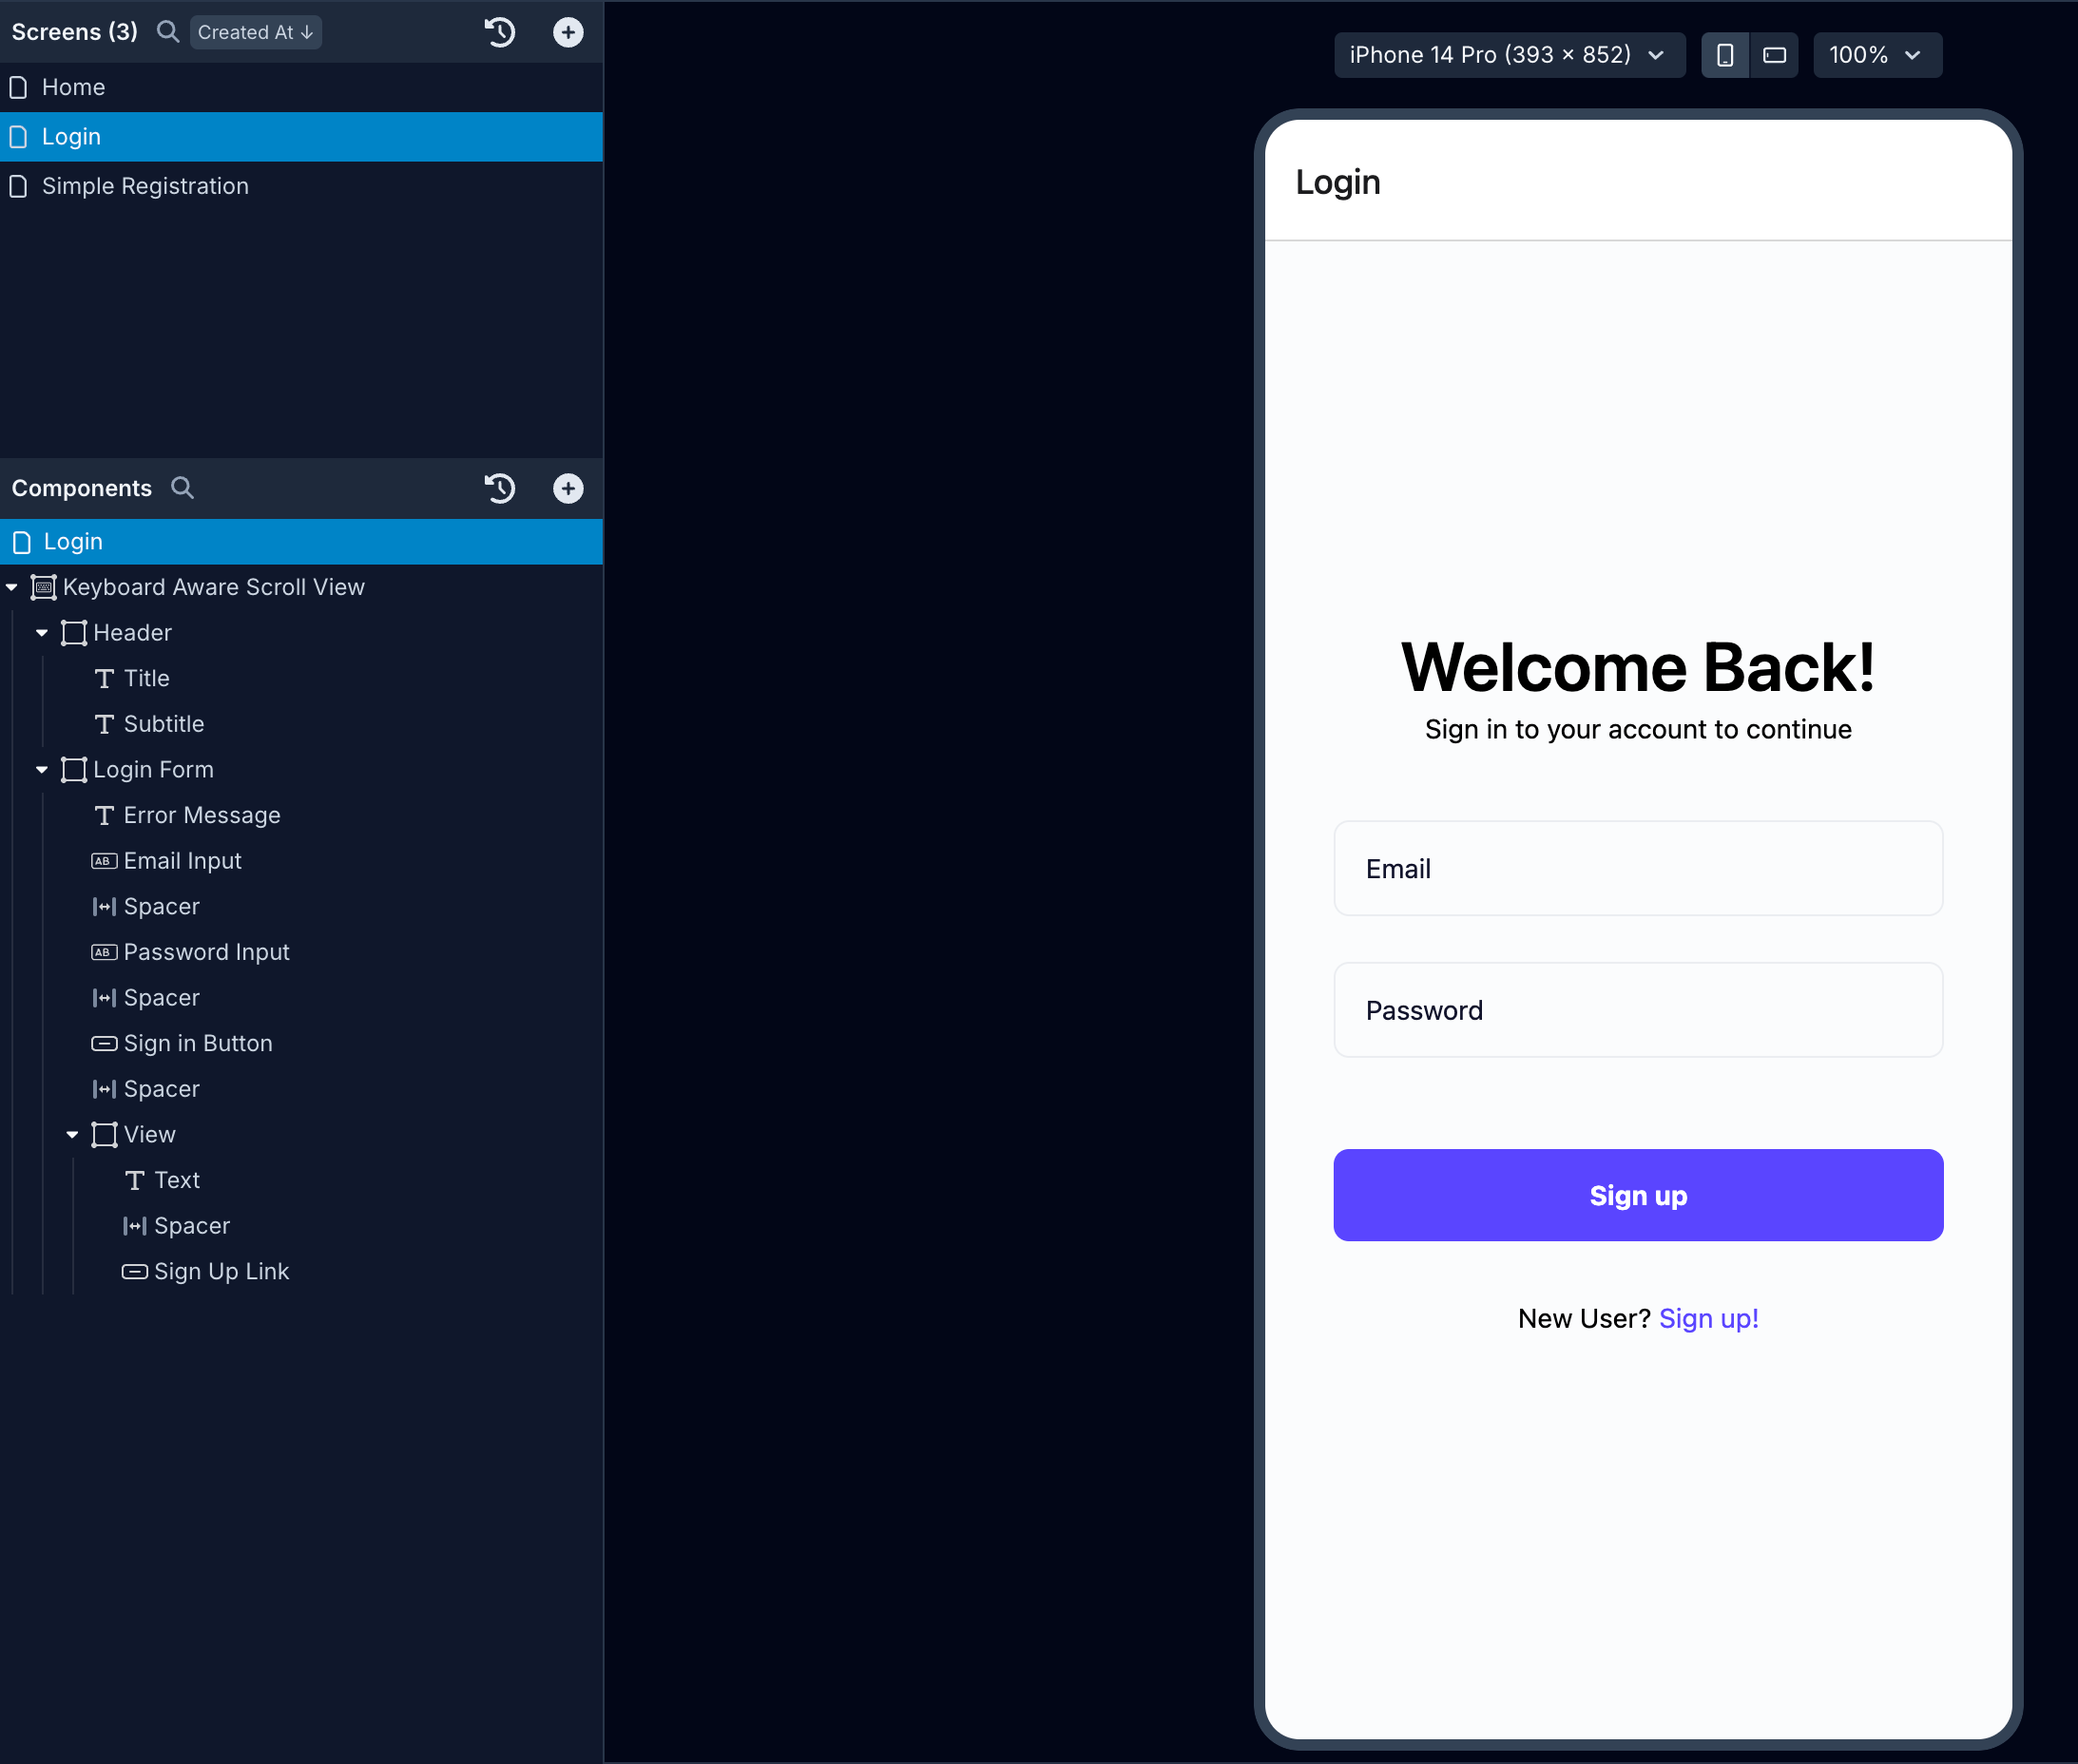
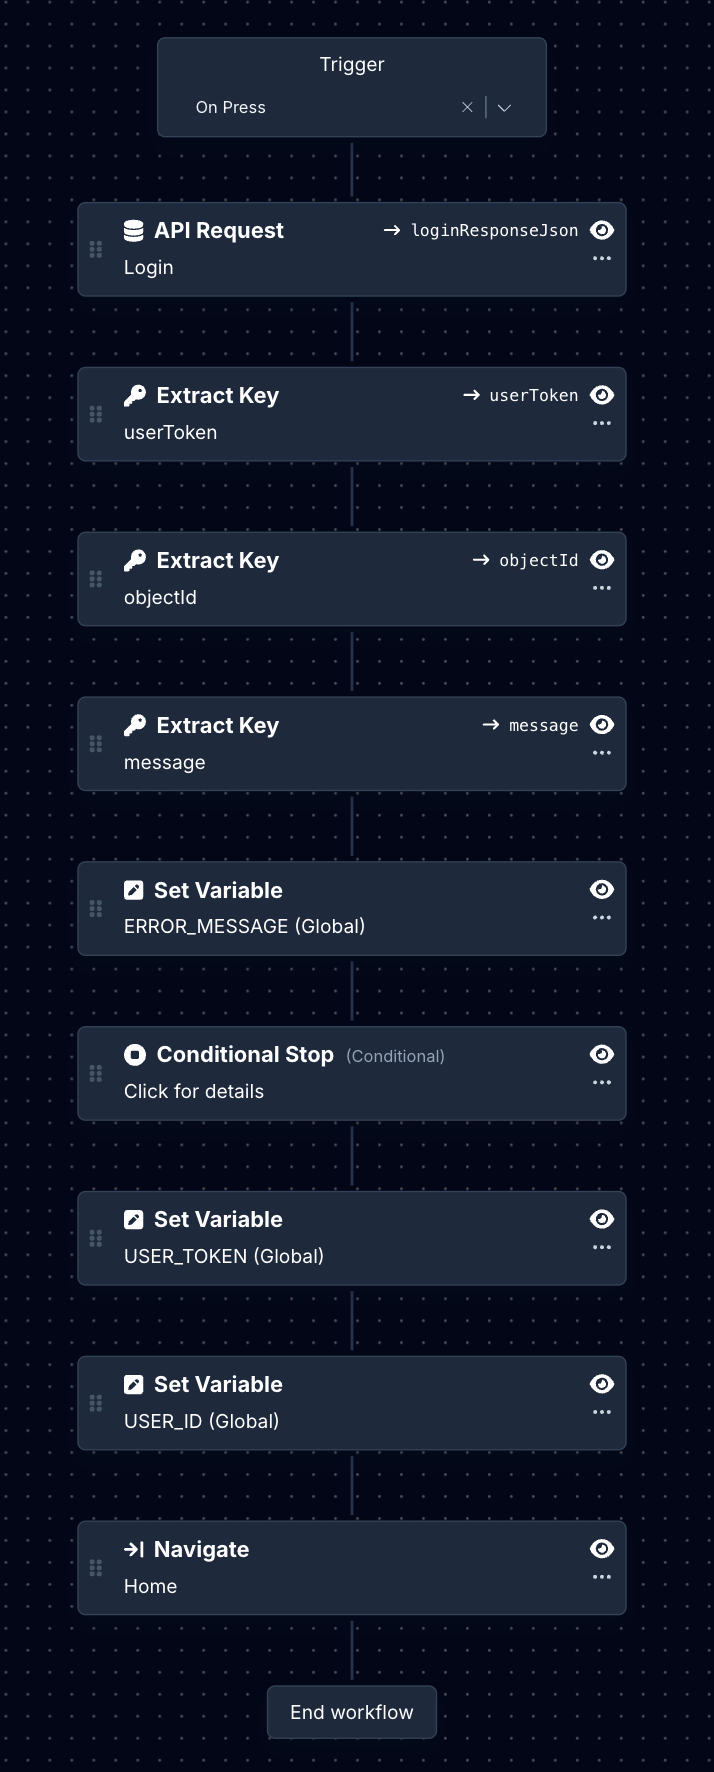
A typical Log in screen (see the image below) will have a Button/Touchable component in its Components tree to send the API request.
Action Workflow
When sending an API request to log in a user using the endpoint created in the earlier step, you will need to stack the following actions on a Button/Touchable.
Following actions will be stacked on the Login screen.
- To add an action, select the Button/Touchable component from the Components tree.
- Then, in the Properties Panel, go to the Interactions tab.
- Click the
OnPressbutton to open the Action Editor. - In the Action Editor, search for the actions in the left panel.
Here is the description of each action:
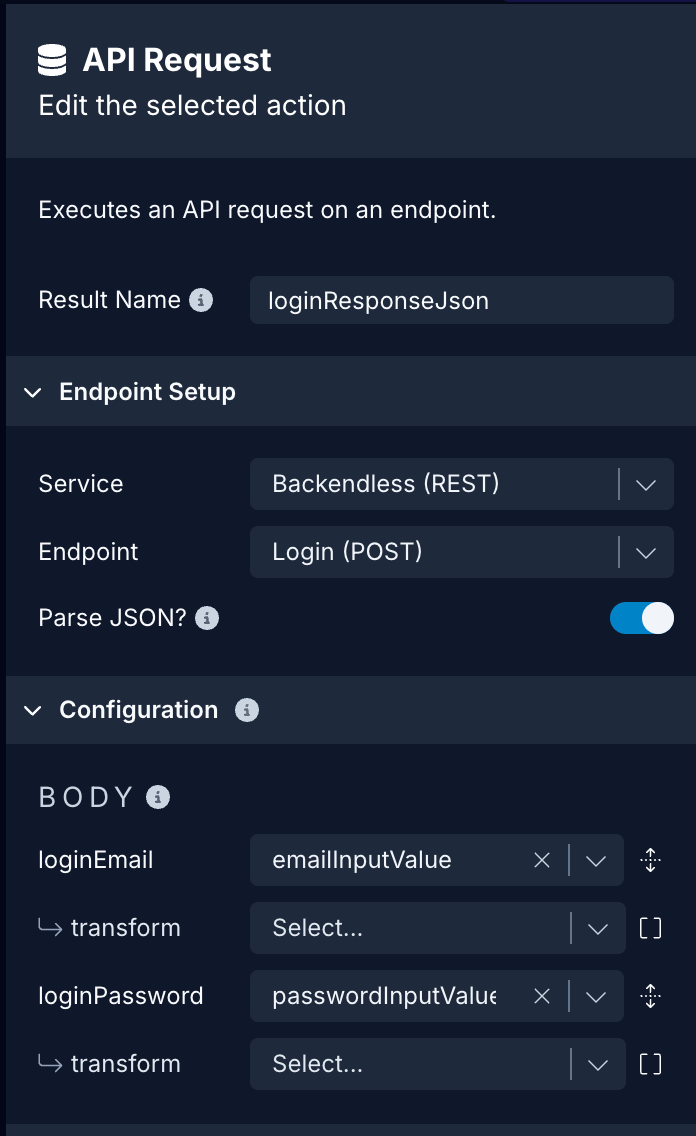
1. API Request
API Request is used to send the POST request to the endpoint users/login. It comes back with a user-token, objectId, and other user-related data from the Backendless REST API service. In the action:
- Select the Service name.
- Select the Endpoint. In this case, it's Login.
- Add a variable to store the Result Name. The variable assigned here will enable it to be used by subsequent actions.
- In the Body, select the appropriate
Data Sourceproperty for each variable defined in the Body when setting up the endpoint, from the dropdown menu.
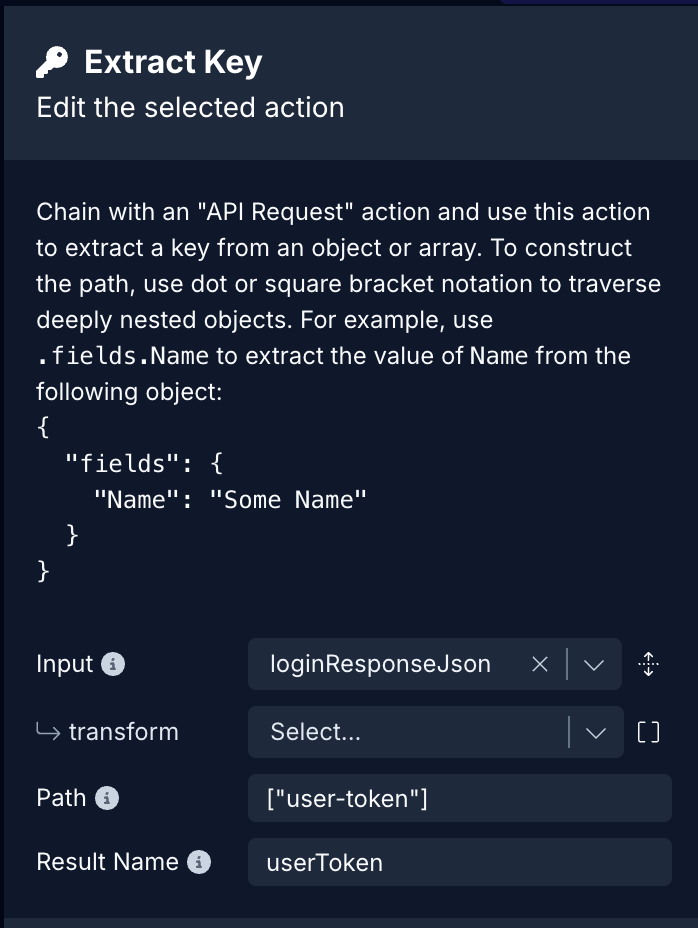
2. Extract Key:userToken
Using the loginResponseJson value from the previous action, let's extract the userToken. In the action:
- Select the value of the Input to be Result Name of the previous action.
- Add the Path value:
["user-token"]. - Add the Result Name:
userToken.
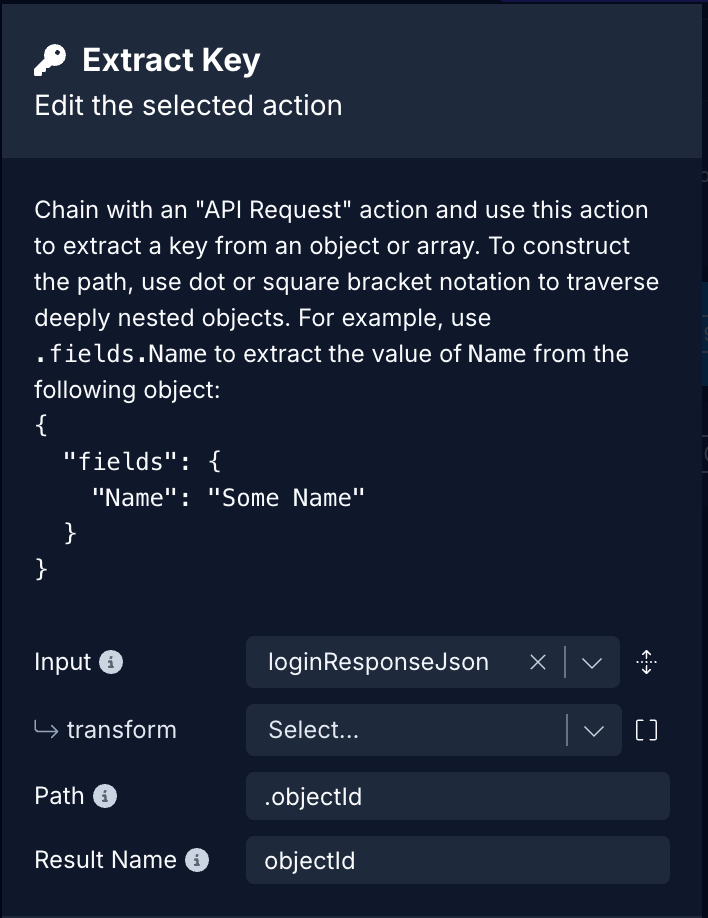
3. Extract Key:objectId
Using the loginResponseJson value from the previous action, let's extract the objectId. In the action:
- Select the value of the Input to be Result Name of the previous action.
- Add the Path value:
.objectId. - Add the Result Name:
objectId.
4. Extract Key: error message
In the action:
- Select the value of the Input to be Result Name of the previous action. For example,
loginResponseJson. - Add the Path value:
.message. - Add the Result Name:
message.

5. Set Variable: Error Message
In the action:
- In the Variable, select the Global Variable assigned for Error Message from the dropdown menu.
- In the Value, select the Action Result
messageextracted from the previous action.
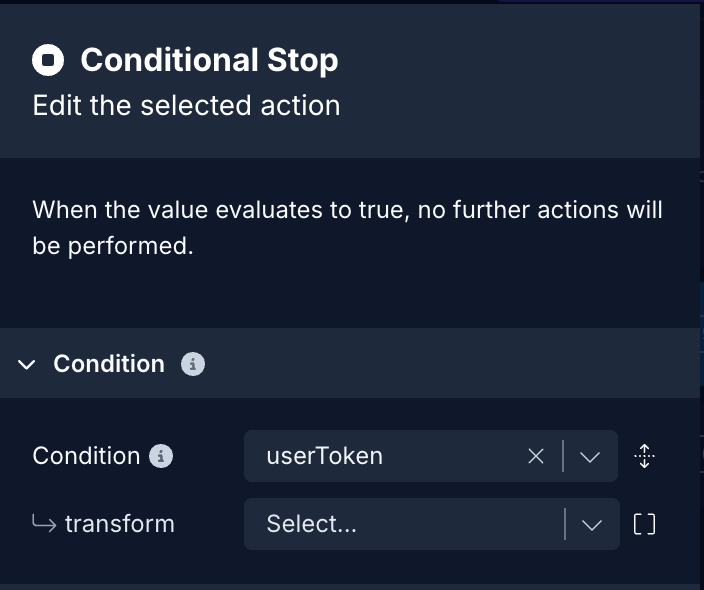
6. Conditional Stop
This action will stop the execution of any actions defined after it. It will check if the userToken value is present or not and if not, the action will stop the execution. Useful to implement after handling errors. In the action:
- In Check value, select
userTokenfrom the dropdown and a transform functionnegate.
7. Set Variable: User Token
In the action:
- In the Variable, select the Global Variable assigned for User Token from the dropdown menu.
- In the Value, select the Action Result
userTokenextracted from the previous action.

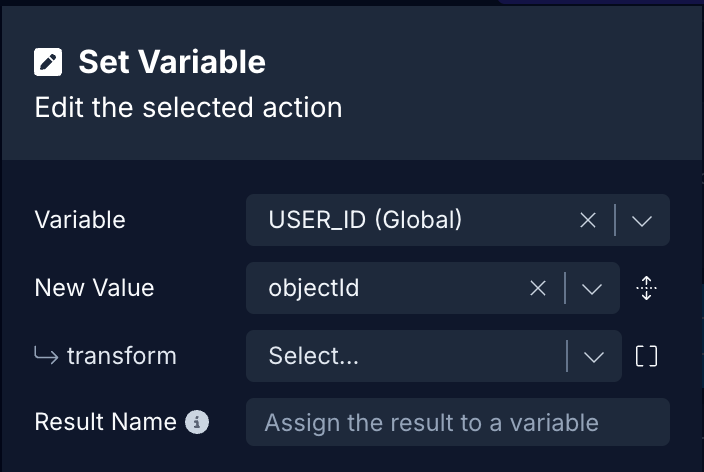
8. Set Variable: User Id
In the action:
- In the Variable, select the Global Variable assigned for Object Id from the dropdown menu.
- In the Value, select the Action Result
objectIdextracted from the previous action. We will use this value of theobjectIdin the Home screen to fetch the authenticated user's data from the Backendless database. It will be passed as a query parameter.
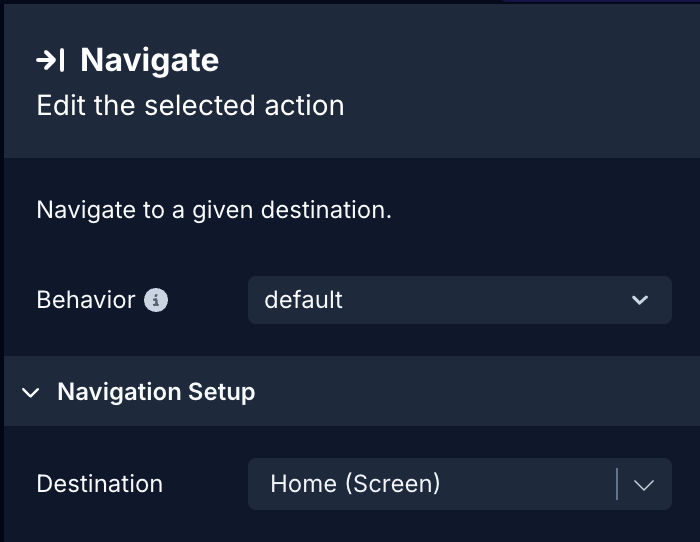
9. Navigate
This action helps an authenticated user (when the API request is successful) to navigate to a screen that is only visible to authenticated users (for example, a Home screen). In the action:
- In Destination, select the screen name from the dropdown menu.
Authenticated API Requests: Fetching Logged-in User's Data
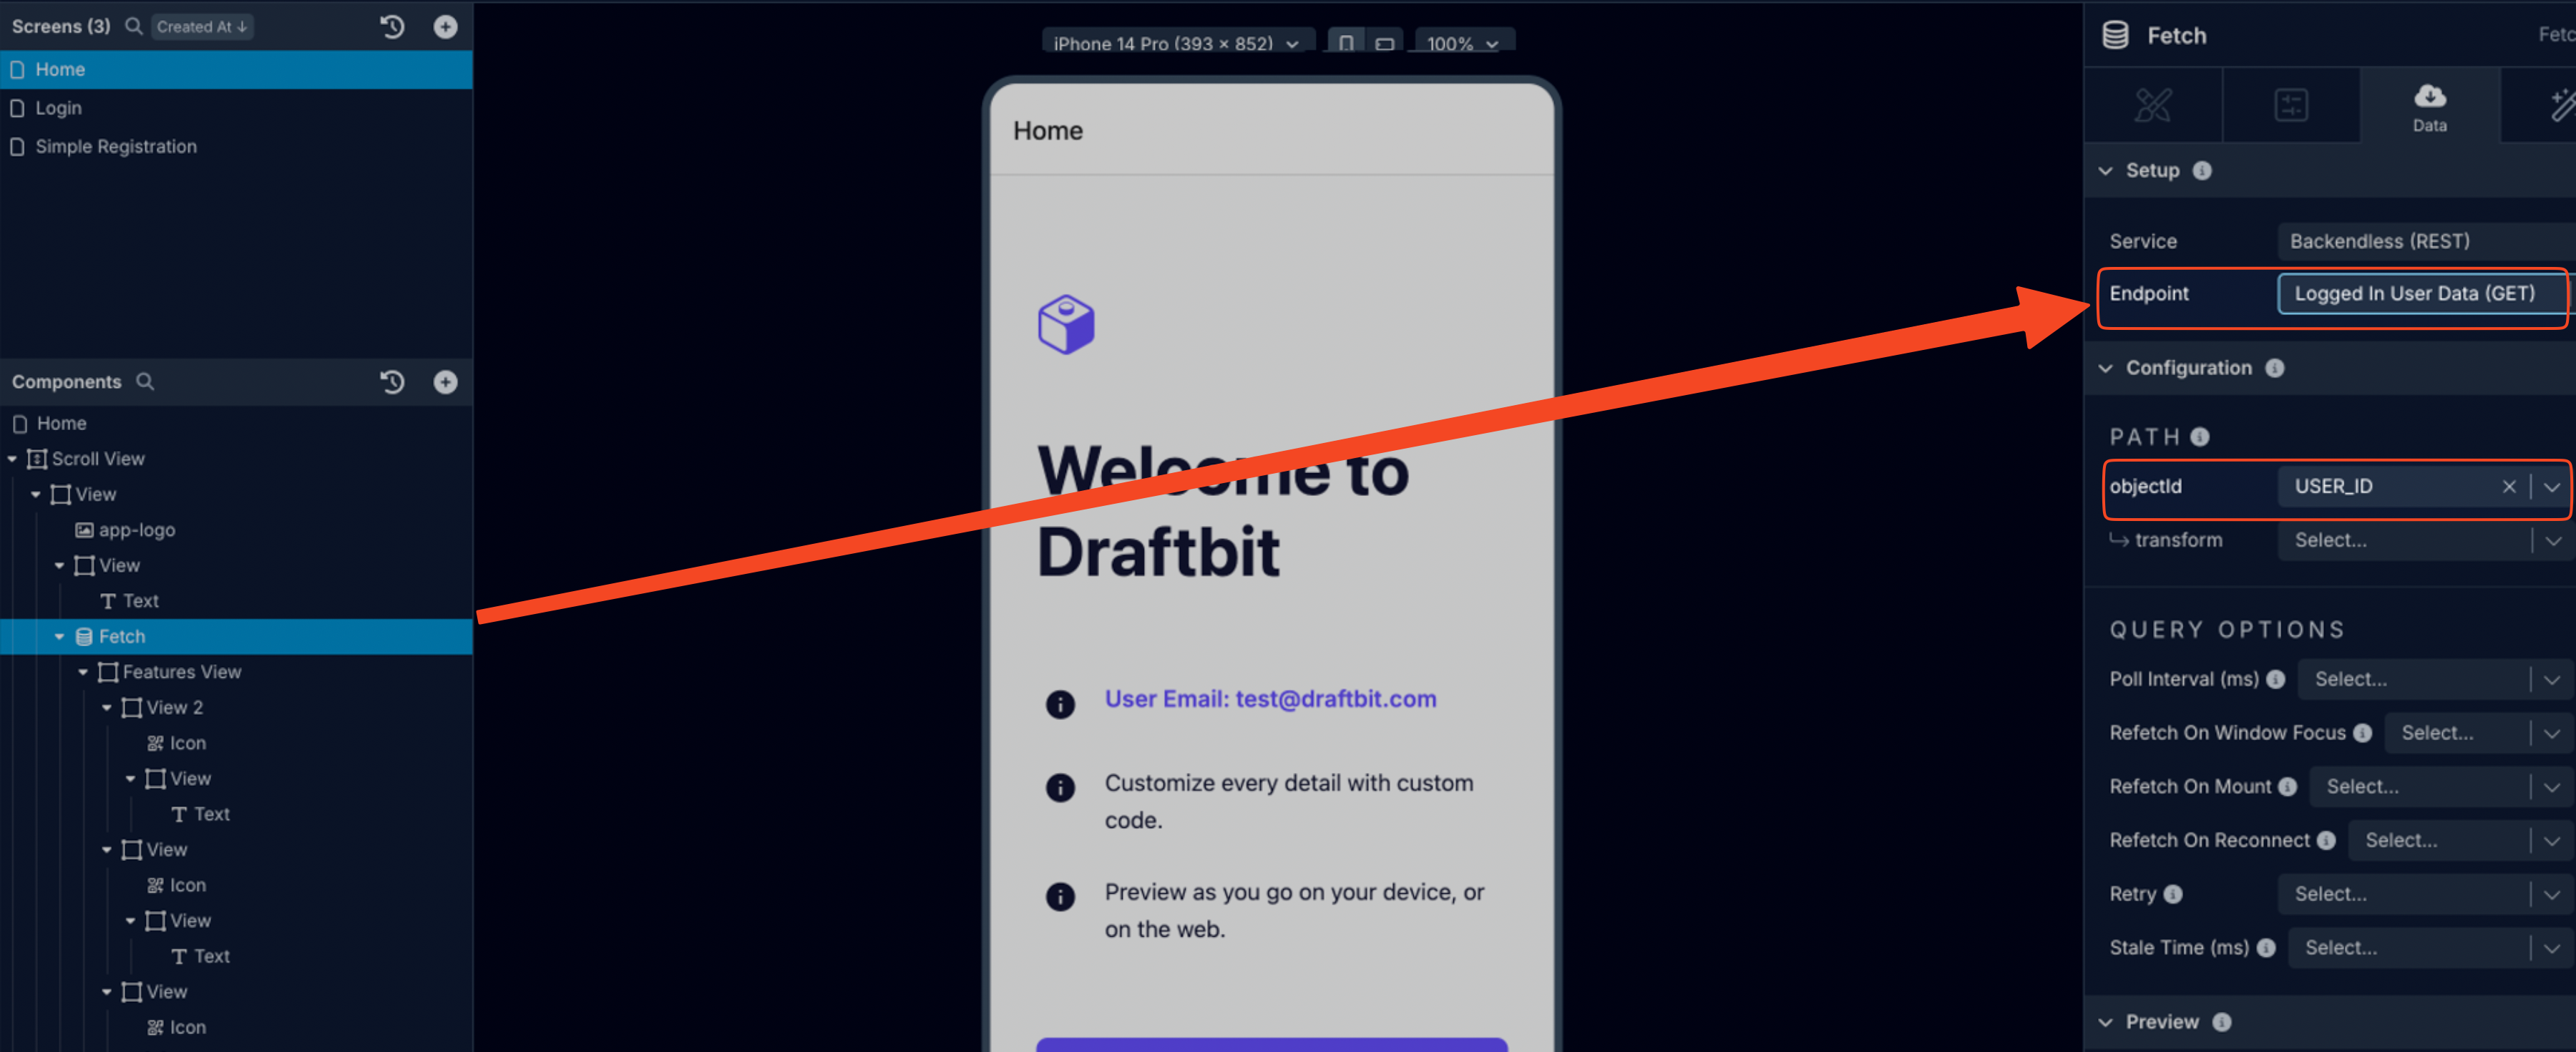
Authenticated API requests are those requests where your app sends a unique identifier to fetch the data from the REST API's database. In Backendless, to fetch a logged-in user's data, one way is to make an API request on the Fetch component and providing the objectId as a query parameter.
If you have followed the documentation so far, you must have saved the objectId in a Variable from the previous step (when implementing the process of login).
To make an API request, the initial step is to add an endpoint to the API service.
- Click Add Endpoint.
- In Step 1: enter a name for the endpoint and select the Method to
GET. - In Step 2: enter the base name as path:
/users/{{objectId}}. Then manually add the value of the{{objectId}}variable from the Backendless database for testing and saving this endpoint. - In Step 4: click the Test button next to the Endpoint input to verify the response coming from the API service and then click Save.
In the example below, an API request of method type GET is constructed to get the logged-in user's data.
Using the Fetch component on the logged-in screen the above endpoint can be used to display the information.
- Select the Fetch component from the Components tree.
- In the Properties Panel of the Fetch component, select the Service name and then select the Endpoint to fetch the user's data.
- Then in the URL Structure, for the value of
objectId, select the Global Variable from the dropdown menu.
Log out
To implement the logout process with Backendless REST API service, you need to add the endpoint:
/users/logoutOpen the Backendless service you have previously created and follow the steps below:
- Click Add Endpoint.
- In Step 1: enter a name for the endpoint and select the Method to
GET. - In Step 2: enter the base name as path:
/users/logout. - In Step 3: add a Header with the key
user-tokenand the value as the Global Variable that stored the value of the user token. - In Step 4: click the button Test and click Save.
When sending an API request to log out a user using the endpoint created in the earlier step, you will need to stack the following actions on a Button/Touchable.
Action Workflow
Following actions will be stacked on the Logout Button.
- To add an action, select the Button/Touchable component from the Components tree.
- Then, in the Properties Panel, go to the Interactions tab.
- Click the
OnPressbutton to open the Action Editor. - In the Action Editor, search for the actions in the left panel.
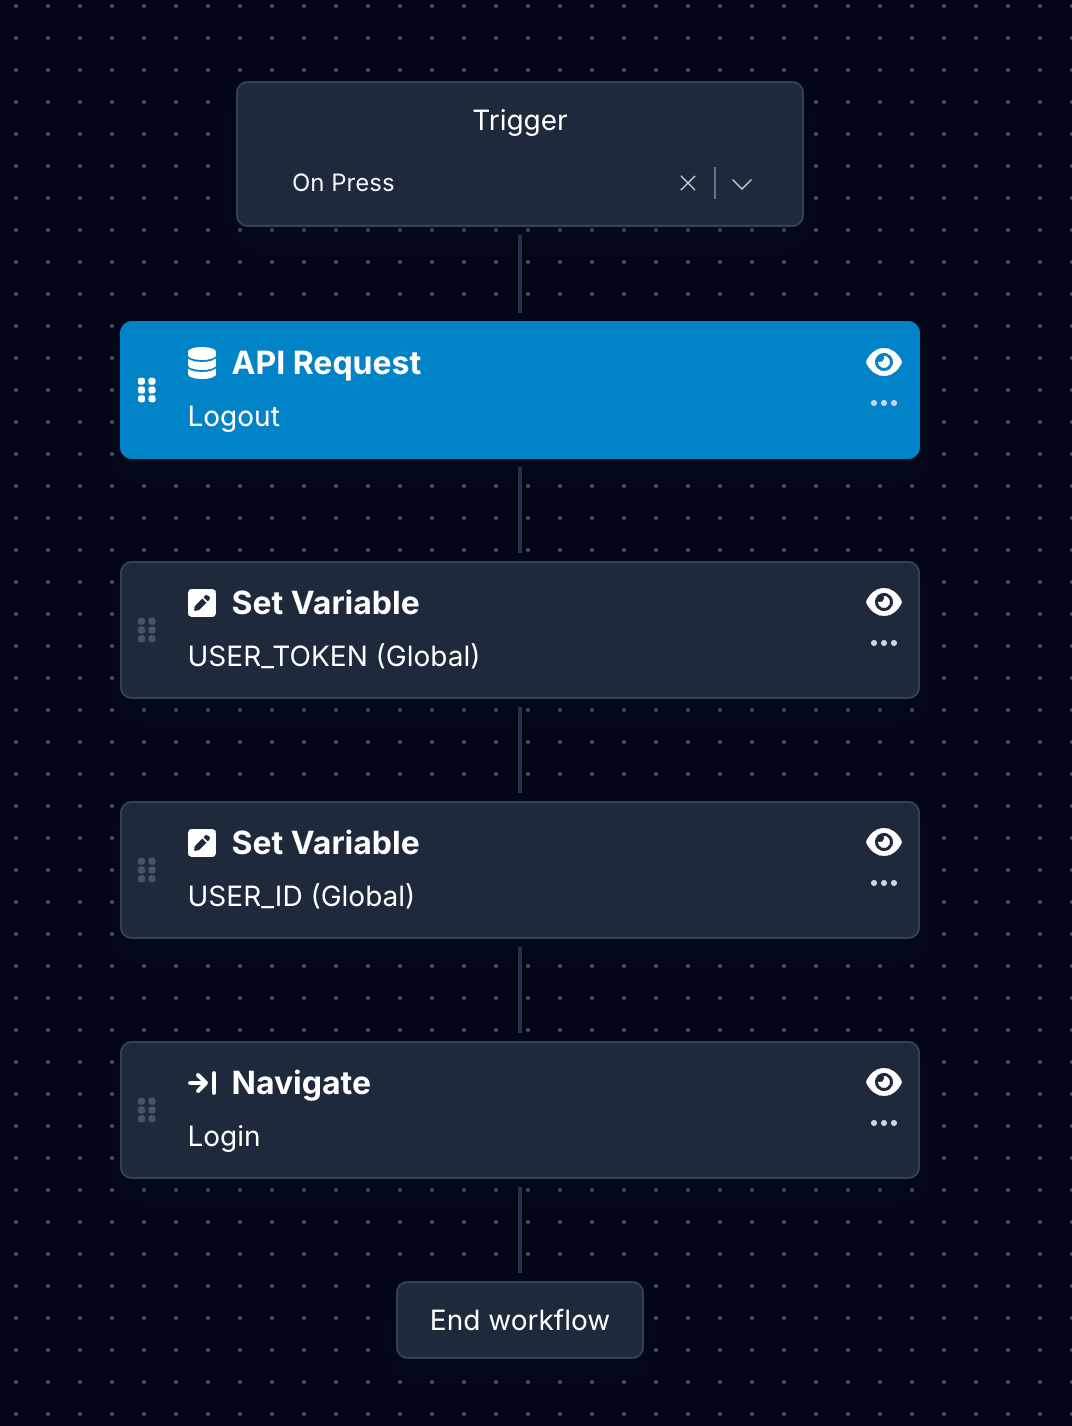
Here is the description of each action:
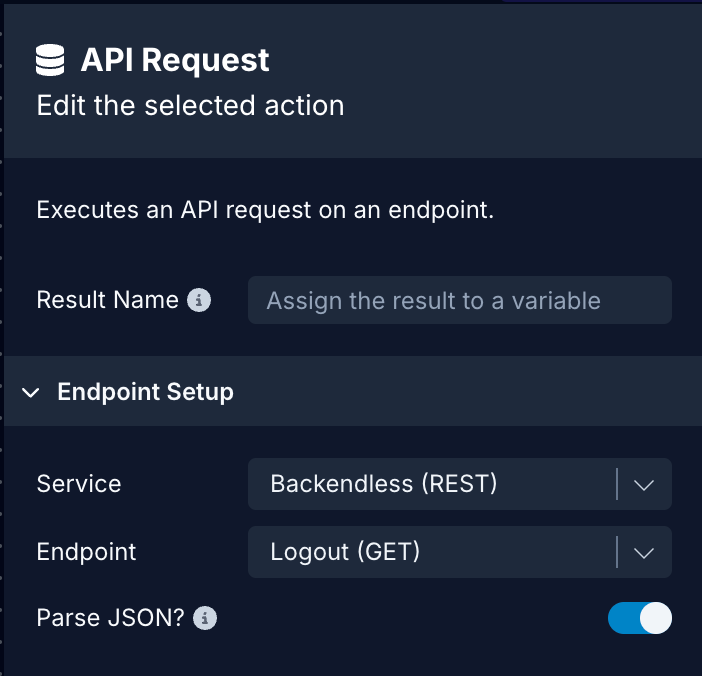
1. API Request
API Request is used to send the GET request to the endpoint users/logout. In the action:
- Select the Service name.
- Select the Endpoint. In this case, it's Logout.
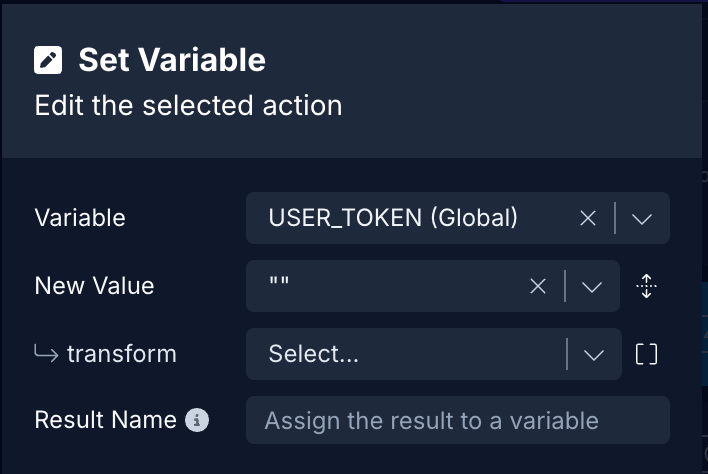
2: Set Variable: User Token
In the action:
- In the Variable, select the Global Variable assigned for
user-tokenfrom the dropdown menu. - In the Value, add an empty string
"".
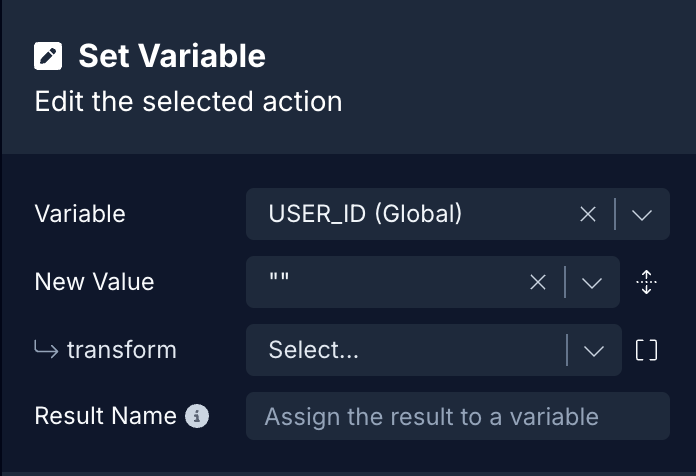
3: Set Variable: User Id
In the action:
- In the Variable, select the Global Variable assigned for
objectIdfrom the dropdown menu. - In the Value, add an empty string
"".
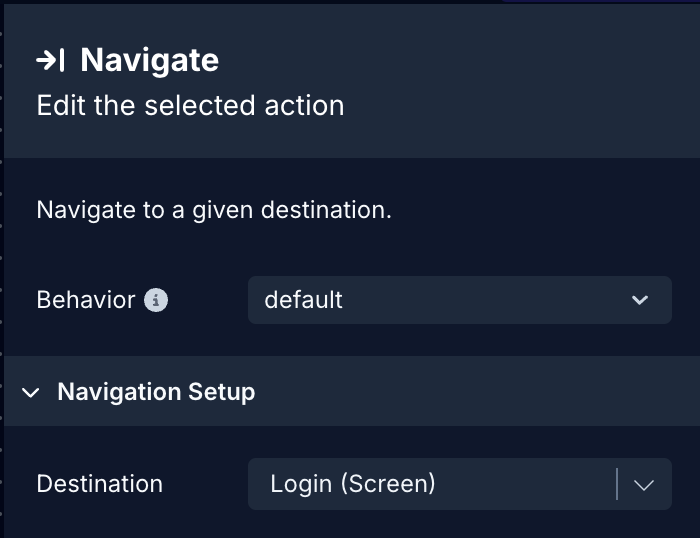
4. Navigate
This action redirects the user (when the API request is successful) to navigate to a screen that is only visible to non-authenticated users (for example, a Login screen). In the action:
- In Destination, select the screen name from the dropdown menu.
Additional resources
- Learn more about Backendless User Registration and Login API here