Submitting Data
In addition to fetching data, it is also common to submit data to an API. Draftbit lets you make API requests using the API Request Action to submit data (i.e. make an HTTP POST, PUT or PATCH request) to an API endpoint.
Make sure you've set up at least one REST API Service and an Endpoint that's configured to submit data to an API. See below for an example.
Configure the endpoint to submit new data
To create a new data record in the database of your choice, you will have to create an endpoint that submits a POST request. For an example, consider a REST API endpoint which accepts a JSON body in the request to create new todos structured like this:
{
    "records": [
        {
            "fields": {
                "item": "Notebook"
            }
        },
        {
            "fields": {
                "item": "Apples"
            }
        },
        {
            "fields": {
                "item": "Bananas"
            }
        }
    ],
}
JSON Body FormatYour API will likely have its own JSON structure for creating records in your backend.
Let's consider the above endpoint example to add a new todo to an existing Airtable base. You will add a new endpoint for POST HTTP method by following these steps:
- Click Add endpoint.
- In Step 1: enter the Name for the endpoint. Make sure the Method select is
POST. - Set the Role to
Createsince the endpoint is creating a new record. Set the Object Type totodos. - In Step 2: add the base name path and/or any query parameters to the API's base URL. Currently, the endpoint has no query parameters or additional endpoint-specific paths.
- In Step 3: add a valid Body structure to submit a POST request. Add one or many
{{variable}}for test values. Click Body Preview to validate the structure of the Body in the request. Using the example above it would look like this:
{
    "records": [
        {
            "fields": {
                "item": {{ todo }}
            }
        }
    ]
}- In Step 5: click the Test button next to the Endpoint input to verify the response coming from the API service.
- The last step is to save the endpoint. Click the Save button.
Trigger an API Request action to submit a new item
Once your components, API Service, and Endpoint are set up correctly, select the Button or Touchable component in the Components tree and go to the Interactions tab in the Properties panel (last tab on the right-hand side).
- Click the
+button next to Action. - From the dropdown select the action API Request.
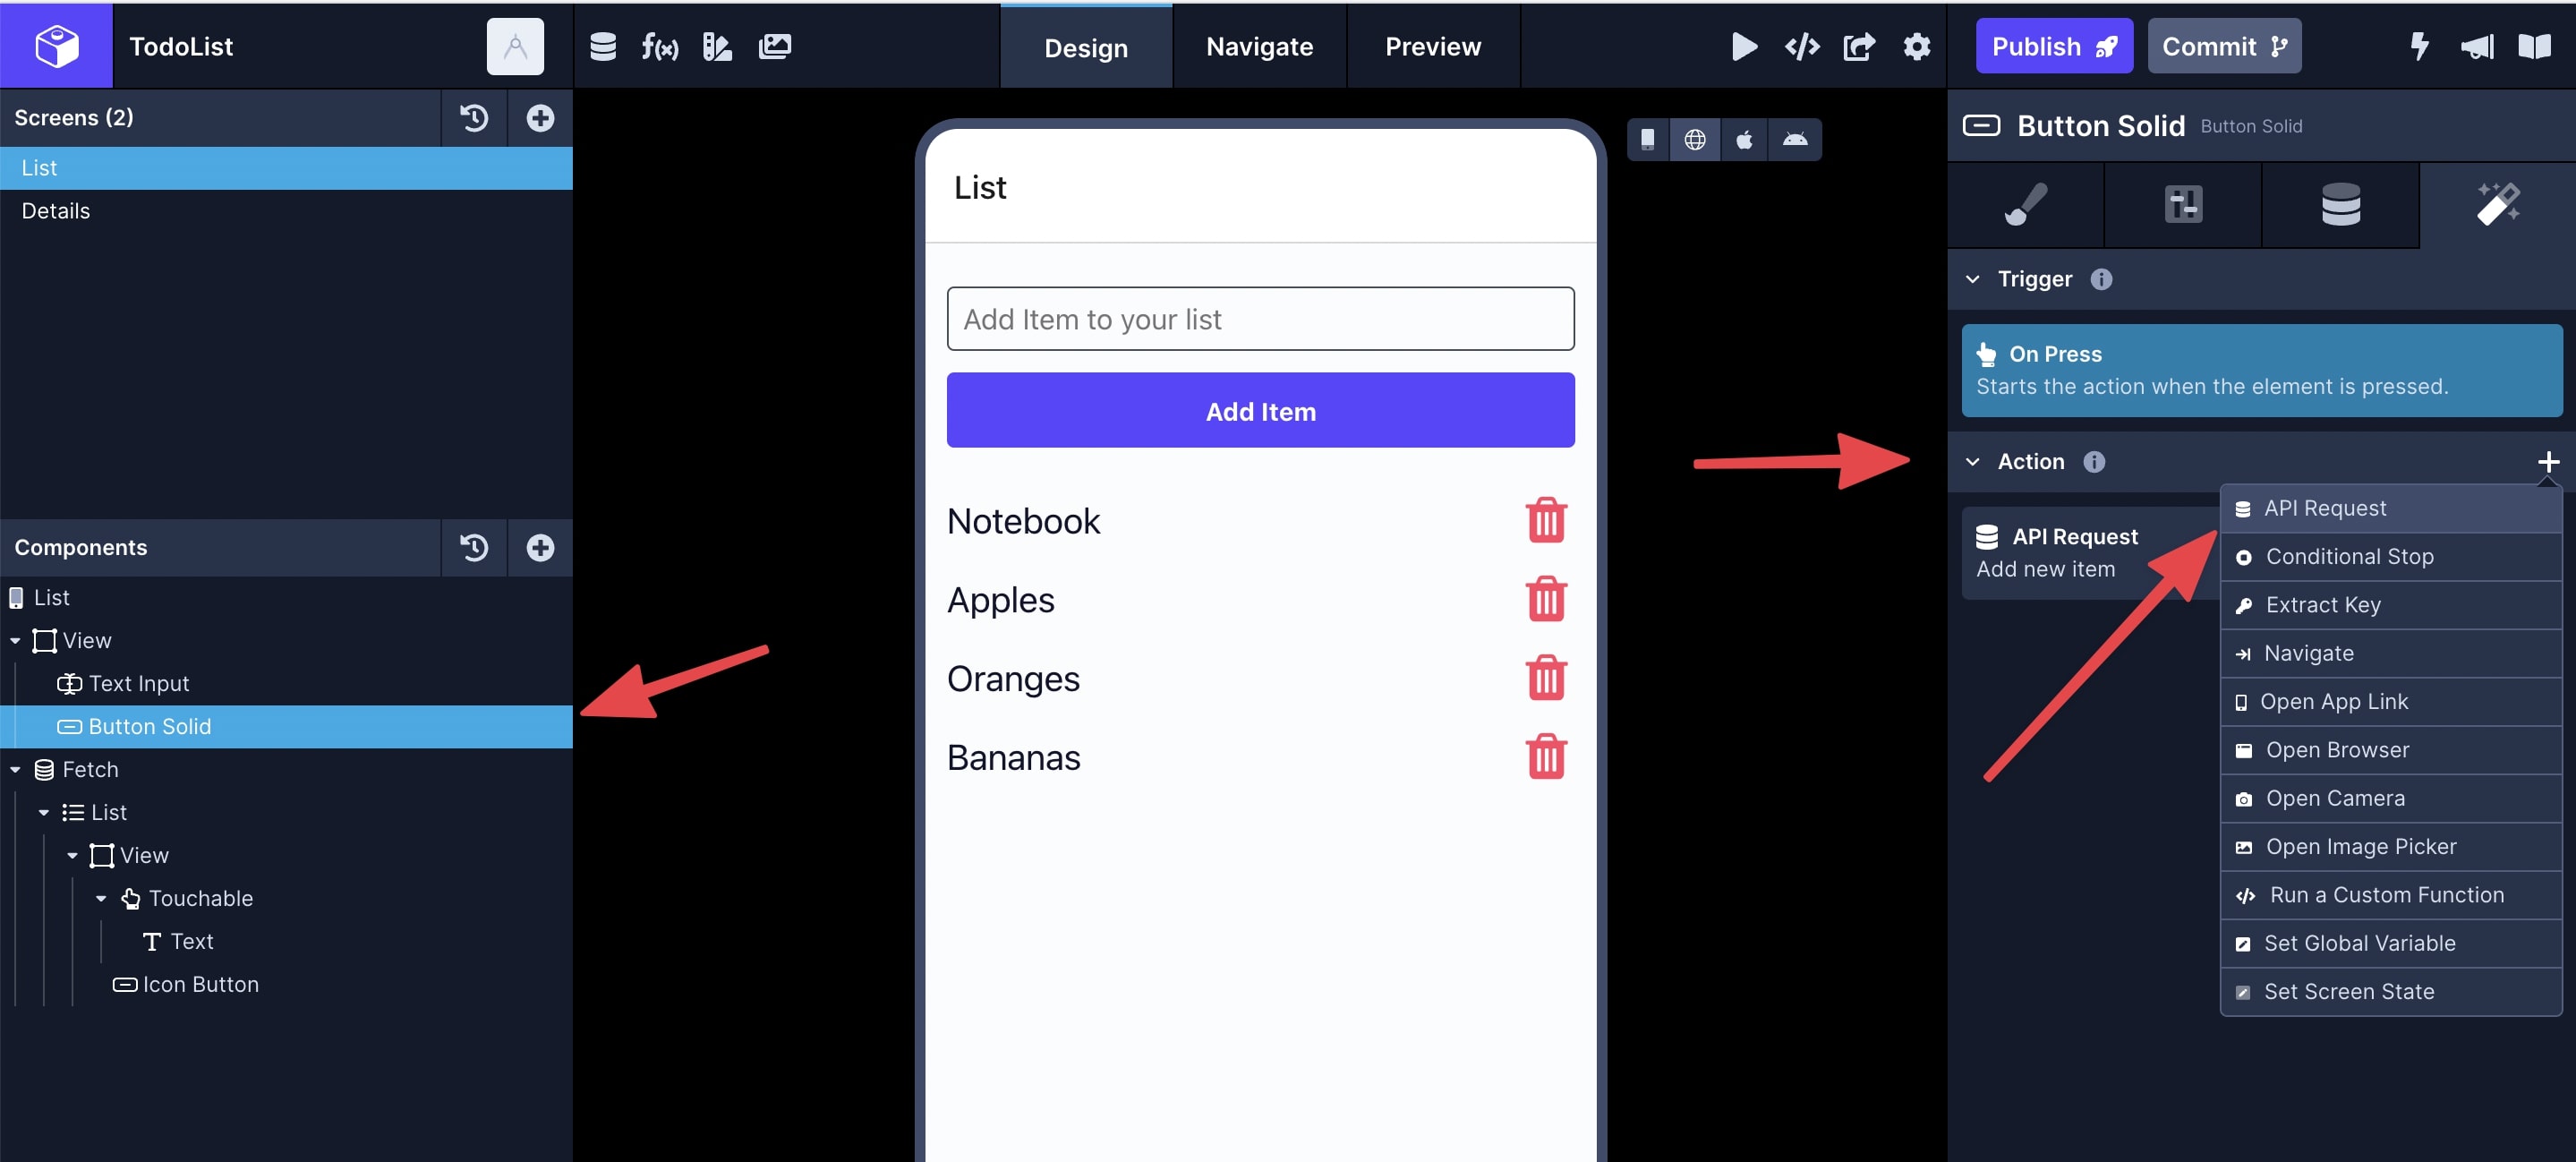
- Select the Service name and Endpoint name from the dropdowns.
- After you've made your selections, a Configuration section will appear and there will be an input for each key/value pair you defined in your Body Structure. The dropdown next to each variable will be pre-populated with all the
Data Sourceprops you have set on the screen. Select the corresponding value from the dropdown that matches your variable.
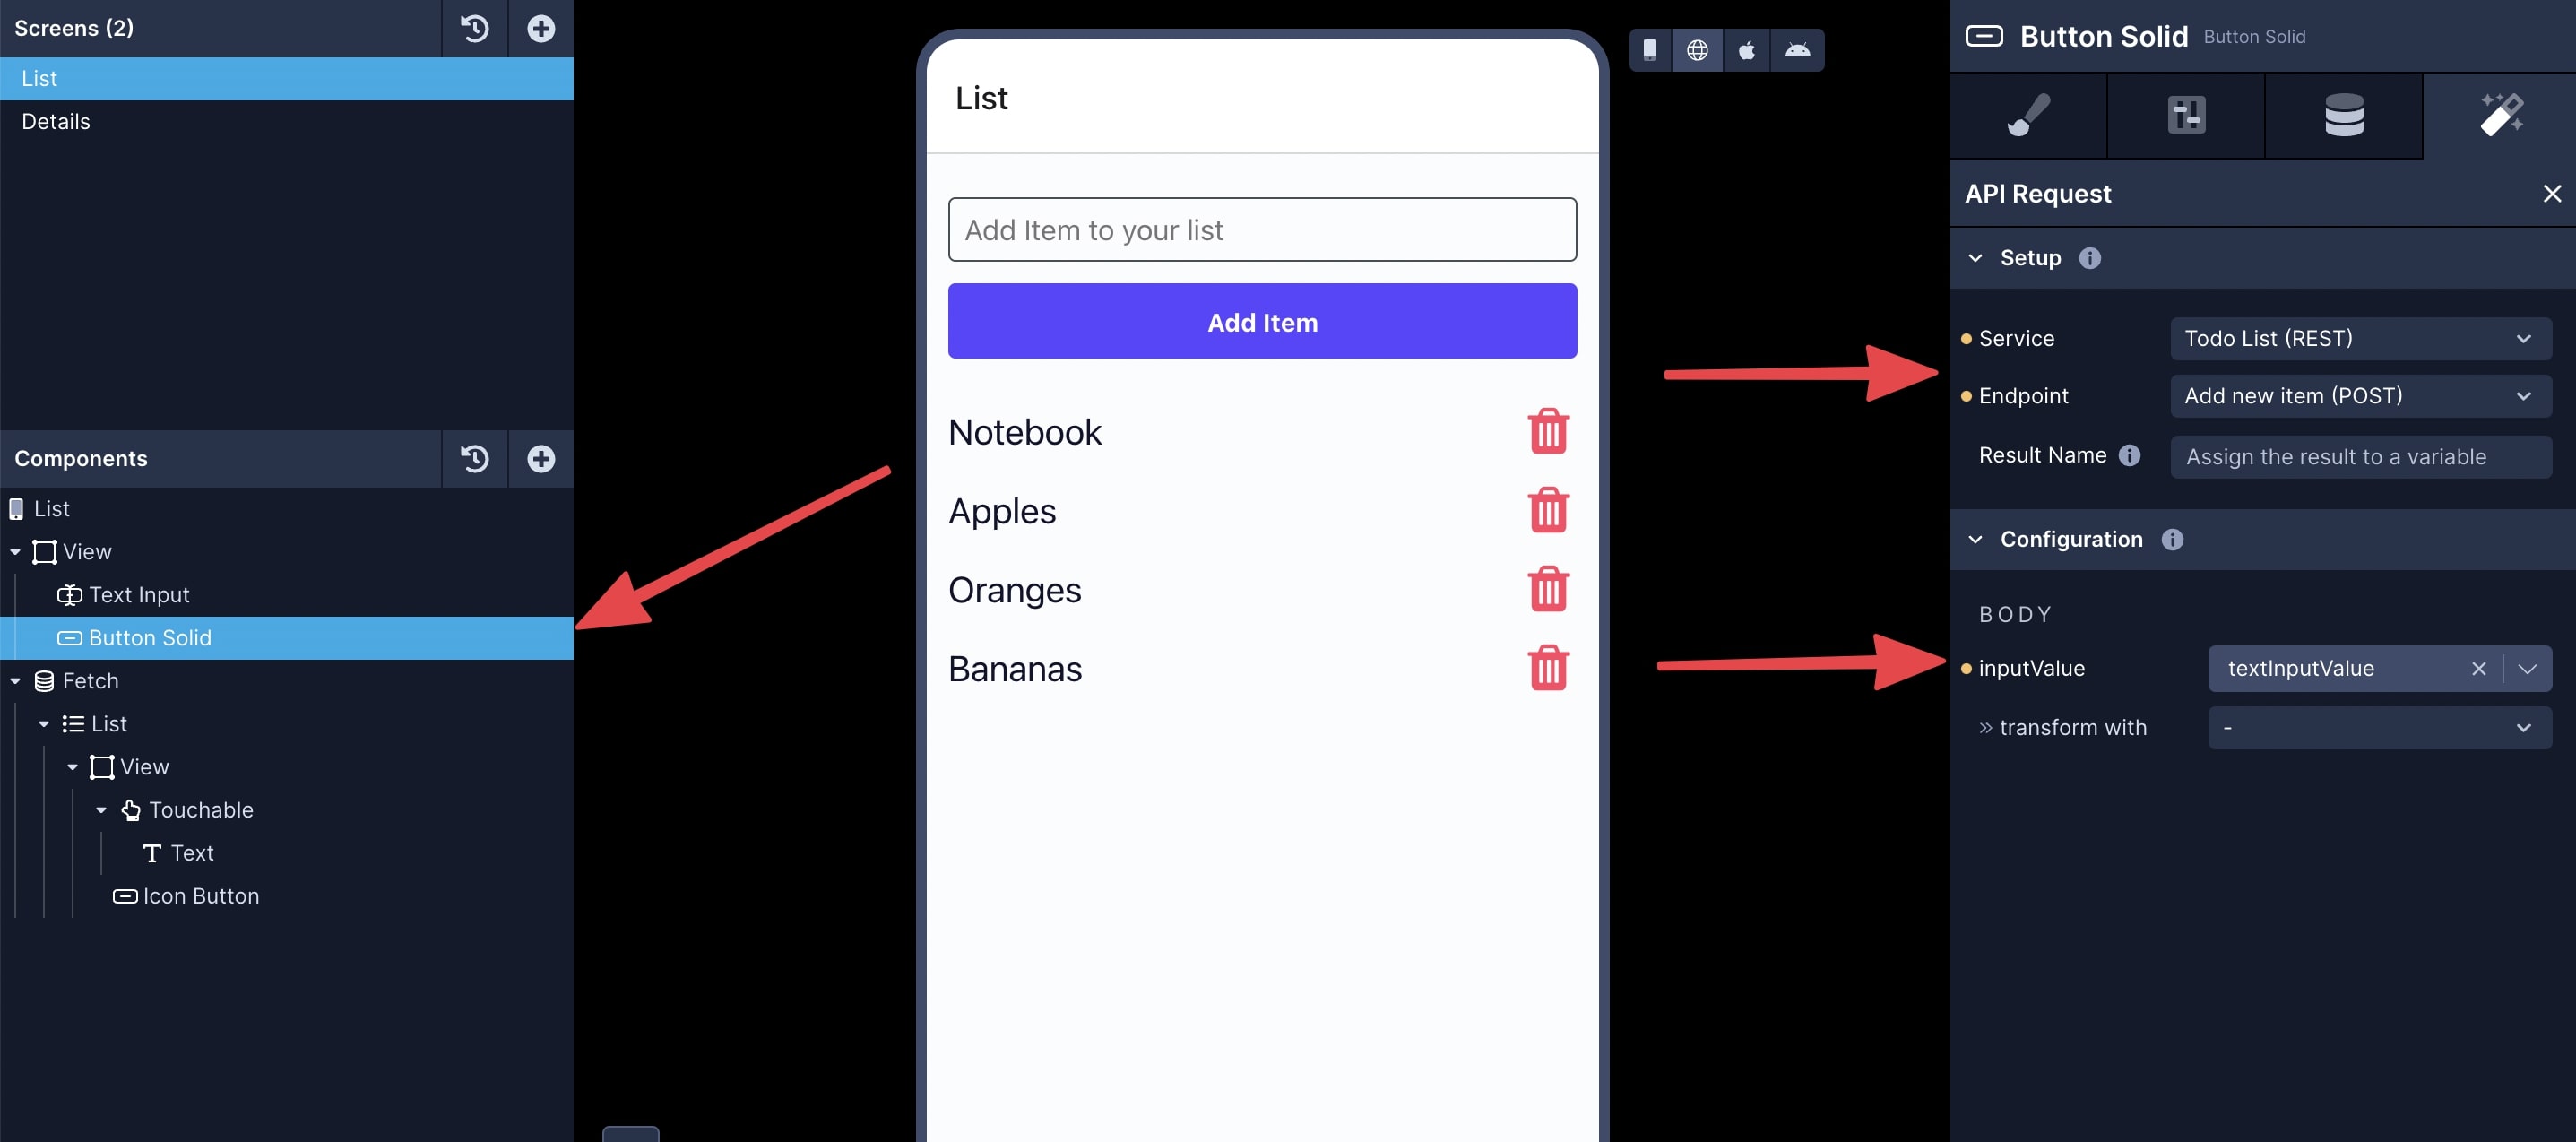
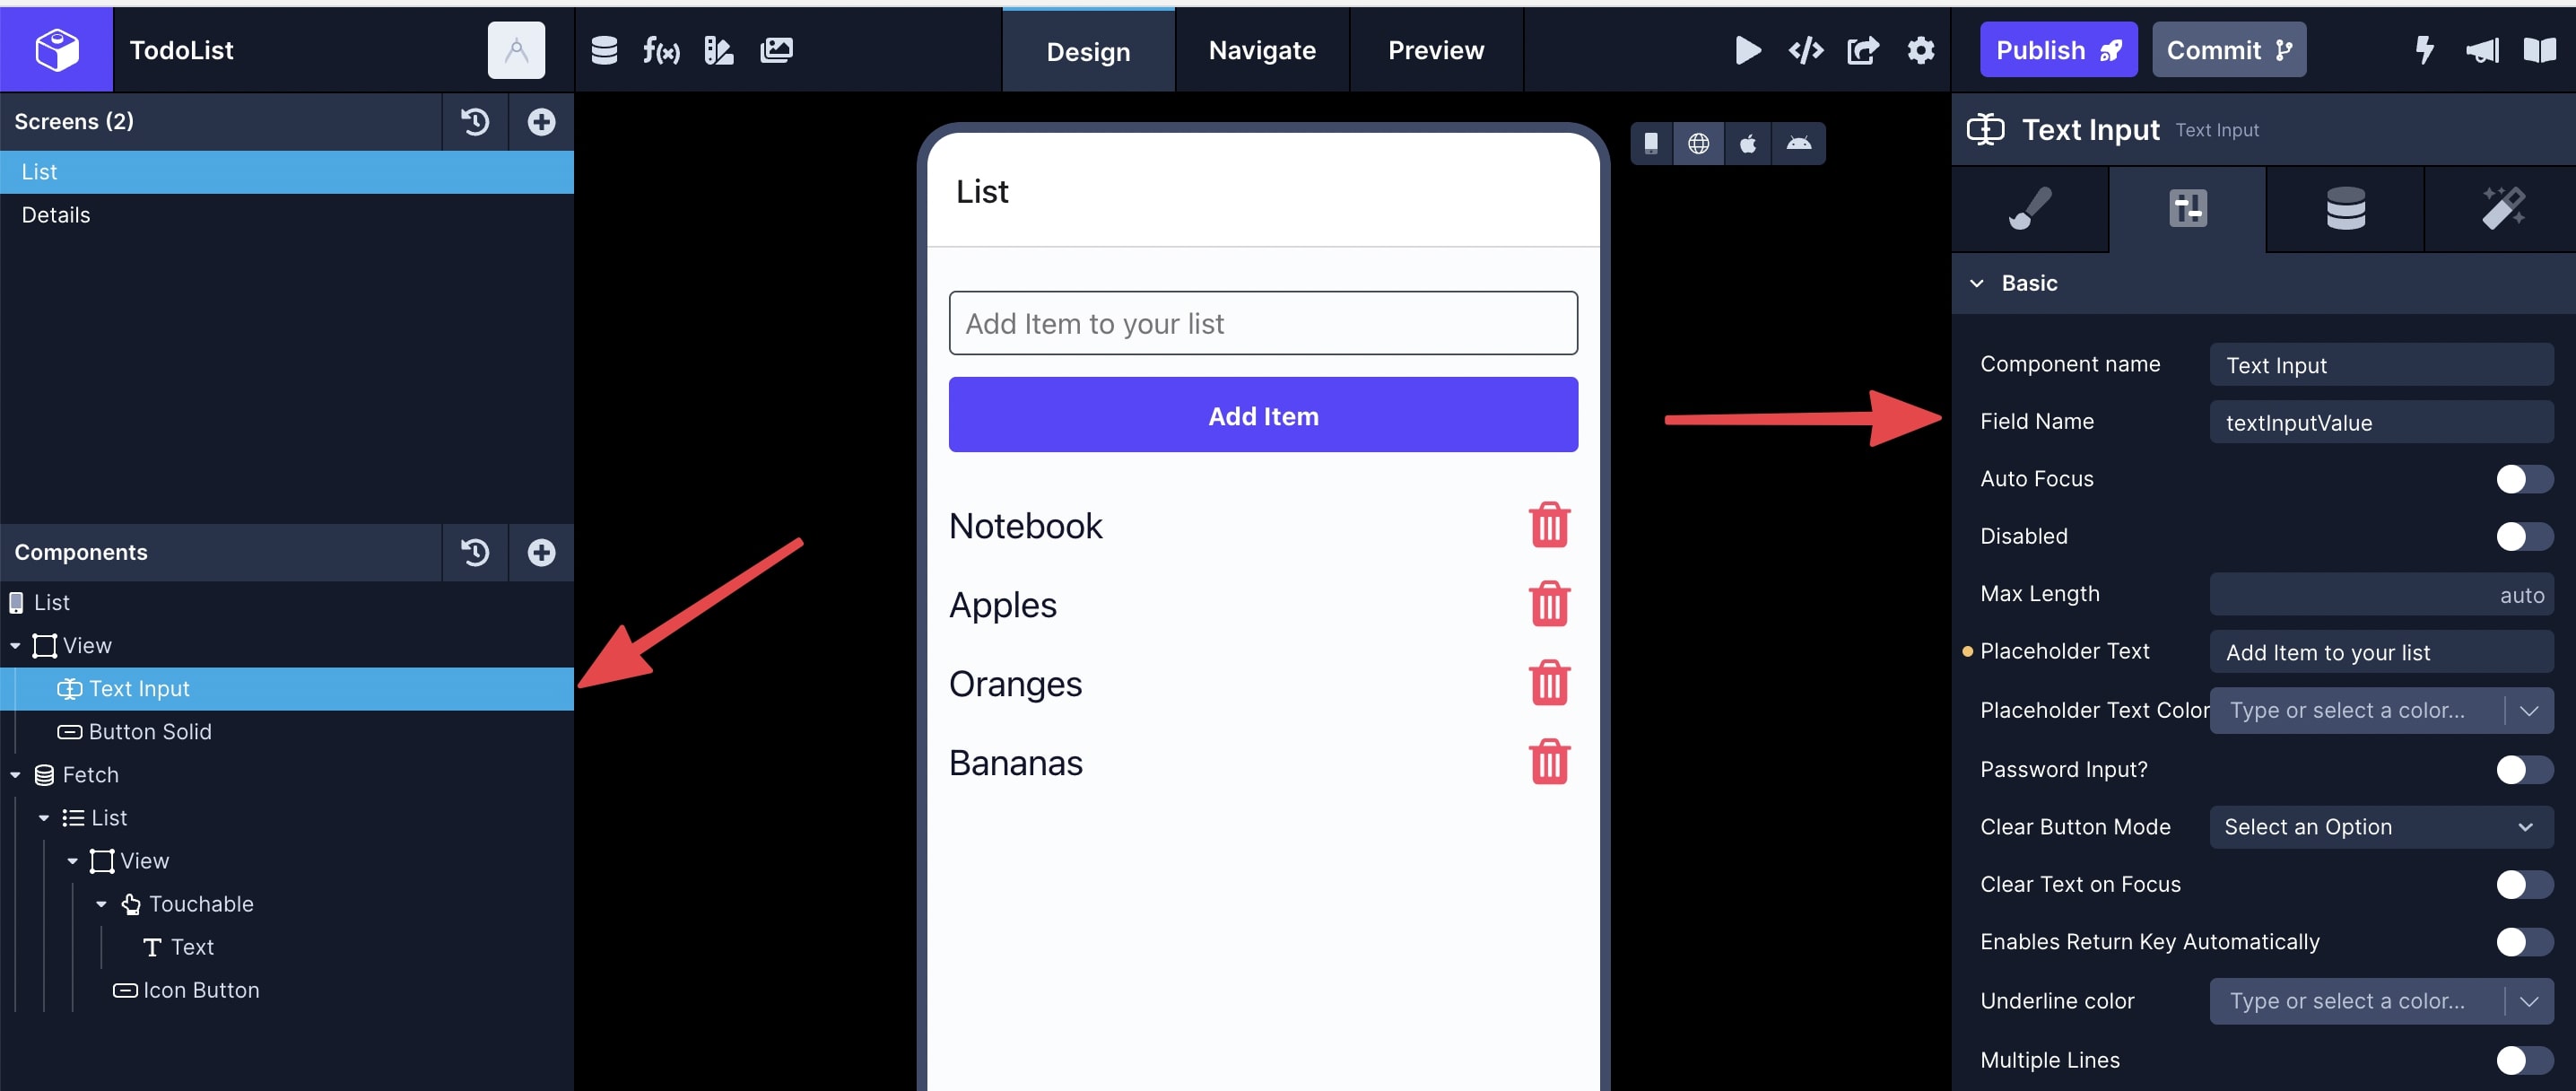
The textInputValue passed in the above example is the value of the Data Source prop on the TextInput component. To find it, go to the component and from the Properties panel, go to the Configs tab:
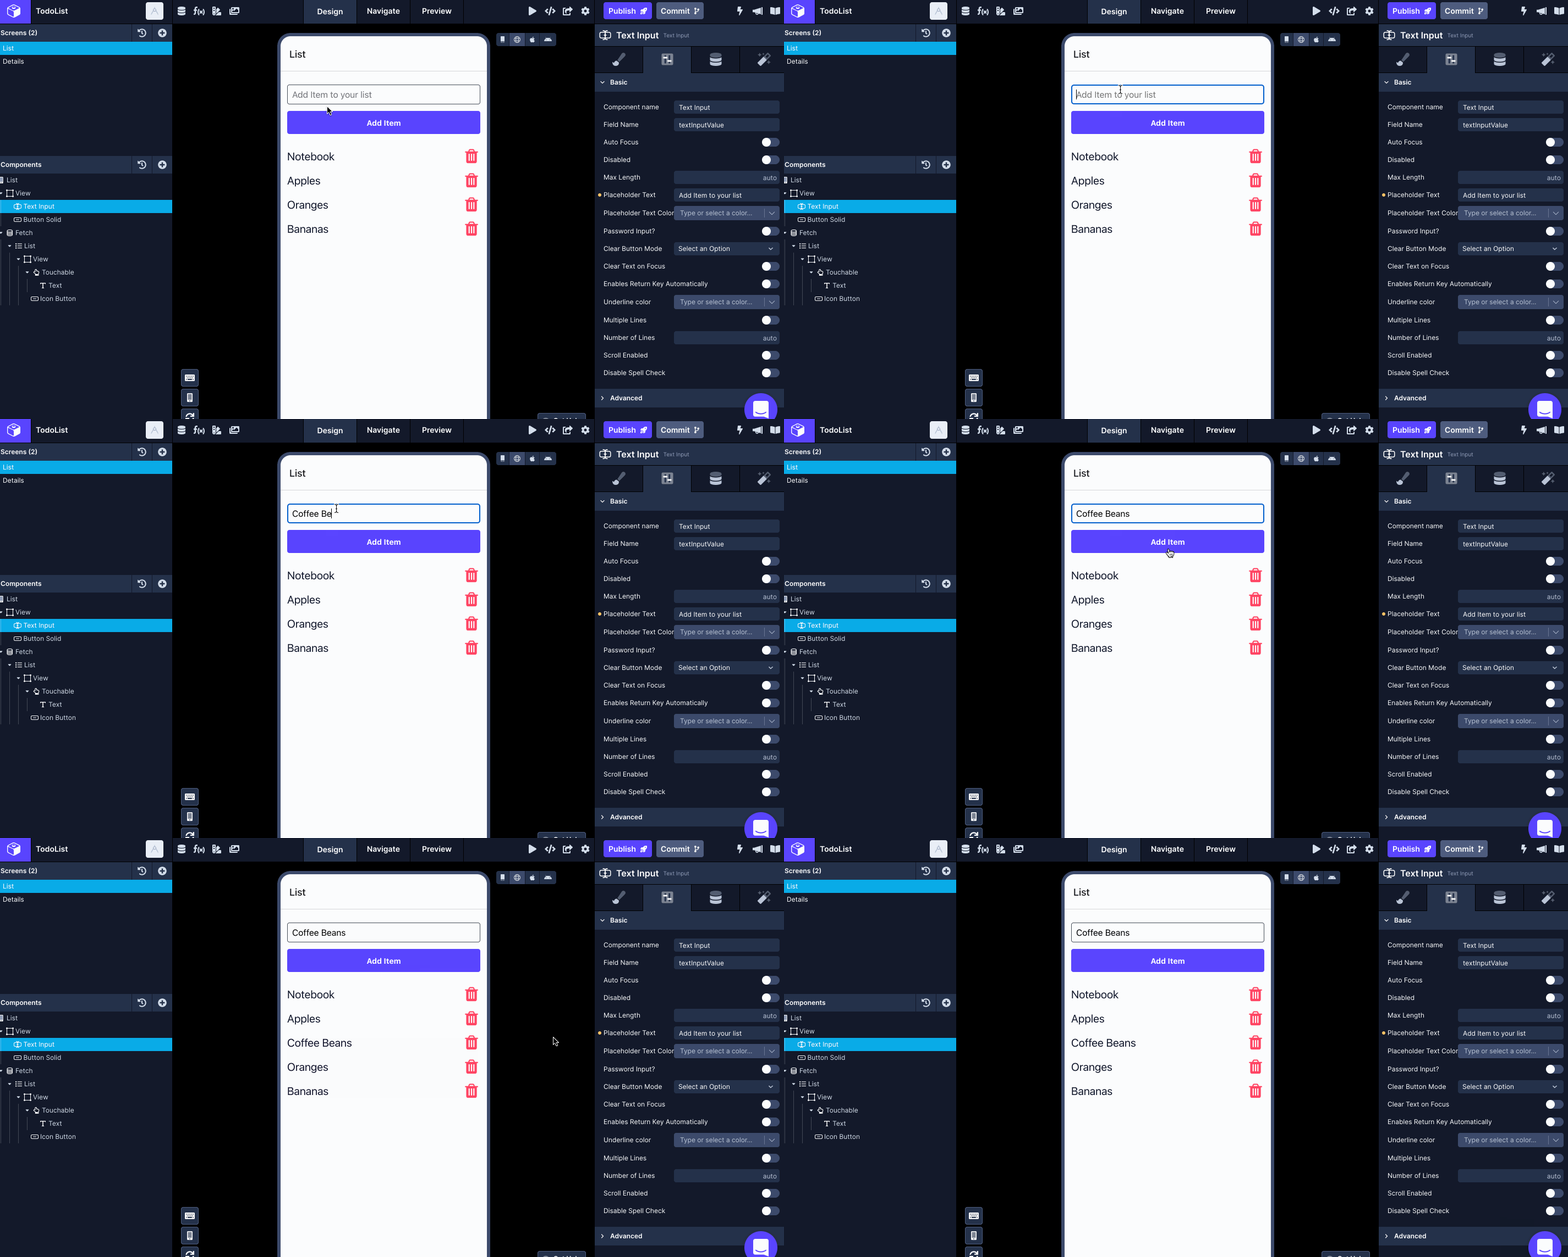
Here is the complete example of adding a new item to the list.
Importance of Role and Object Type when configuring an endpointUsing the
RoleandObject Typelets a Draftbit app cache and re-fetch data under the hood. Read more here.
Note.Please ignore the
Field Nameprop in the attached screenshots and videos as this property does not exist anymore. We will update the screenshots and videos soon.
Configure the endpoint to update existing data
To update an existing data record in the database of your choice, you will have to create an endpoint that submits a PUT or PATCH request. For example, let's consider the same endpoint example as done in the previous section when submitting new data. This endpoint will also accept a JSON body in the request to submit new data from a Draftbit app.
Let's consider the above endpoint example to add a new time to an existing Airtable base. You will usually add a new endpoint for PUT or PATCH HTTP method by following these steps:
- Click Add endpoint.
- In Step 1: enter the Name for the endpoint. Make sure the Method select is
PATCH. - Set the Role to
Updatesince the endpoint is creating a new record. Set the Object Type totodos. - In Step 2: add the base name path and/or any query parameters to the API's base URL. Currently, the endpoint has no query parameters or additional endpoint-specific paths.
- In Step 3: add a valid Body structure to submit a
PATCHrequest. Add one or many{{variable}}for test values. Click Body Preview to validate the structure of the Body in the request. - Check back in your API documentation to get an idea of how your request's JSON body is structured when updating an existing record. Then, add the Body Structure in key-value pairs as shown below.
- In Step 5: click the Test button next to the Endpoint input to verify the response coming from the API service.
- The last step is to save the endpoint. Click the Save button.
Trigger an API Request action to update an existing item
To update an existing item, it will be done on a Details screen. In the example app, it was created when Configuring an endpoint to fetch a single item record.
Once your components, API Service, and Endpoint are set up correctly, select the Button or Touchable component in the Components tree and go to the Interactions tab in the Properties panel (last tab on the right-hand side).
- Click the
+button next to Action. - From the dropdown select the action API Request.
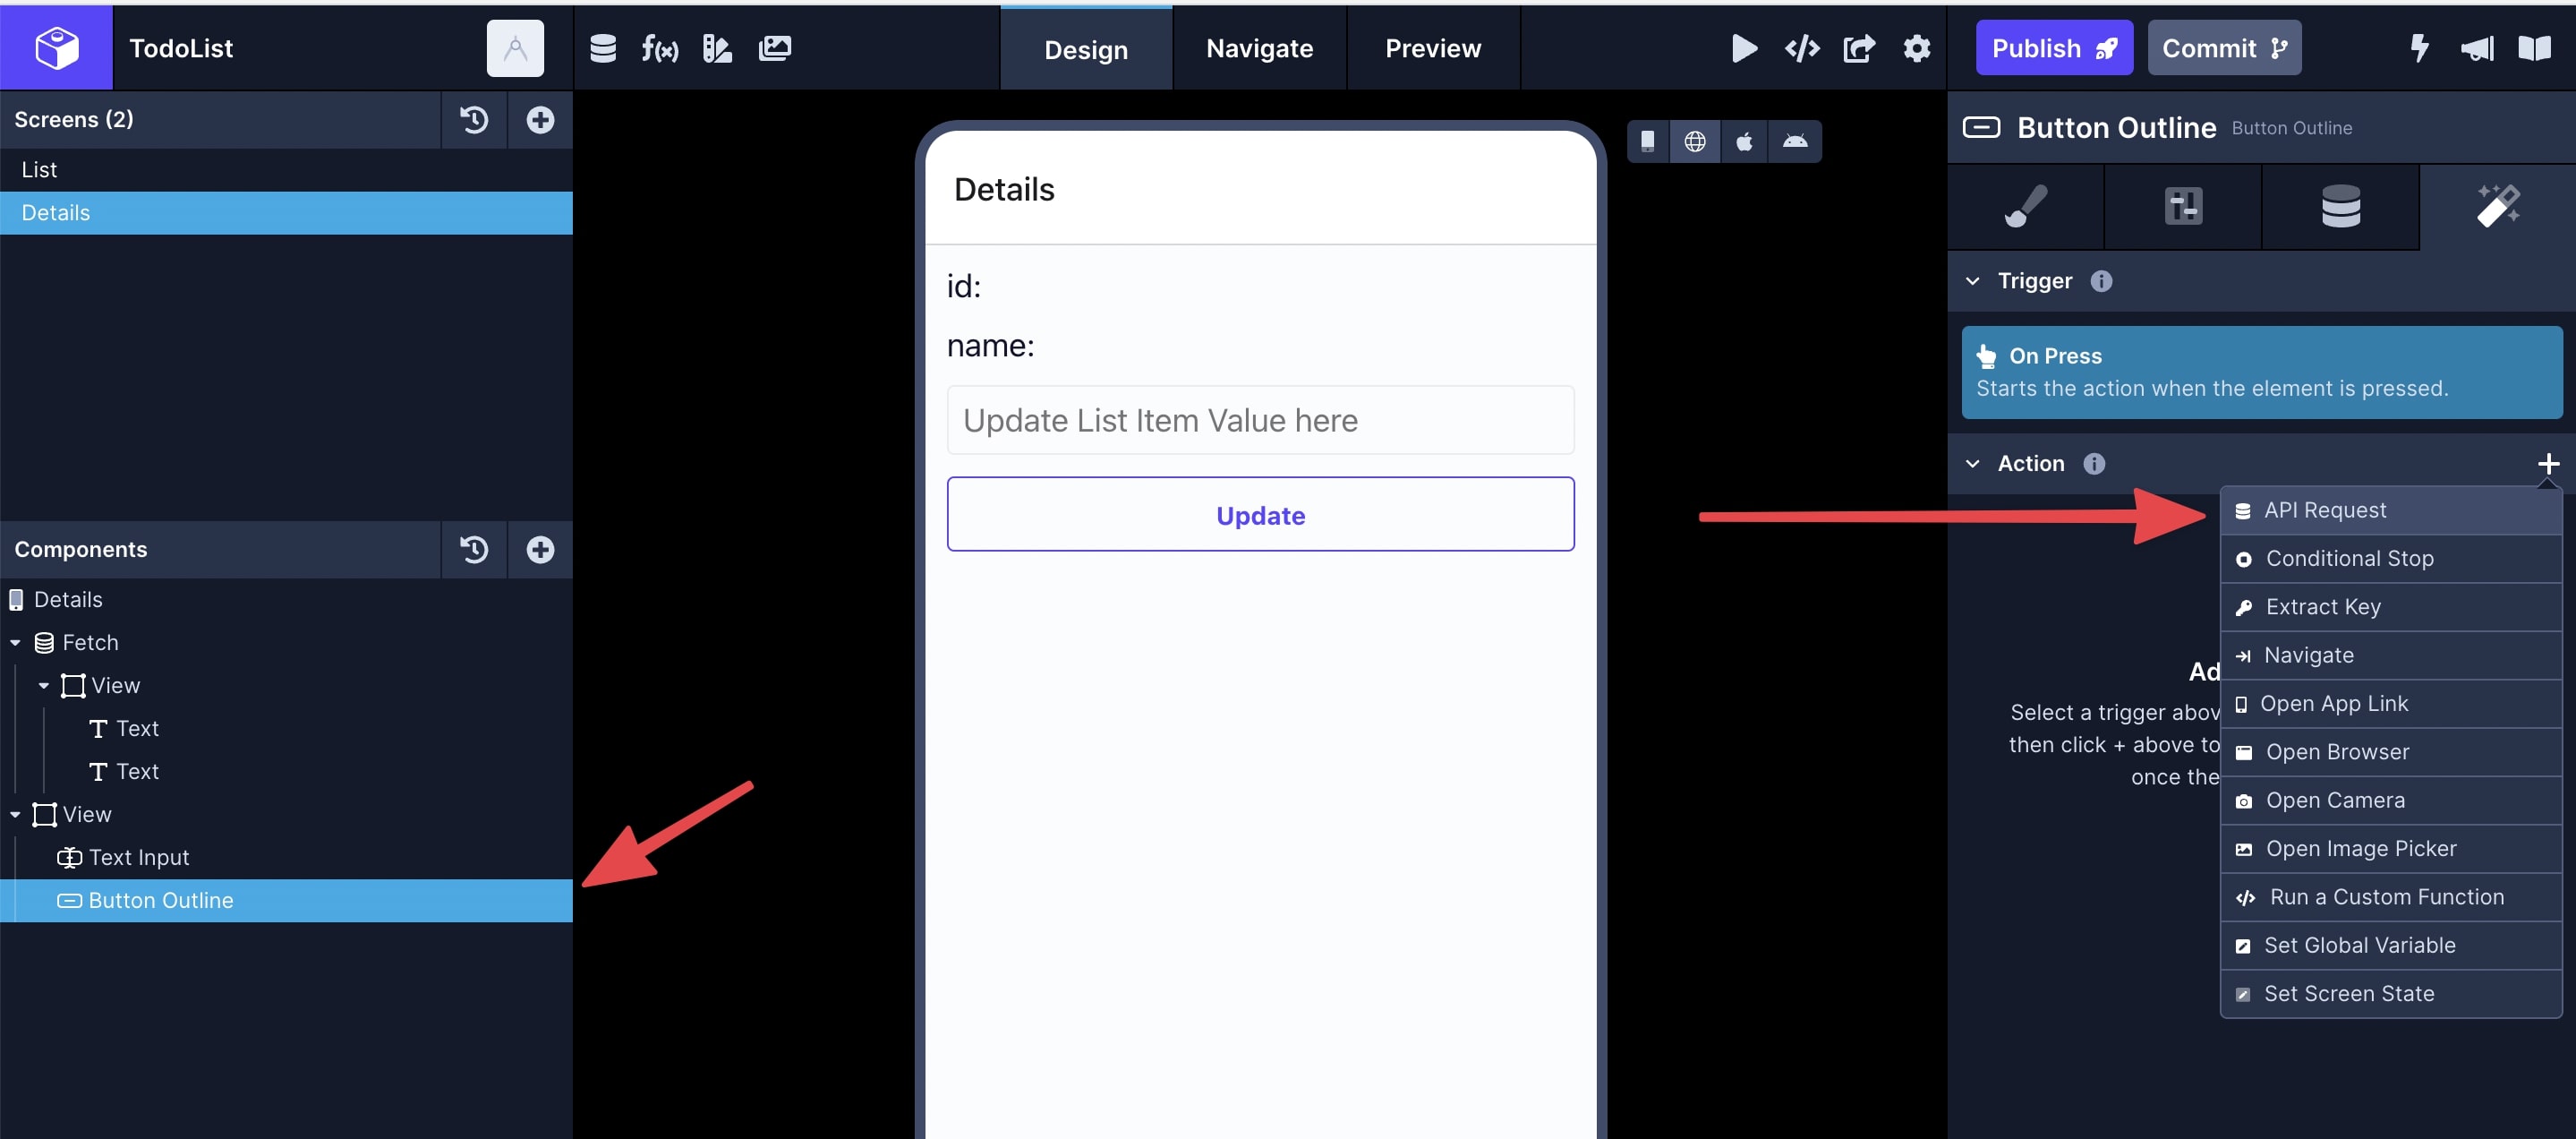
- Select the Service name and Endpoint name from the dropdowns.
- After you've made your selections, a Configuration section will appear and there will be an input for each key/value pair you defined in your Body Structure. The dropdown next to each variable will be pre-populated with all the
Data Sourceprops you have set on the screen. Select the corresponding value from the dropdown that matches your variable.
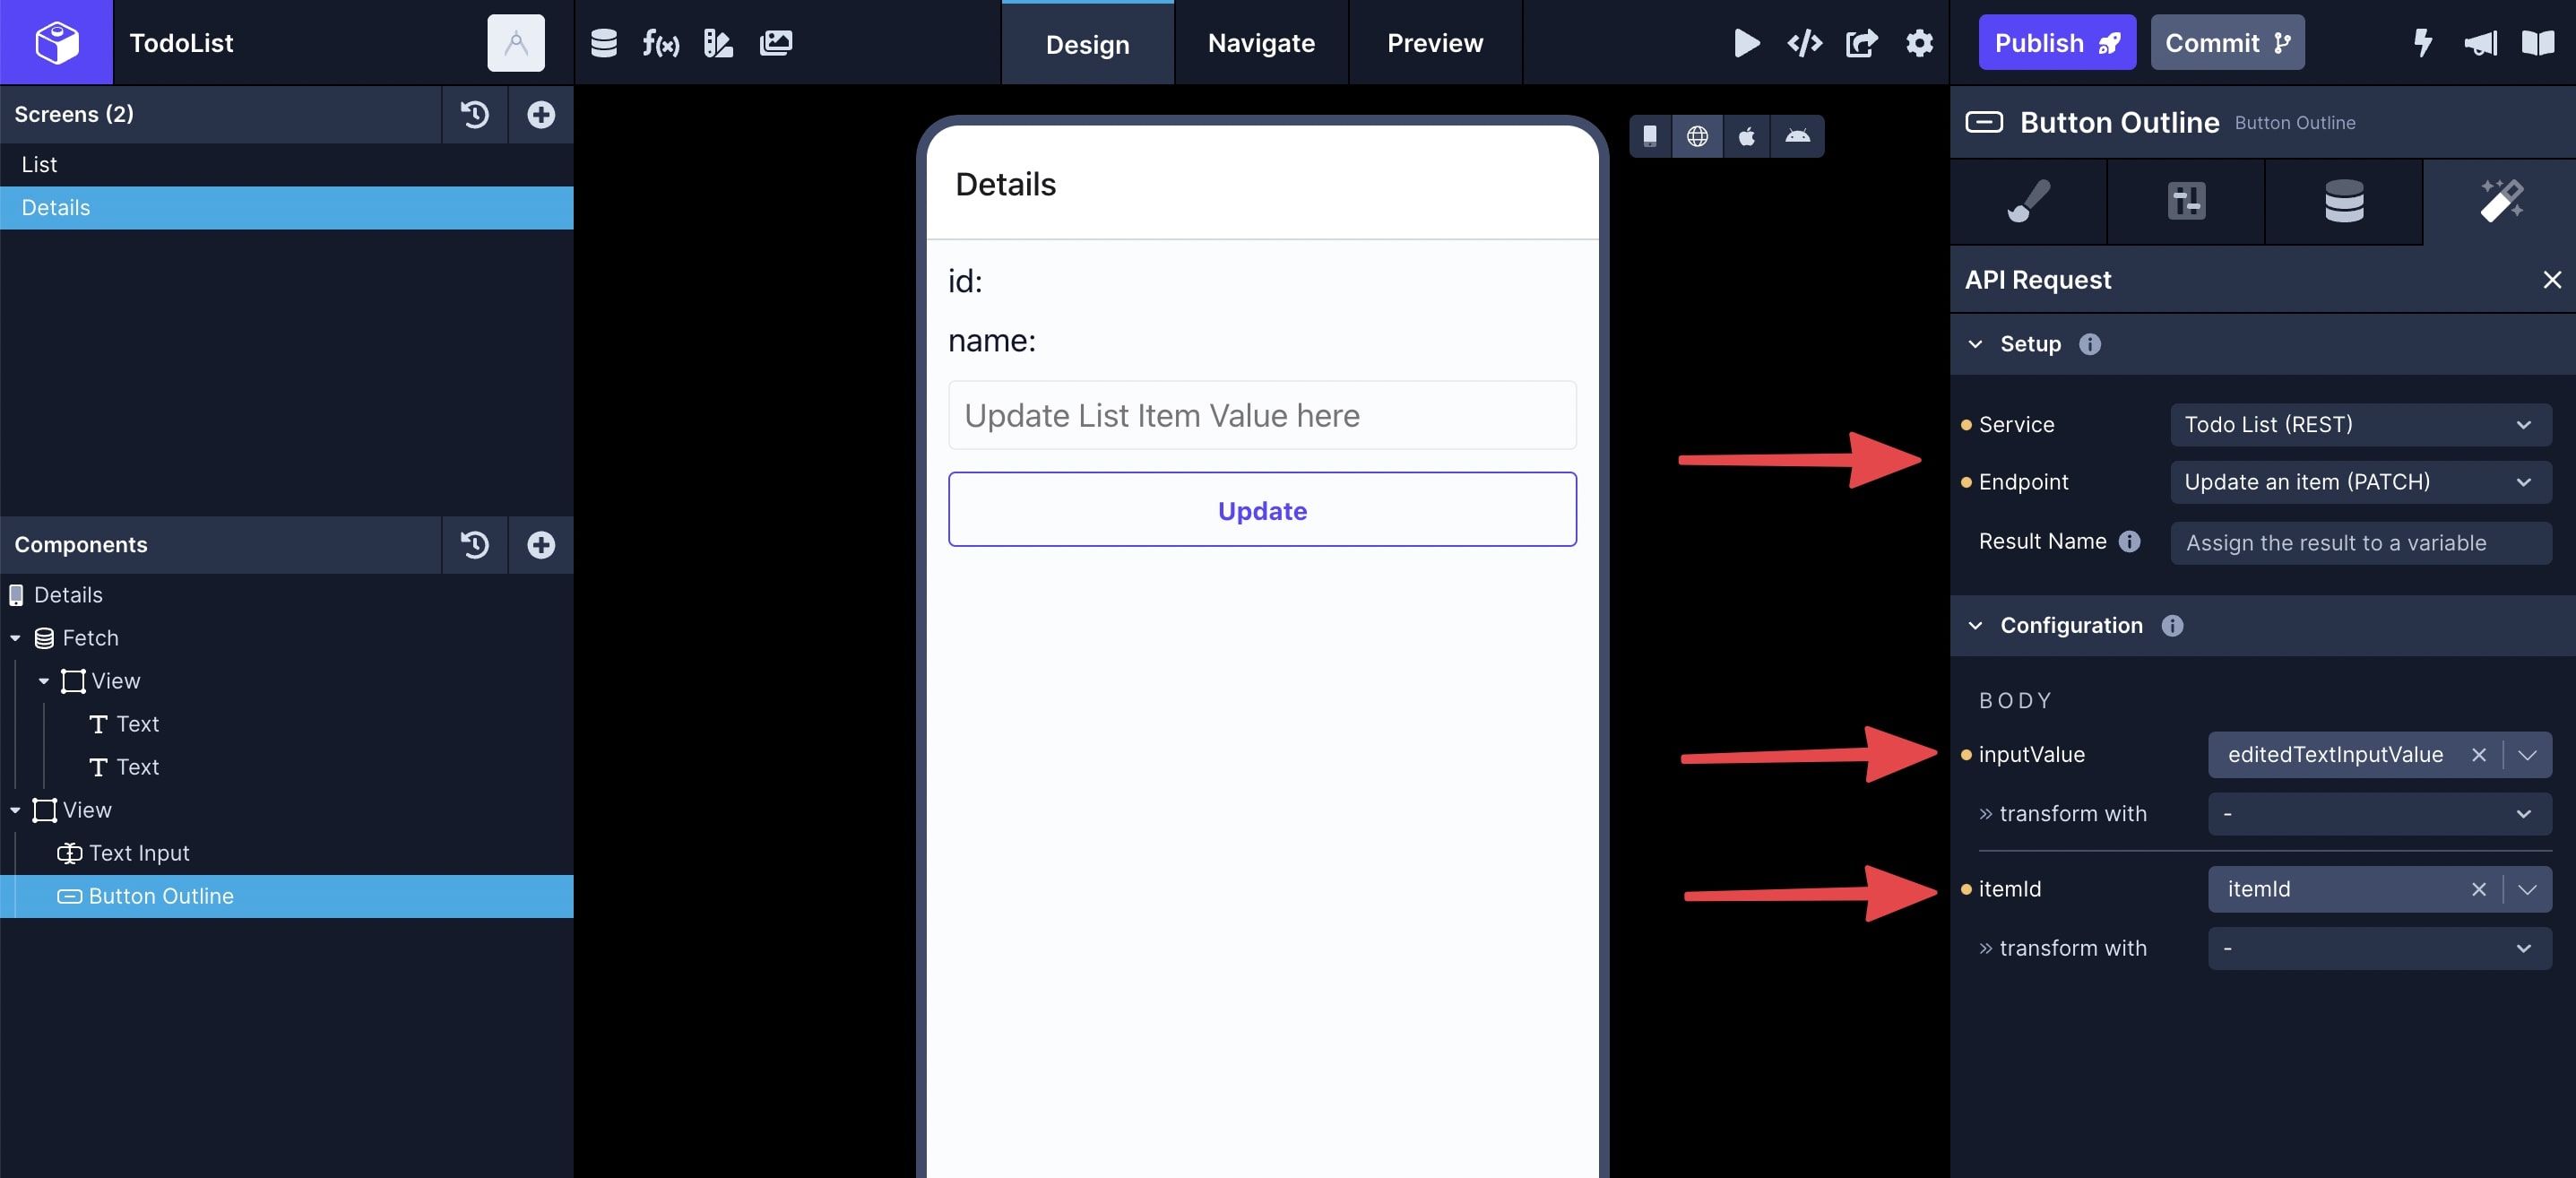
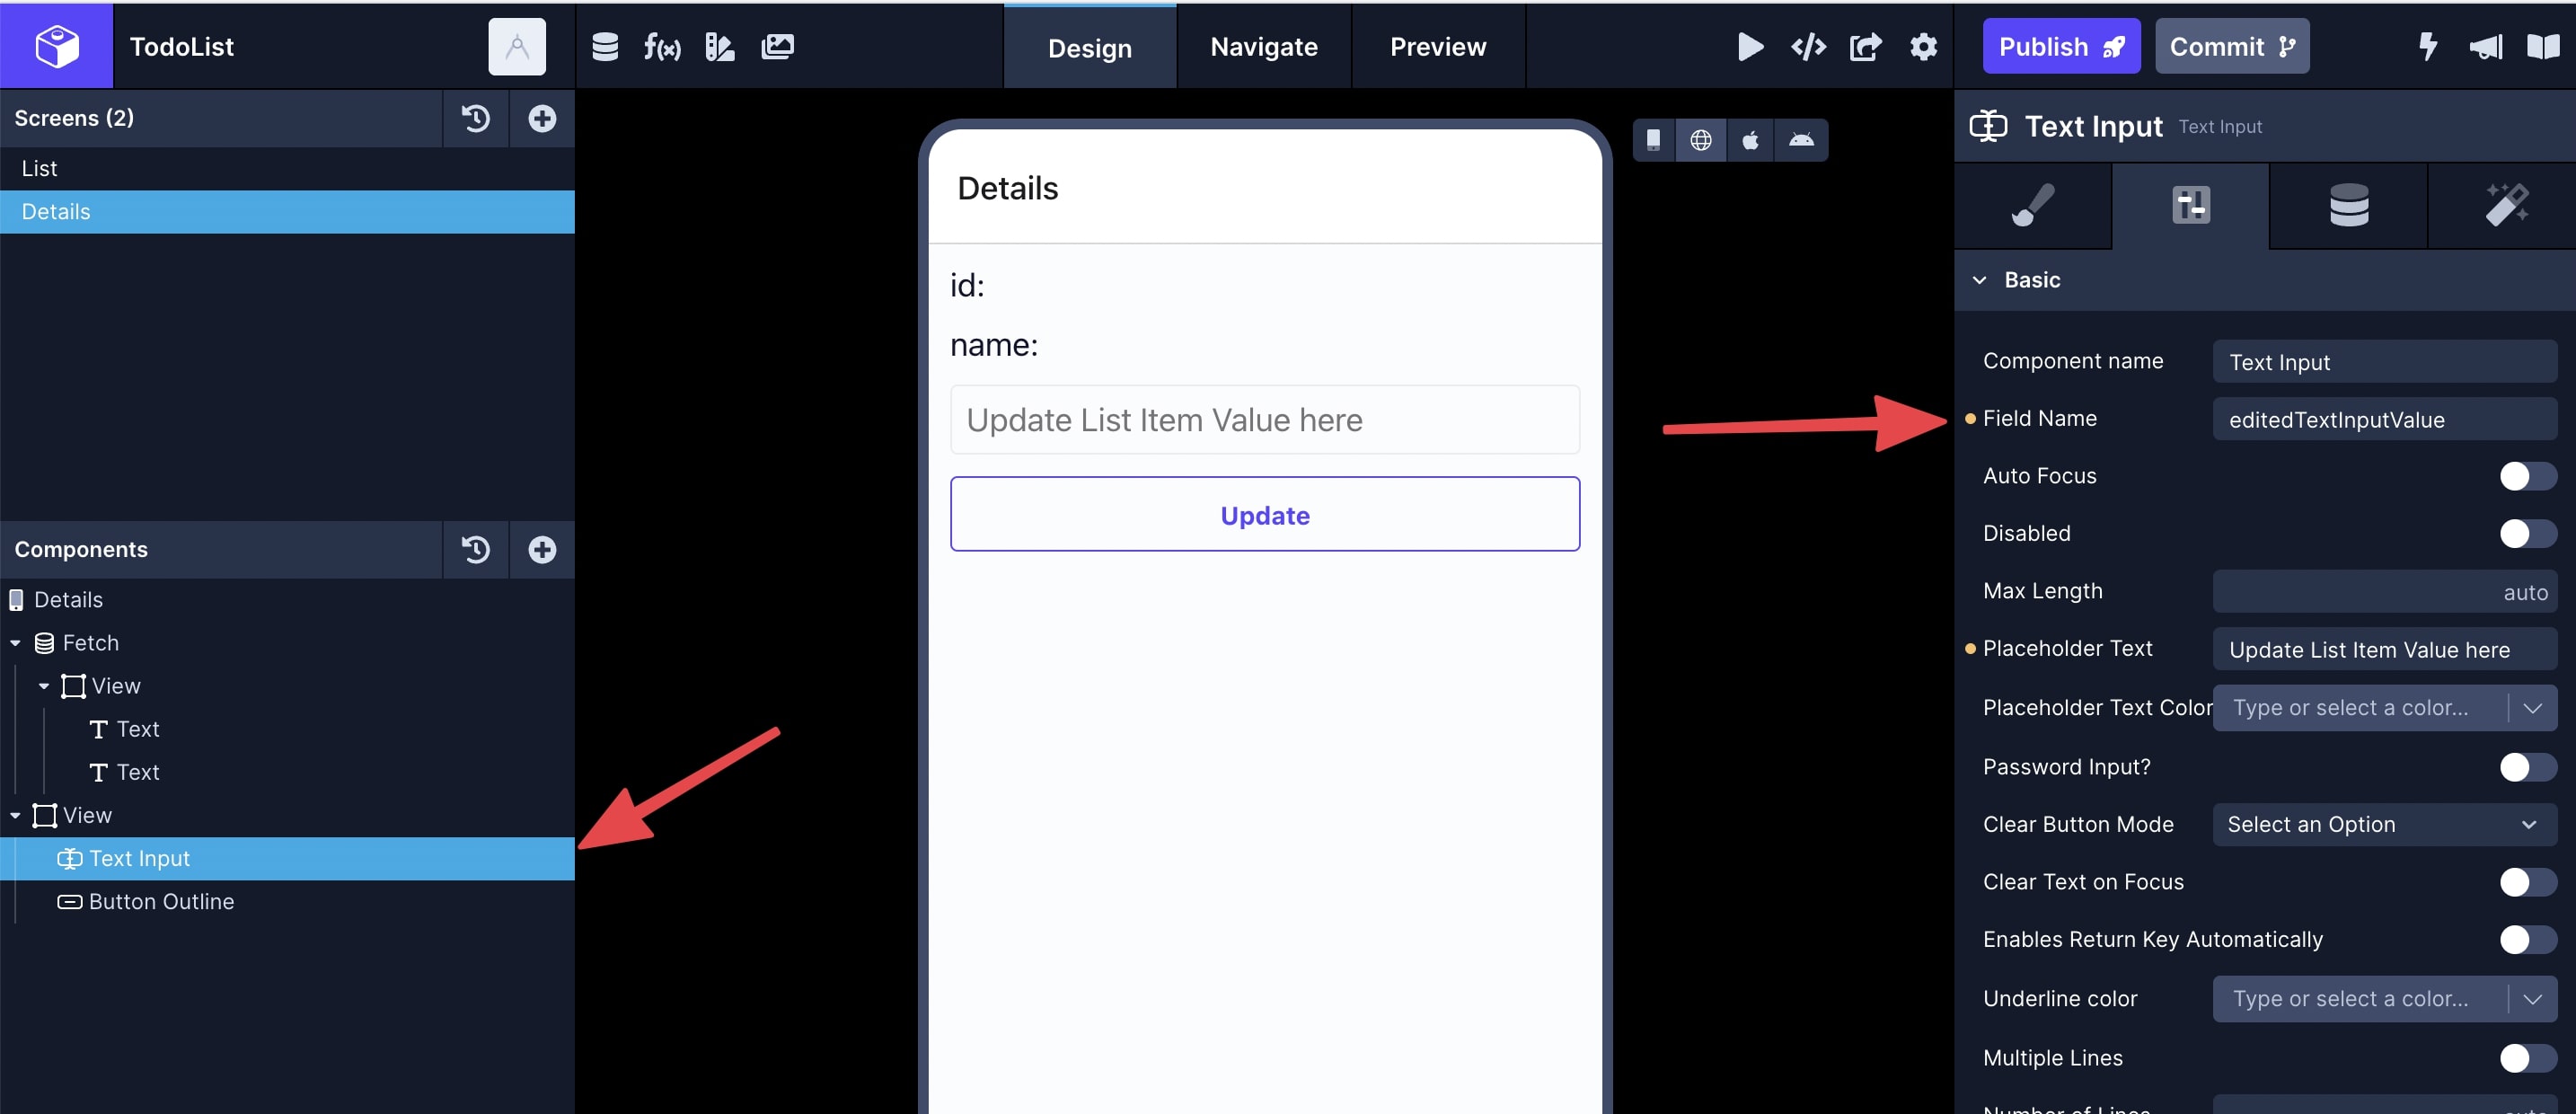
The textInputValue passed in the above example is the value of the Data Source prop on the TextInput component. To find it, go to the component and from the Properties panel, go to the Configs tab:
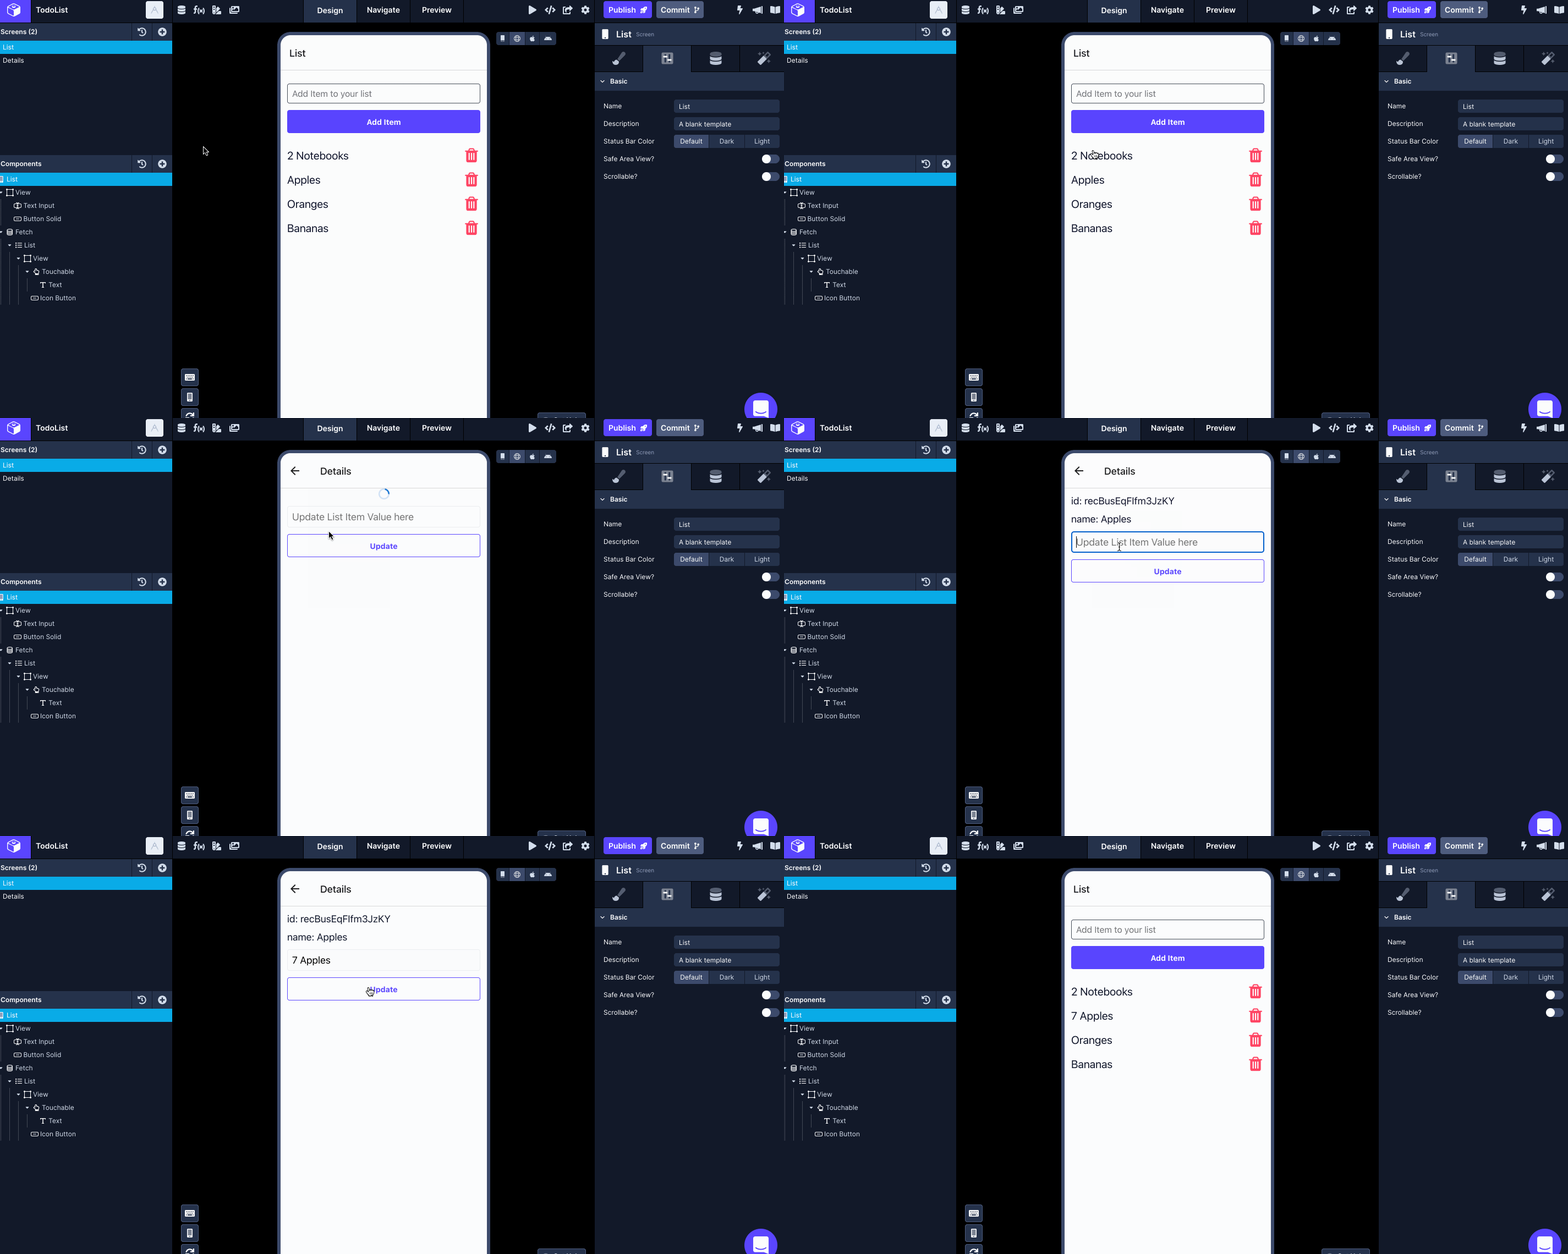
Here is the complete example of updating an existing item in the list.
Configure the endpoint to delete existing data
To delete an existing data record in the database of your choice, you will have to create an endpoint that submits a DELETE request. For example, let's consider the endpoint below:
https://api.airtable.com/v0/appkLwyequqaR6EWY/todolist/{{id}}It accepts the value of the id of an existing record to delete.
You will add a new endpoint for the DELETE HTTP method by following these steps:
- Click Add endpoint.
- In Step 1: enter the Name for the endpoint. Make sure the Method select is
DELETE. - Set the Role to
Deletesince the endpoint is creating a new record. Set the Object Type totodos. - In Step 2: add the base name path and/or any query parameters to the API's base URL. Currently, the endpoint uses a dynamic variable
/{{id}}to delete a record based on the value of theidprovided. - Provide an
idof the existing record under Path Test Values or include in the Body section. - In Step 4: click the Test button next to the Endpoint input to verify the response coming from the API service.
- The last step is to save the endpoint. Click the Save button.
Trigger an API Request action to submit a new item
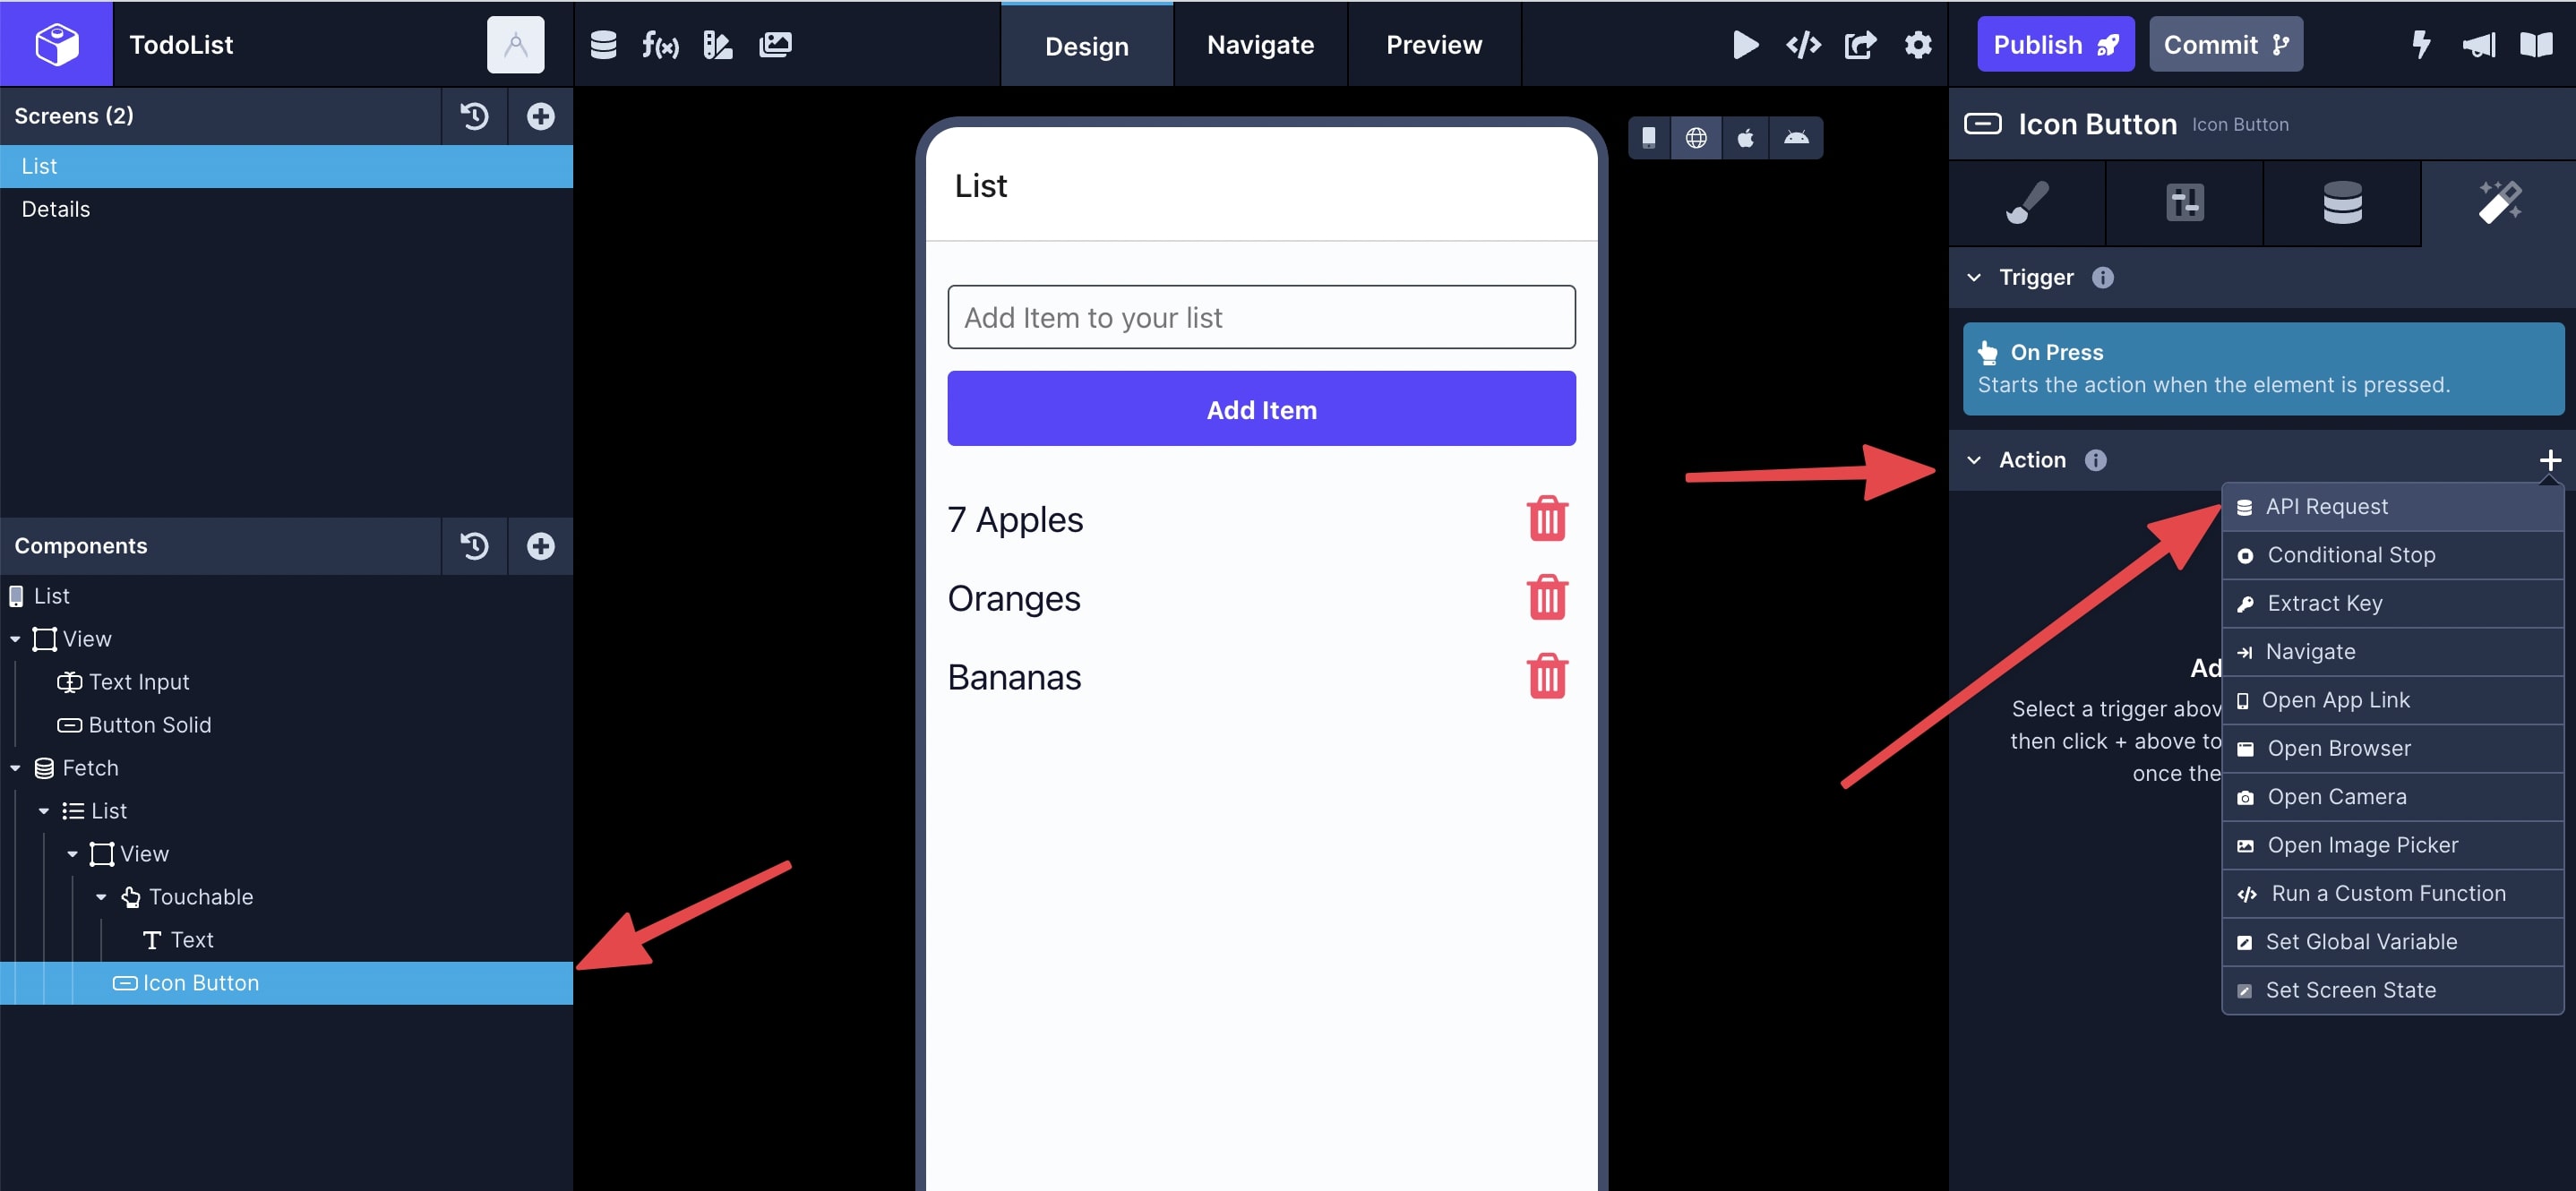
Once your components, API Service, and Endpoint are set up correctly, select the Button or Touchable component in the Components tree and go to the Interactions tab in the Properties panel (last tab on the right-hand side).
- Click the
+button next to Action. - From the dropdown select the action API Request.
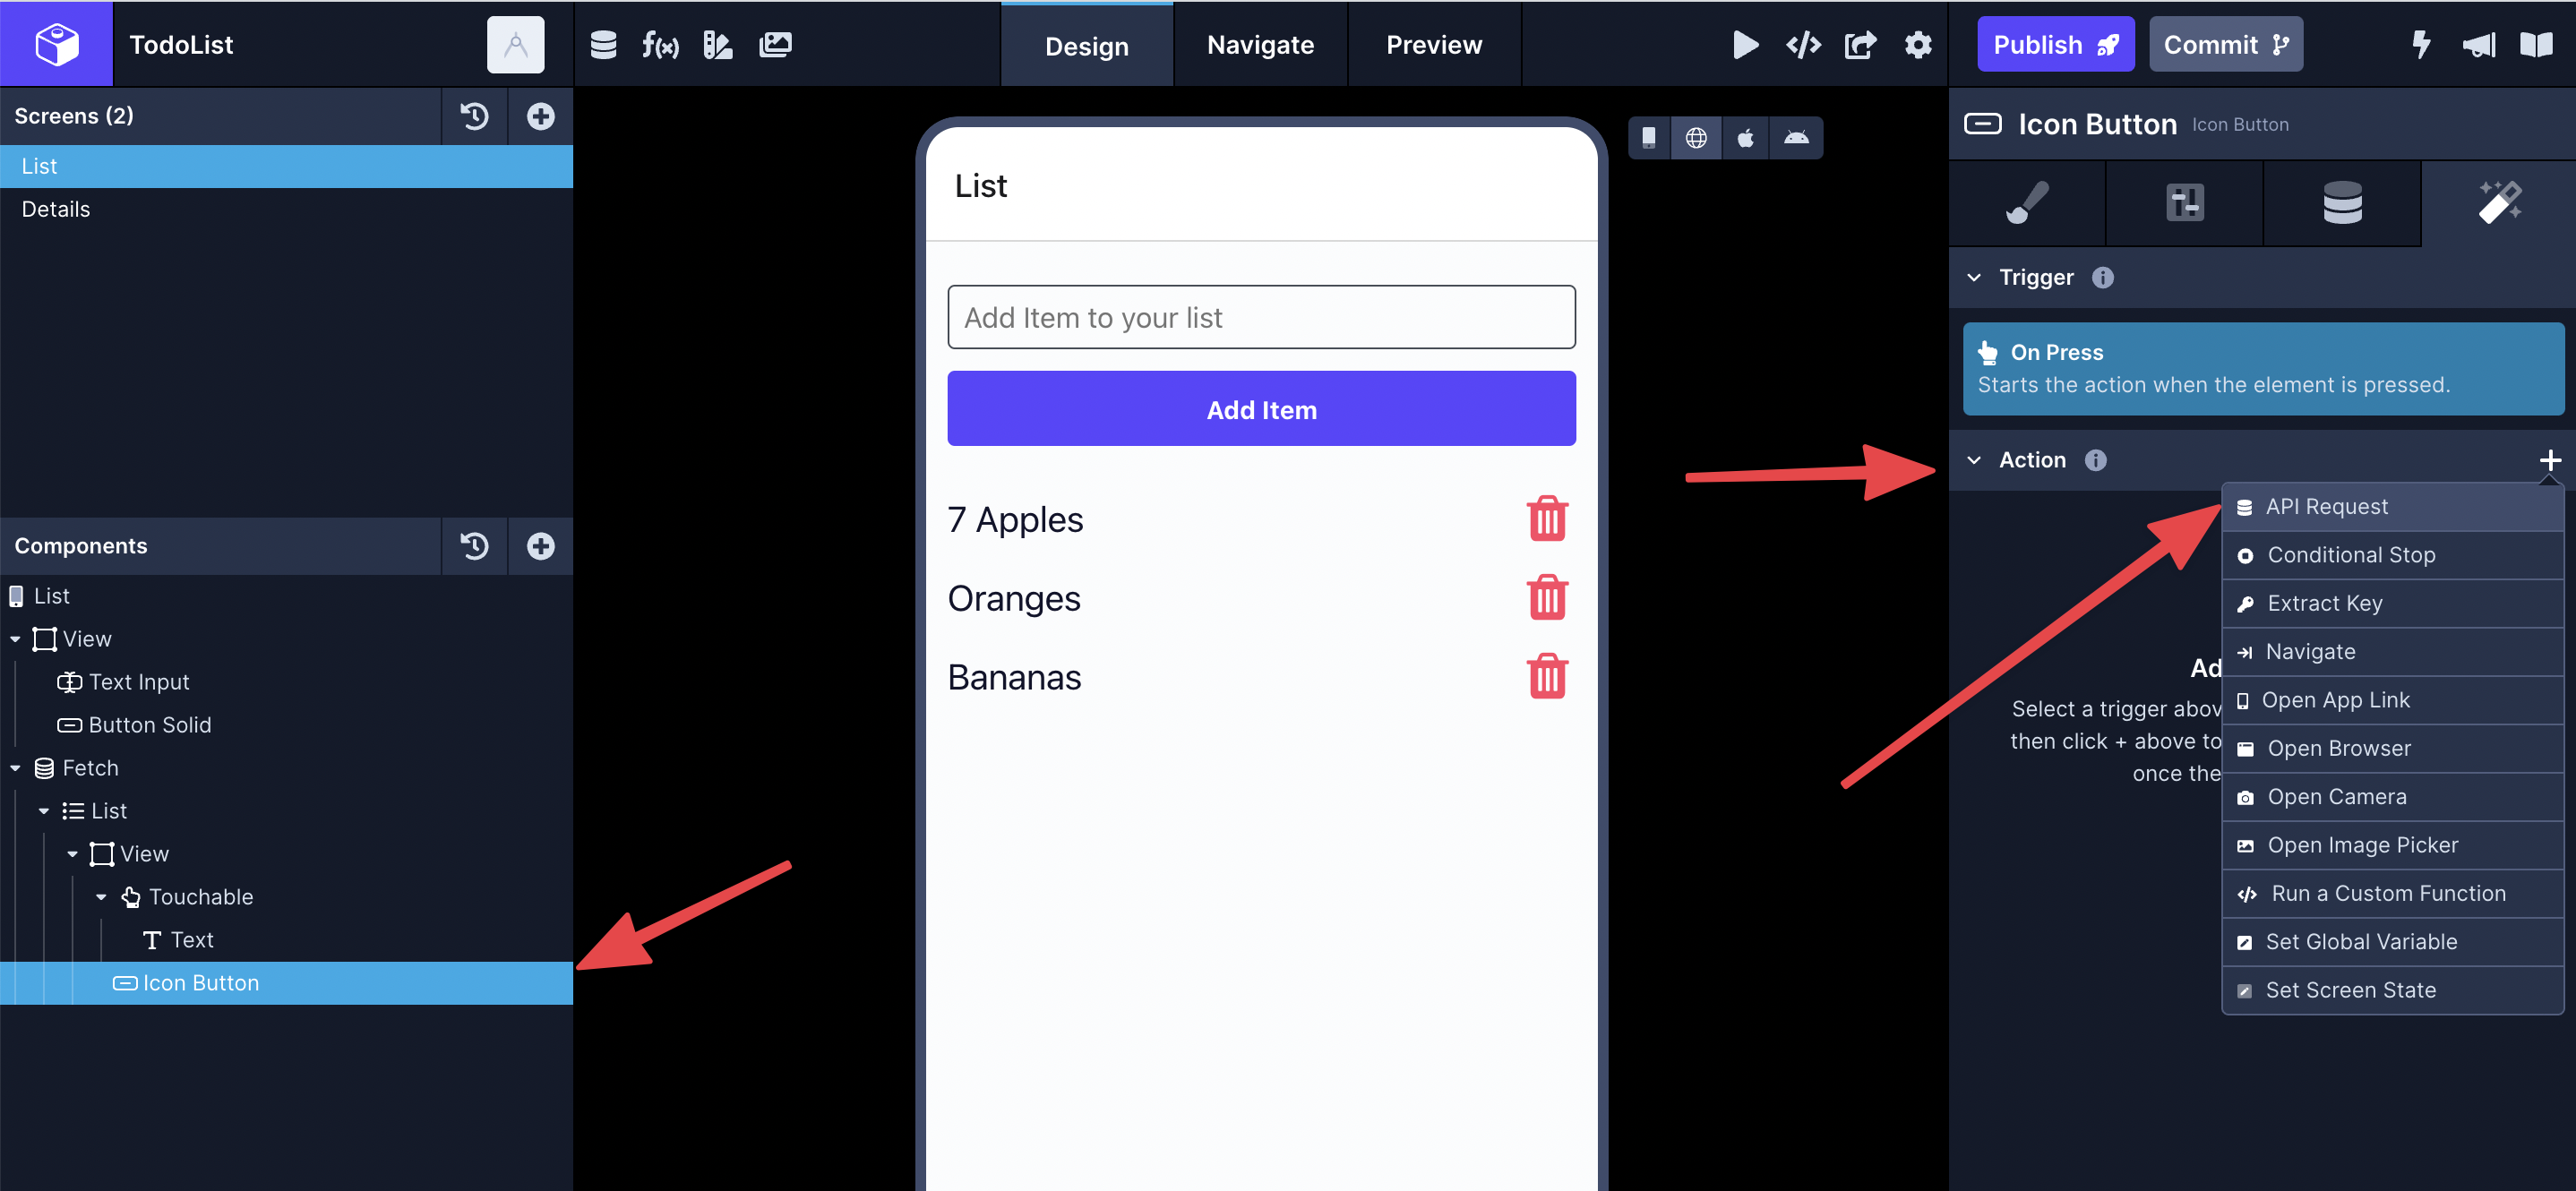
- Select the Service name and Endpoint name from the dropdowns.
- After you've made your selections, a Configuration section will appear. It will allow you to define the value of the path variable defined when creating the endpoint. Select the corresponding value from the dropdown that matches your variable.
For this example, the dropdown next to the variable id is pre-populated with all the Data Sources from the List component.
Here is the complete example of deleting an existing item in the list.
Updated about 1 year ago
