
Intro to Authentication
Authentication verifies a user's identity to provide them access to your mobile application. Inside Draftbit, the process of adding authentication starts with the REST API service. If the REST API service you are using supports user management, it is likely using JSON Web Tokens.
Implementing user authentication in a Draftbit app, we recommend you to use an Email/Password or a unique identifier sign-in provider.
The process of authenticating a user typically needs the following steps in a mobile app:
- "Sign Up": Provide a form for a user to enter credentials to create a new account.
- "Log In": Provide a form for a user to enter credentials to authenticate their identity and login into the app.
- "Saving Auth Token": Save the Authentication Token when a user's credential verifies with the backend service. Authentication Token is received as a response from the REST API service. Using the saved Auth Token will allow you to make API requests to Authenticated endpoints in the REST API service.
- "Log Out": An action to reset authentication and return the client to an unauthenticated state.
Using Authentication in a Draftbit app requires familiarity with the following concepts:
- Variables
- REST Services & Endpoints
- Configuring an Endpoint
- Navigation
- Data Enabled components
- Action Workflows
- Navigation Params
Define Global Variables
The initial step to implement authentication in a Draftbit app is to add the API service using the Data modal in the left-hand column of the builder.
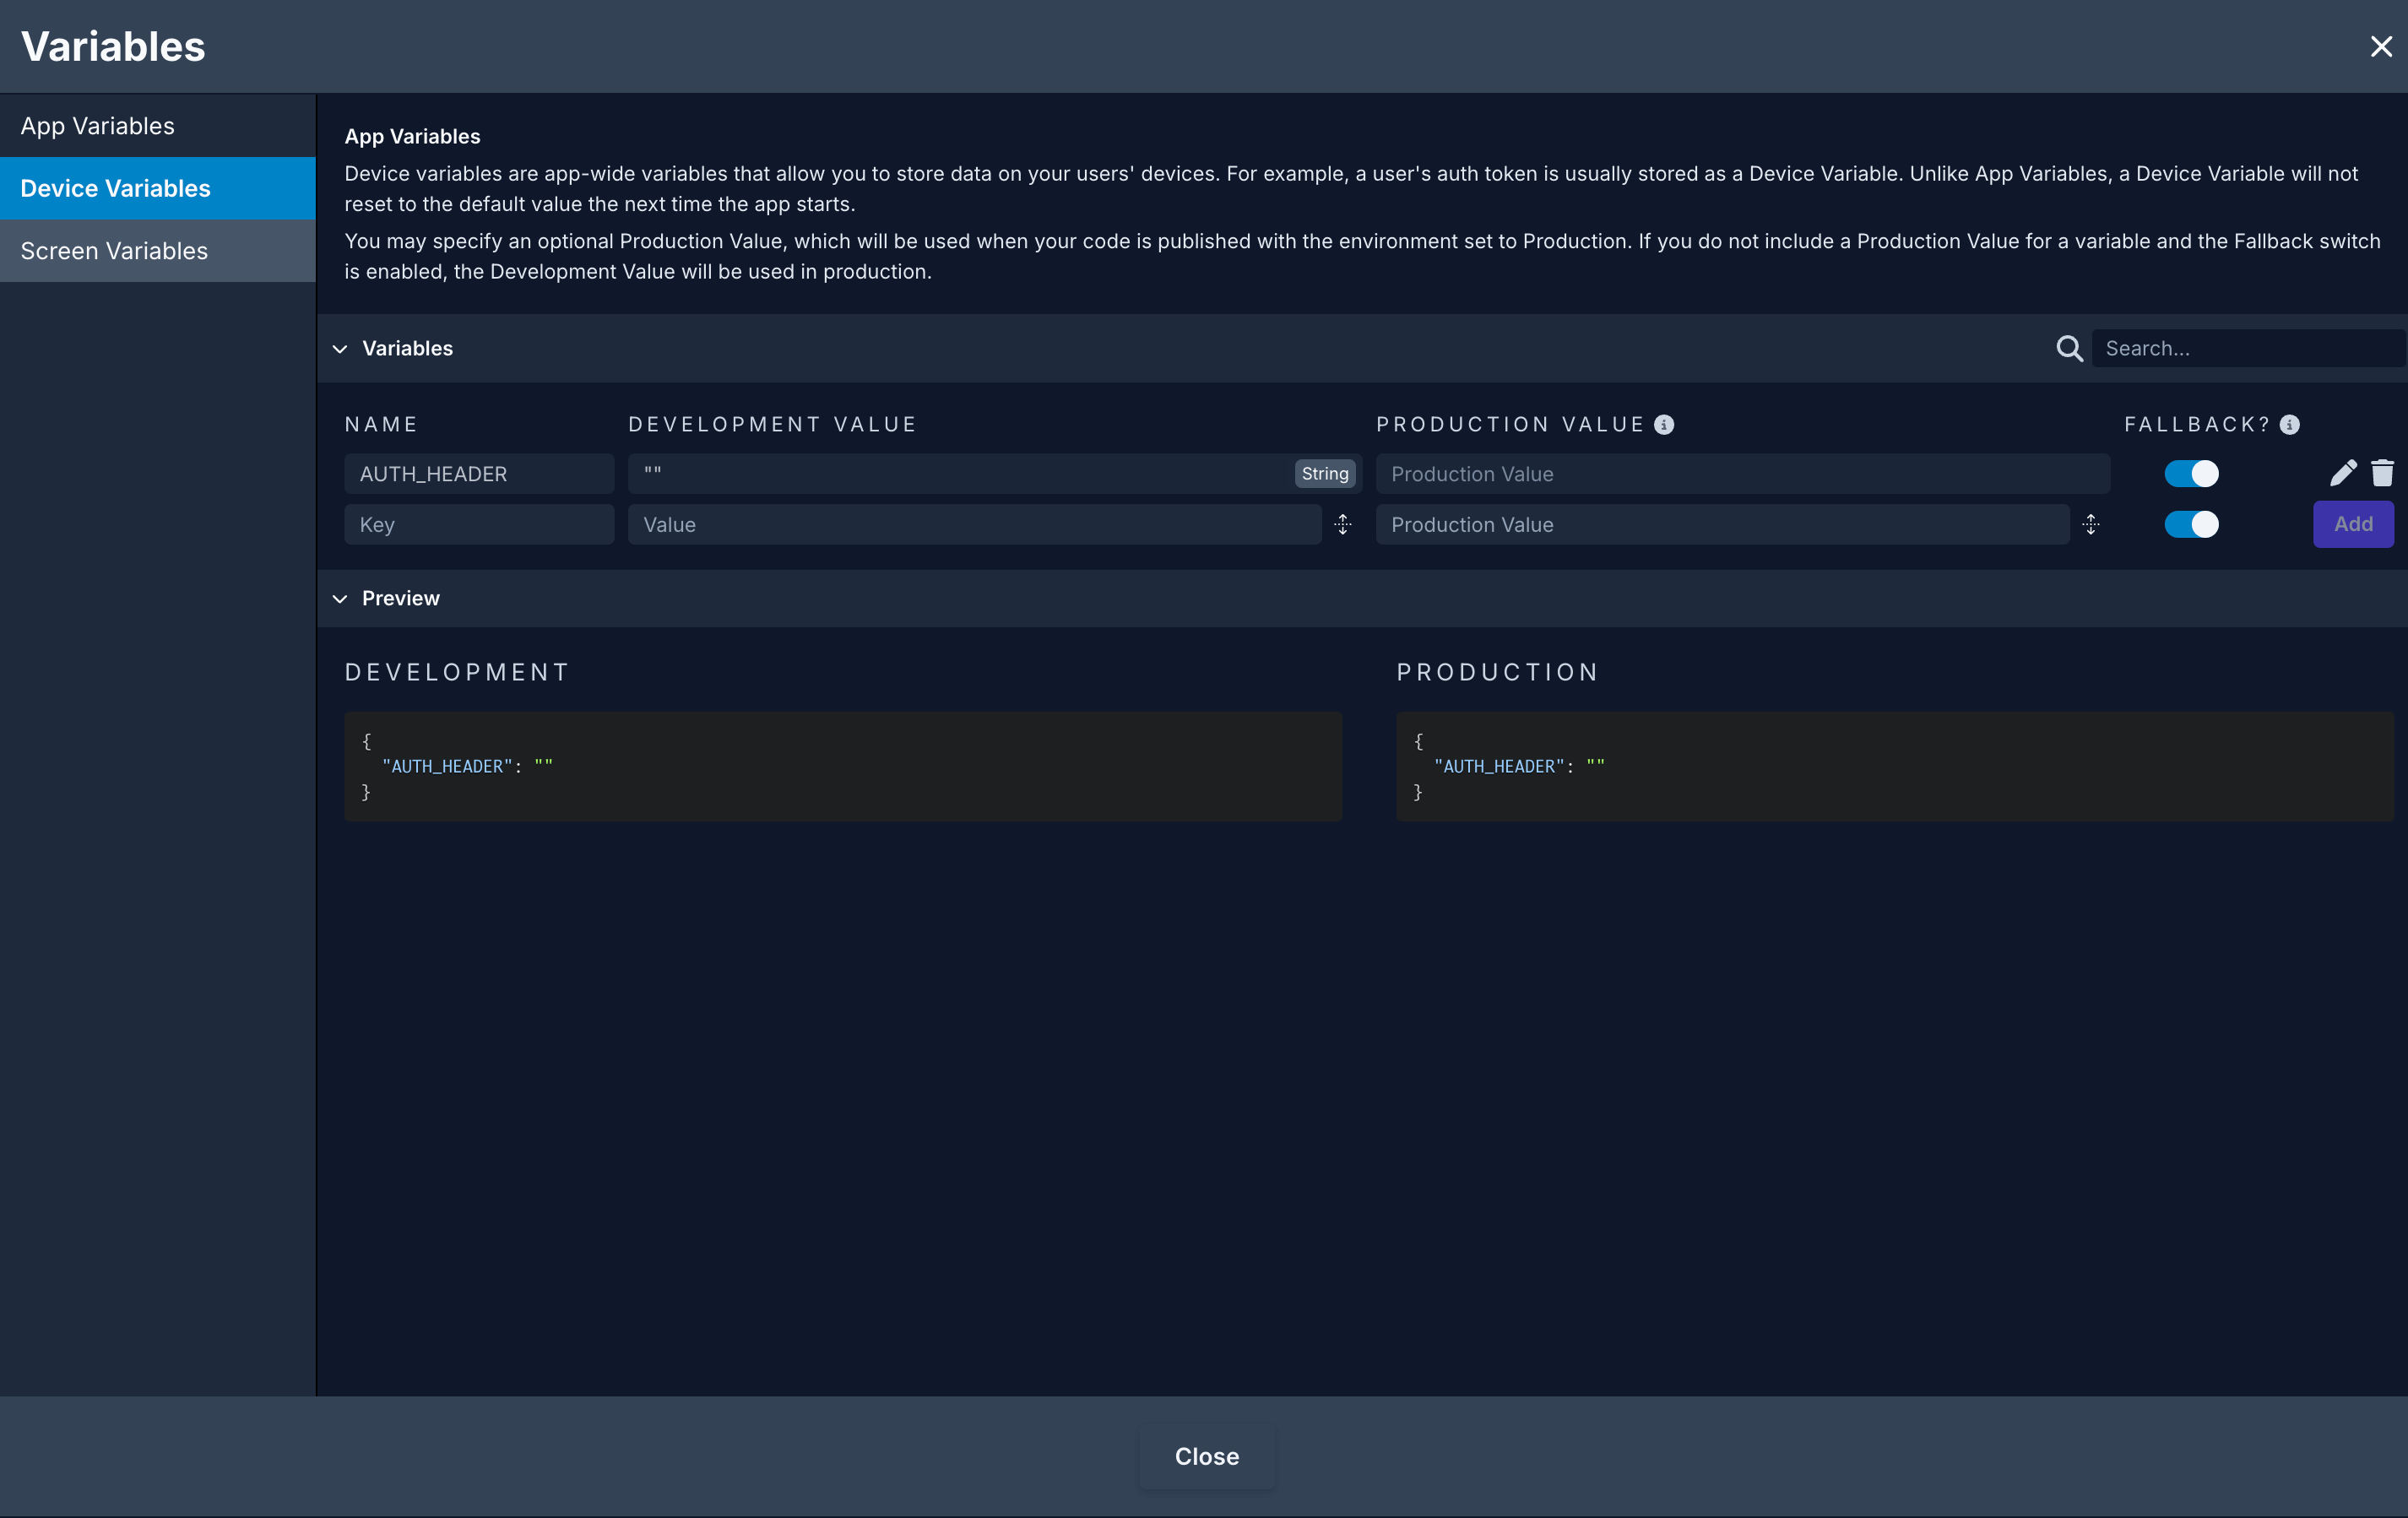
Then, create a Device Variable to save the auth token as the value of the Authorization Header. Saving the auth token will allow the app user to view the protected data. It will also be useful when a user re-opens the app and is automatically logged in instead of entering their credential. Although, any auth token has an expiry date associated with it. All tokens to persist a logged-in user's session should be defined as a Device Variable
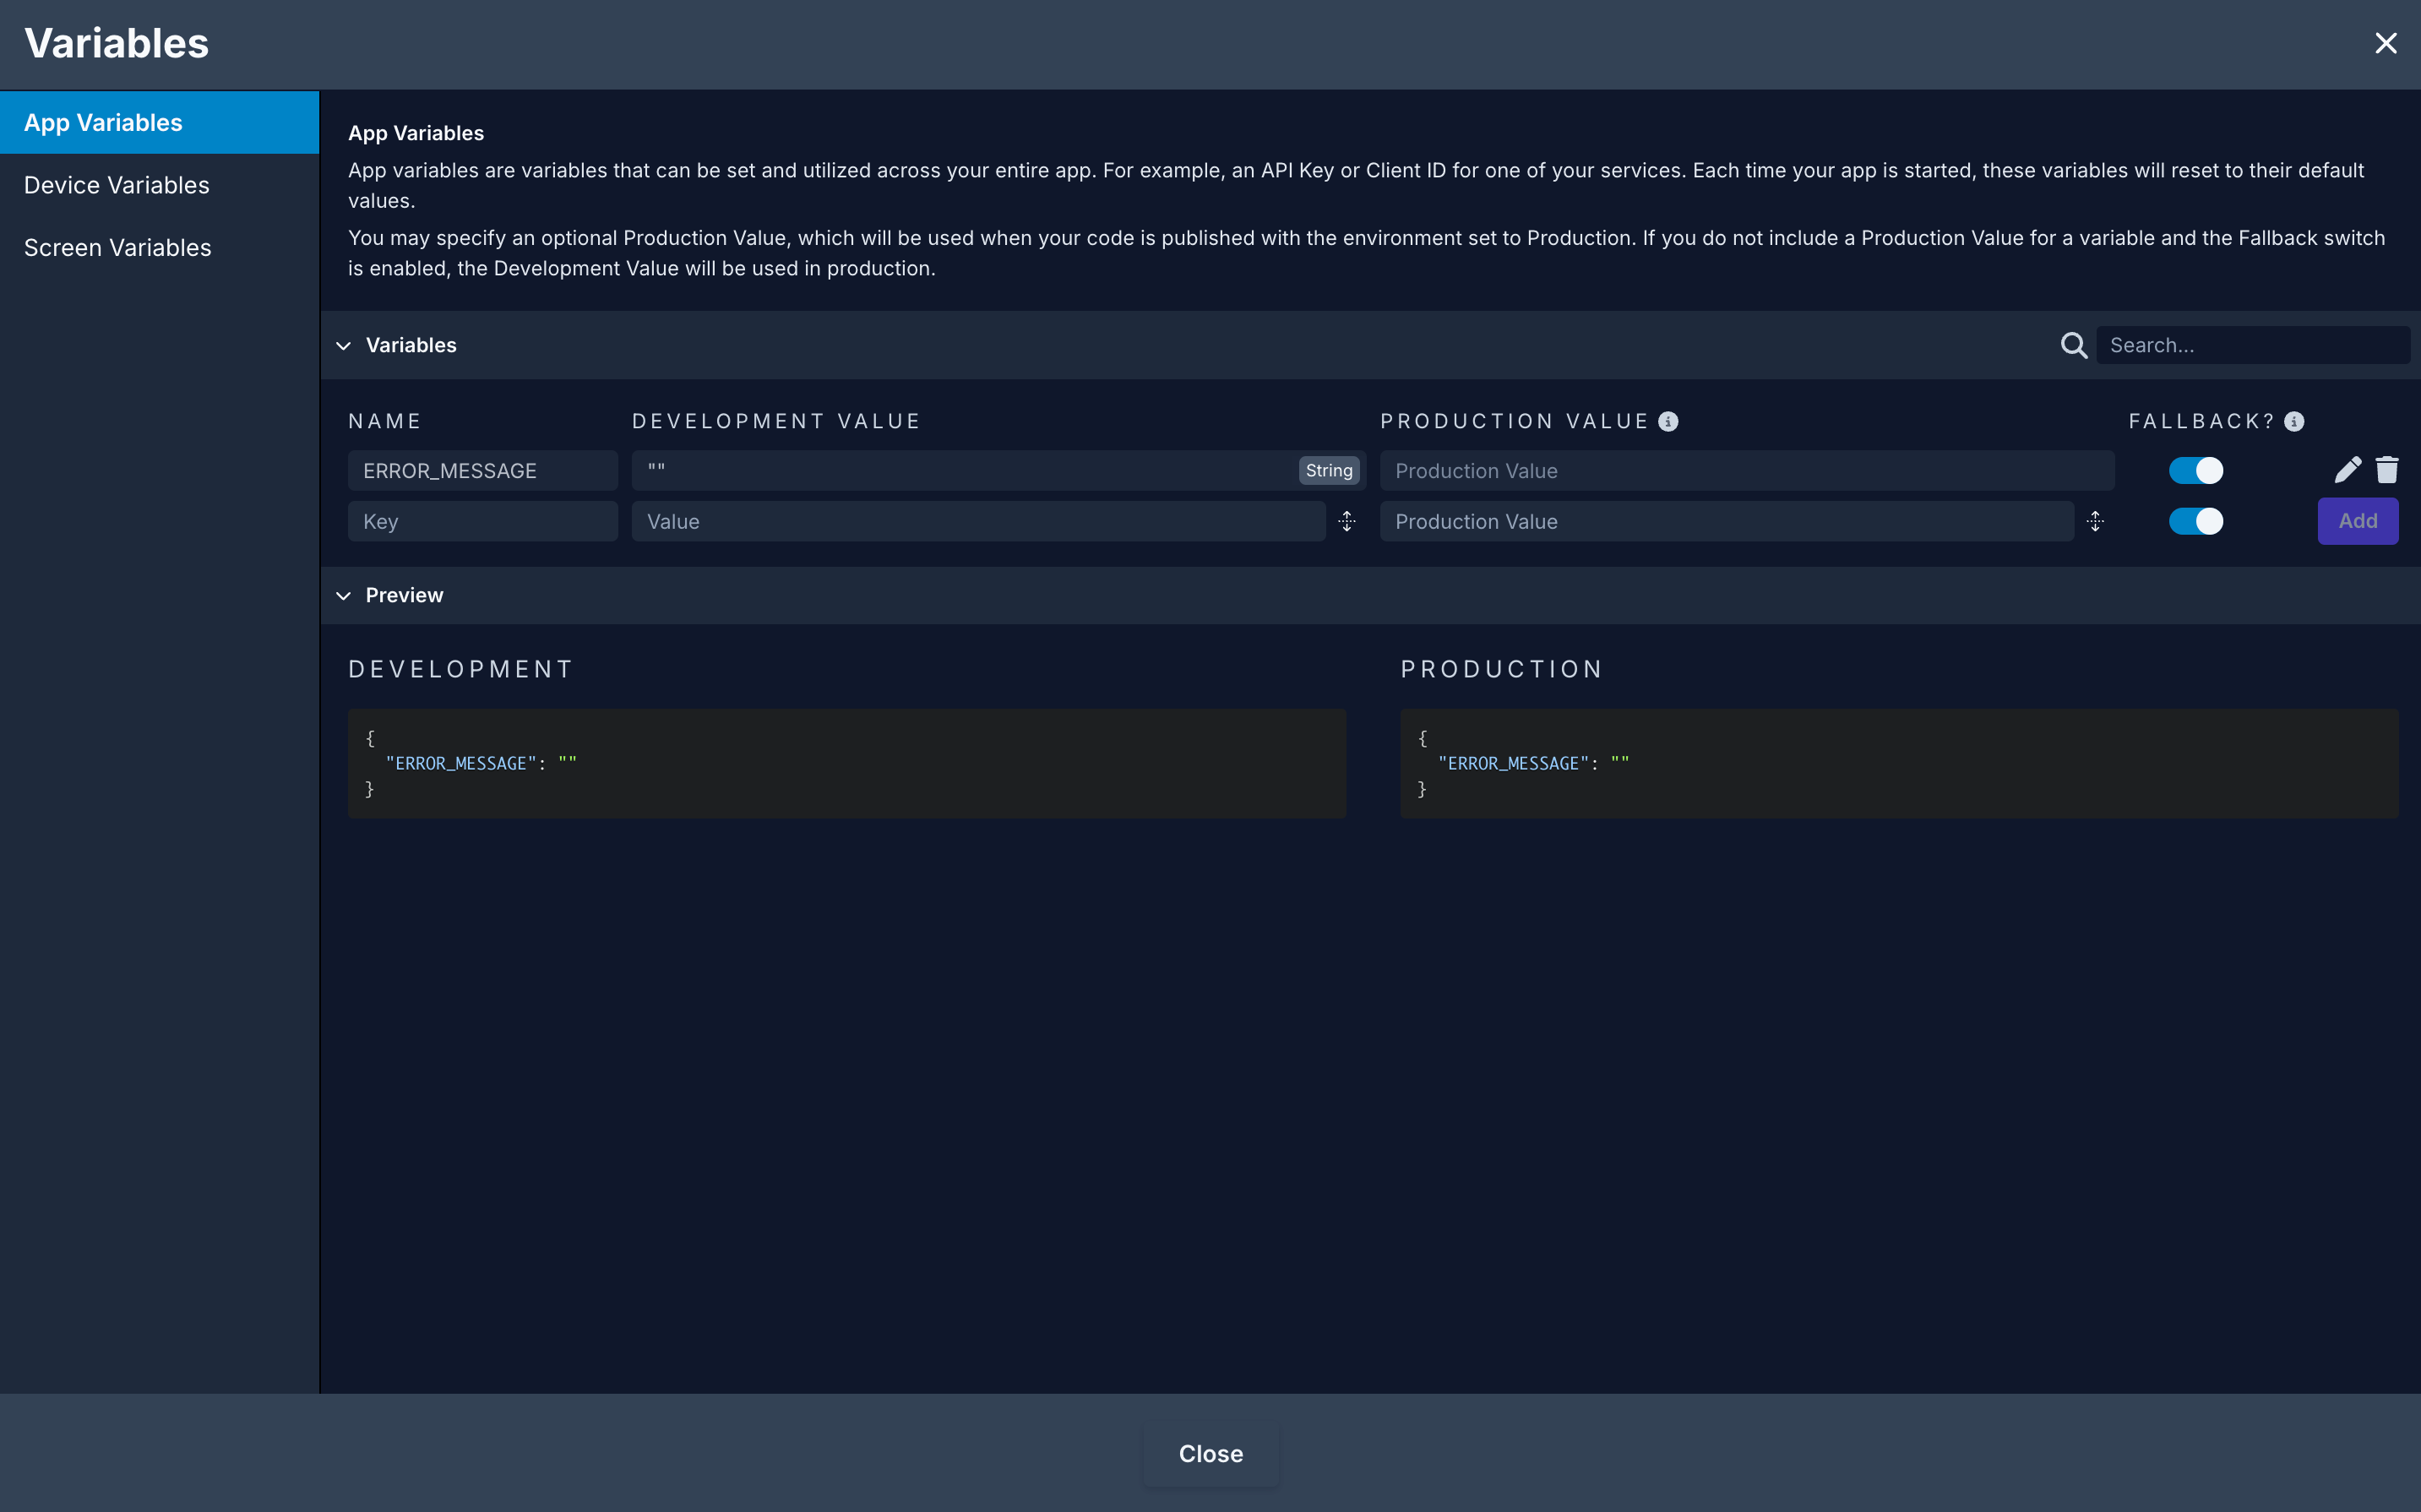
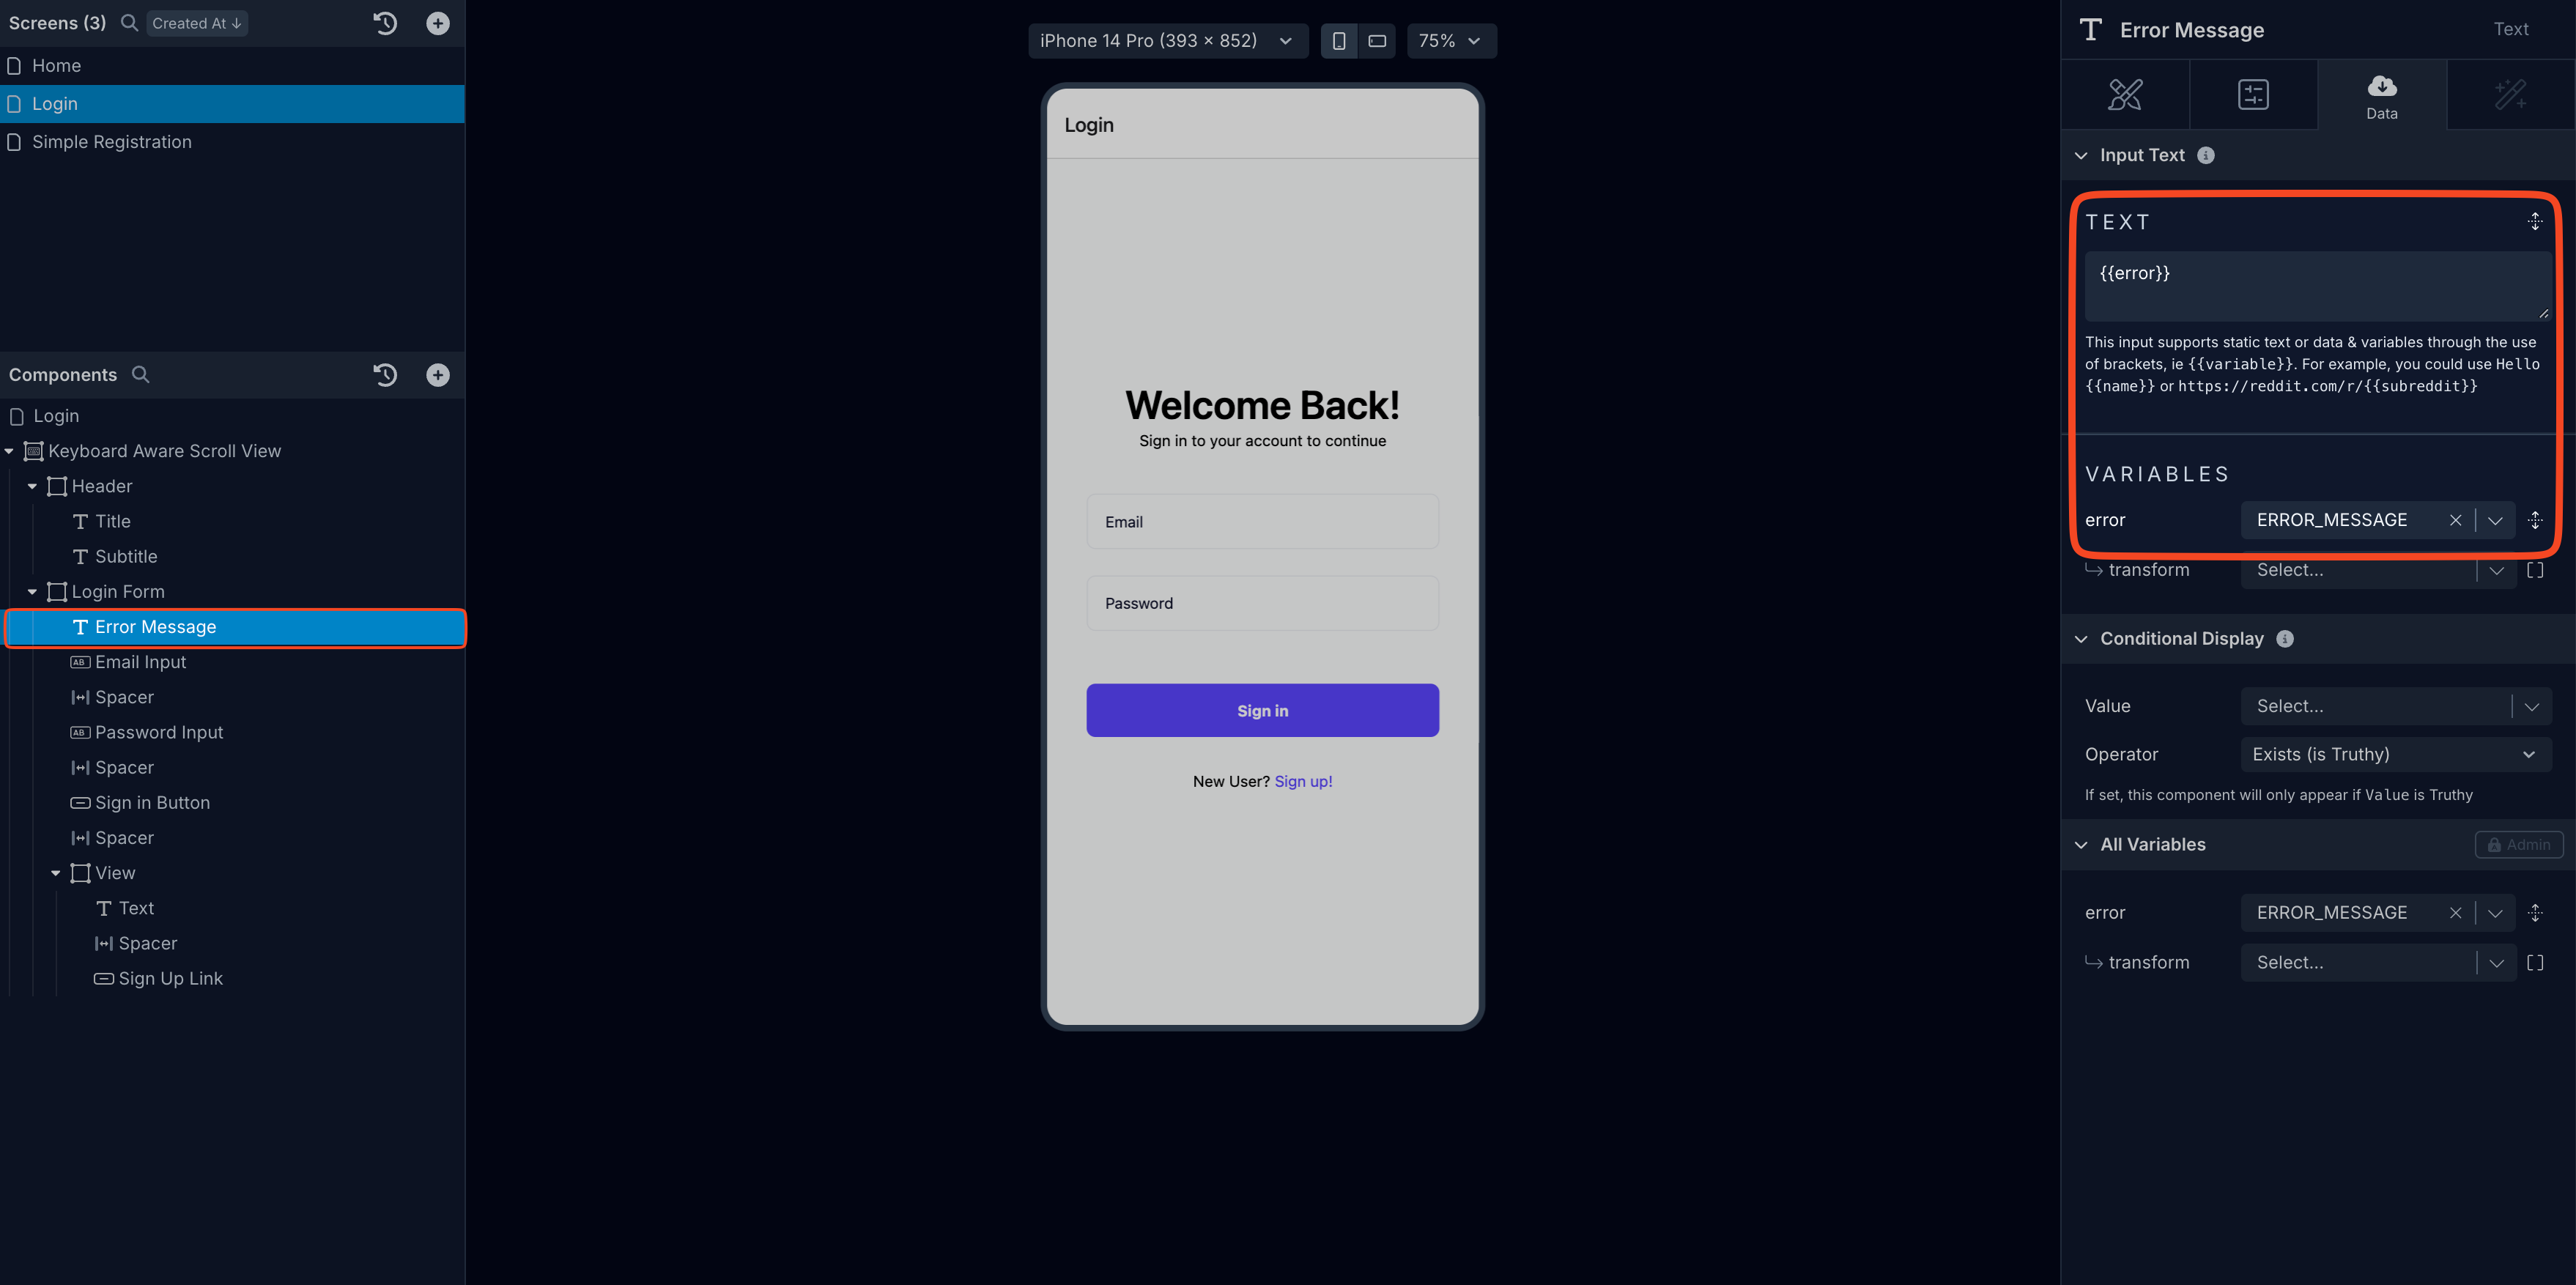
You can also define App Variable to display error messages on the form screen.
Actions required for signup/login
There are a common set of actions required by both the signup and login process. These actions are configured on a Button or a Touchable component. They are triggered in the order they are defined when a user presses the touchable component to perform the action of creating a new account or logging to the app.
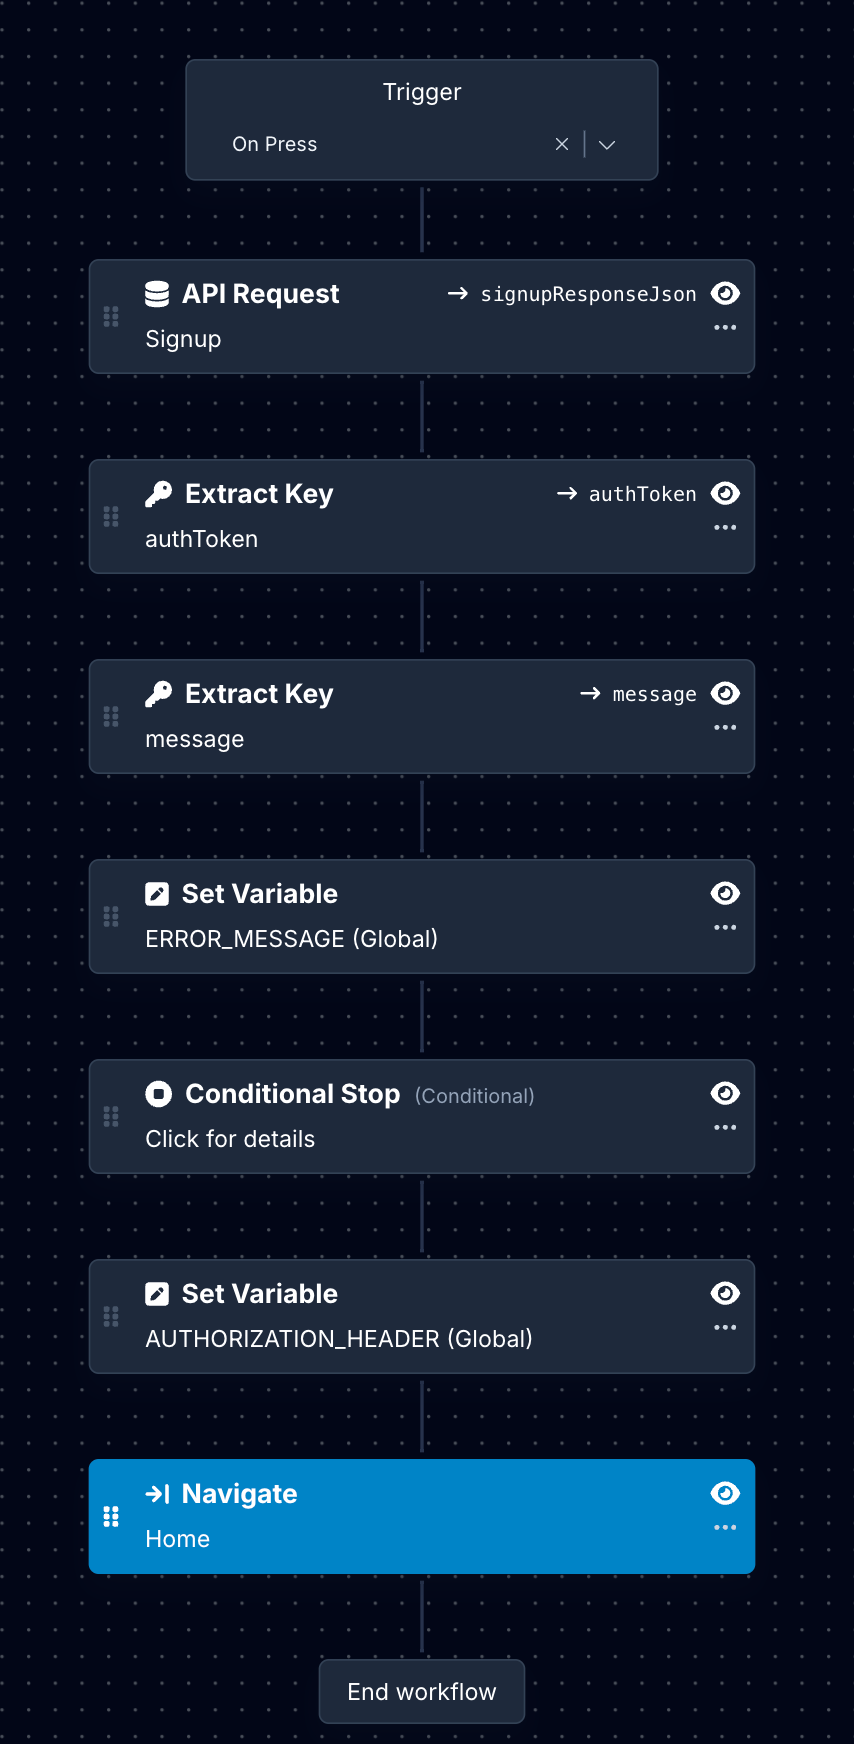
For an example, a sign up form may have the following stack of actions:
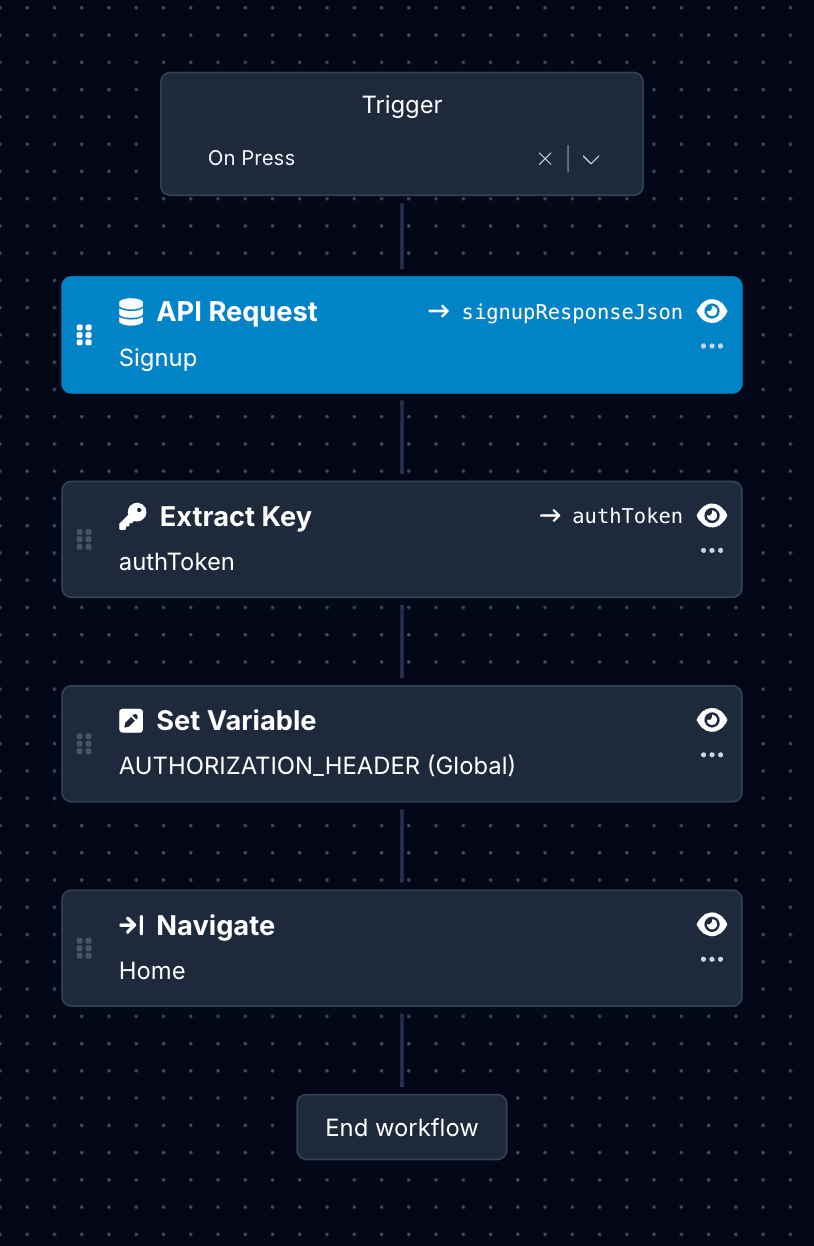
Each action is described below:
API Request
API Request is used to send the POST request to the API service. It comes back with a response in JSON.
On success, the result has the auth token. The failure, the result has an error message. This result should be saved in a custom variable to be re-used in the next action. Using the Result Name property, you can assign a variable to store the result. In the example below, the JSON response is assigned the value of signupResponseJson.
Here is an example:
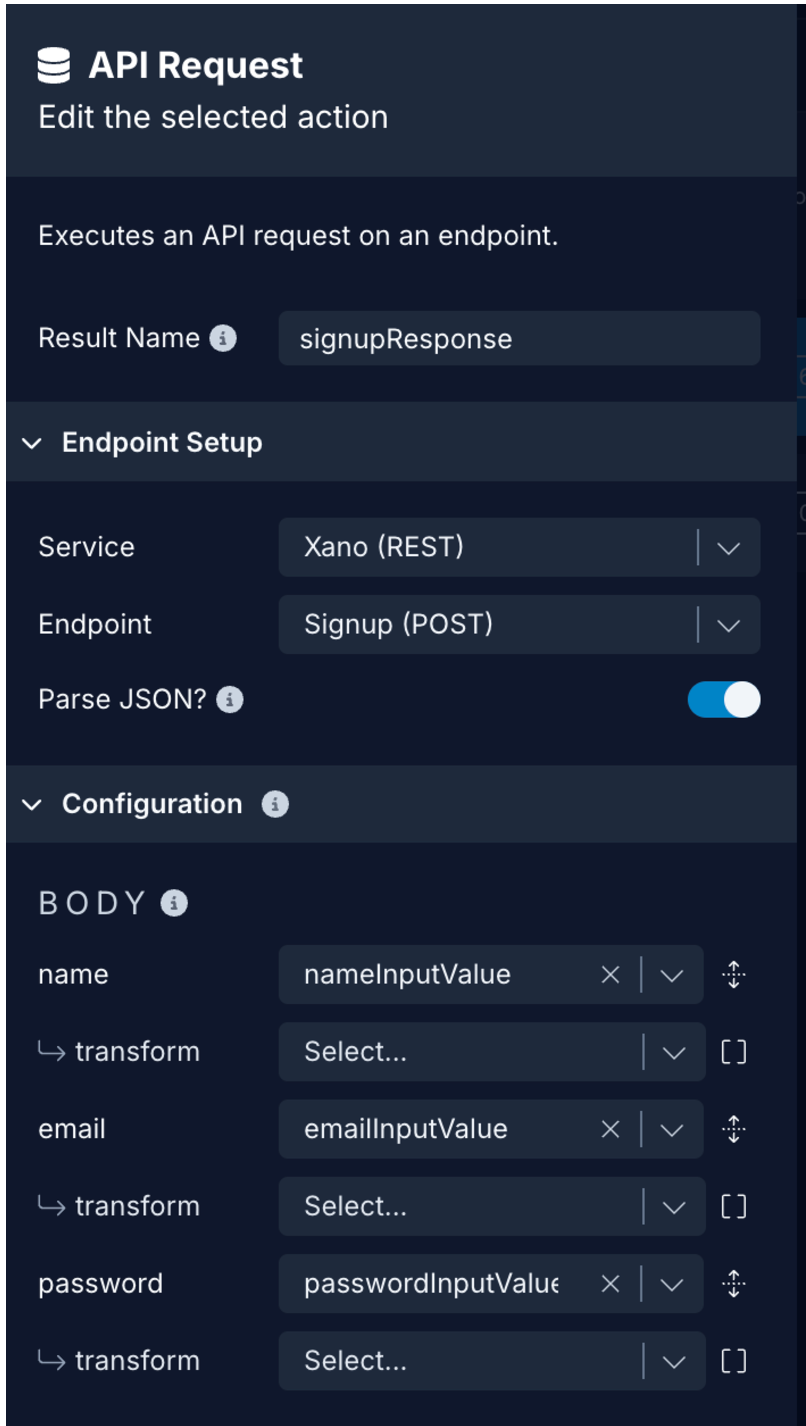
In the above example, the Configuration contains the Body of the API request. It contains the user's credentials such as email, password, etc. The value for each variable is the Field Name prop on a Inputs & Controls component. The variables in the Body of the API request are defined when adding the endpoint.
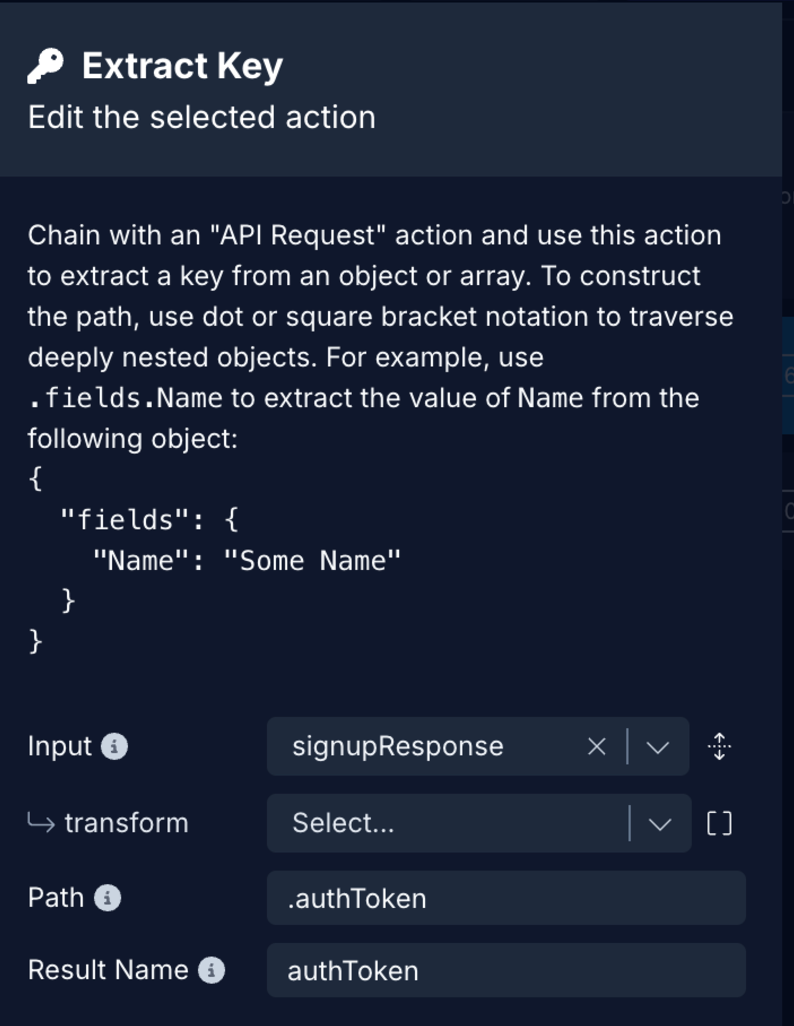
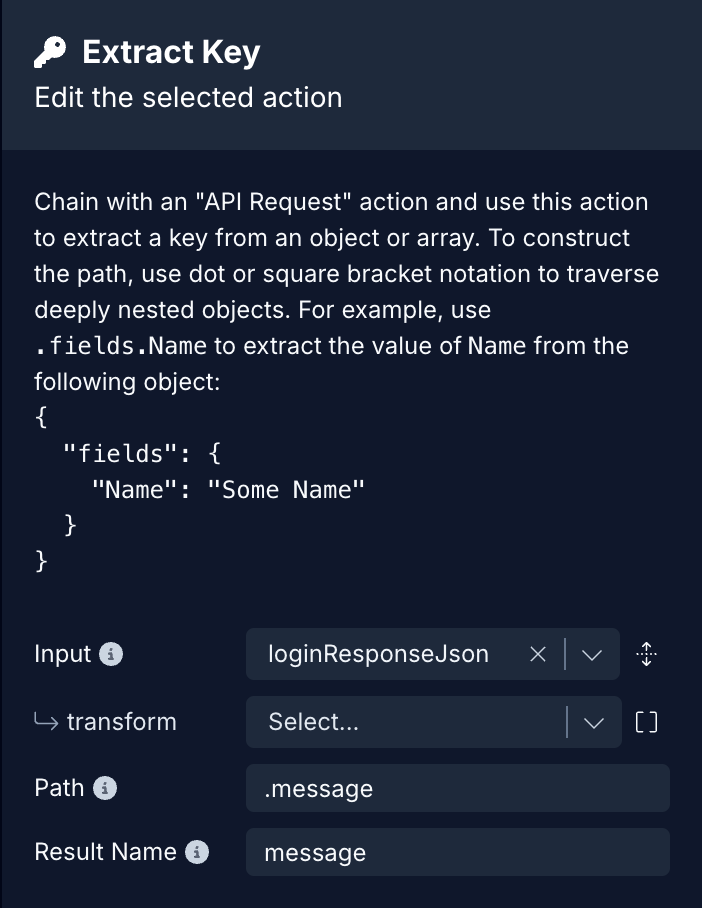
Extract Key
The second stack action to add is called Extract Key. This action is responsible to extract the auth token from the JSON response. The JSON response can be an object or an array.
Construct the Path by using a dot or square bracket notation to traverse deeply nested objects. For example, use .fields.Name to extract the value of Name from the following object:
{
  "fields": {
    "Name": "Some Name"
  }
}
After constructing the Path, set the extracted value to a variable in the Result Name property. In the below example, we are extracting the authToken from the signupResponse:
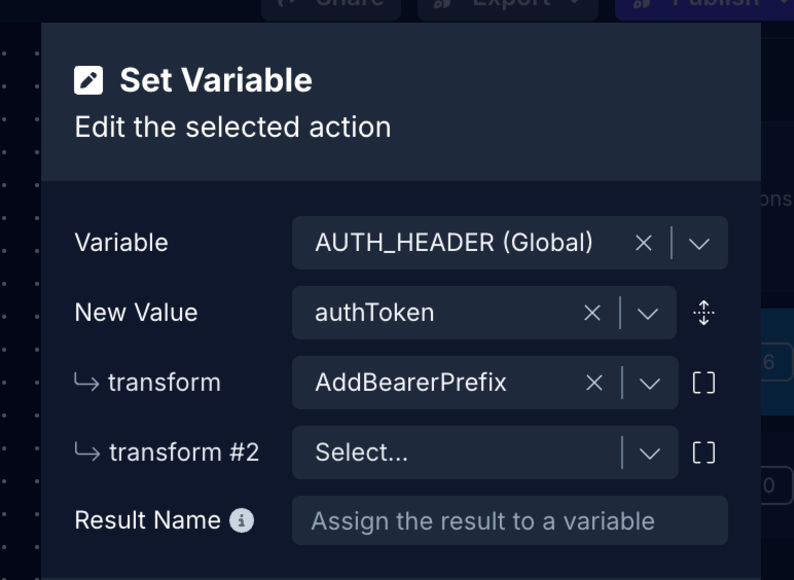
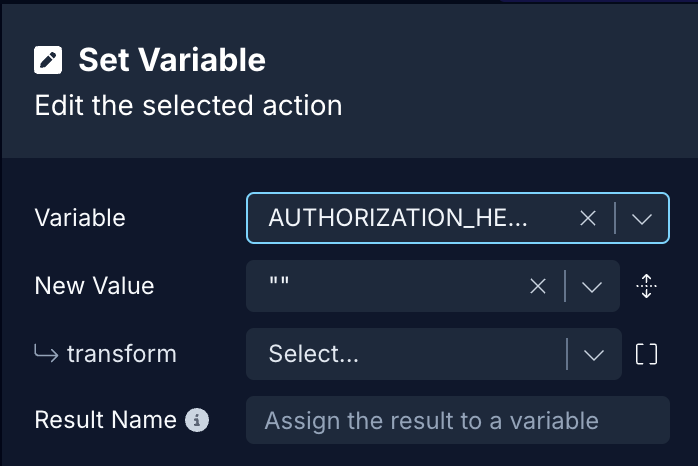
Set Variable
This action is used to set the value of the auth token extracted from the previous action to a Global Variable.
Setting the token value to a Global Variable will allow you to add endpoints that require Authorized access.
Adding a"Bearer "prefix before the token valueThe pattern
Bearer some-token-valueis a common pattern that REST API services use. When sending the token value as a response to thePOSTAPI request it does not contain the prefixBearer(yes, the space is intentional).In Draftbit, you can use the transform function AddBearerPrefix when setting up the token value to a Global Variable.
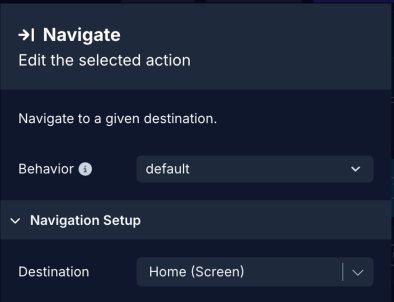
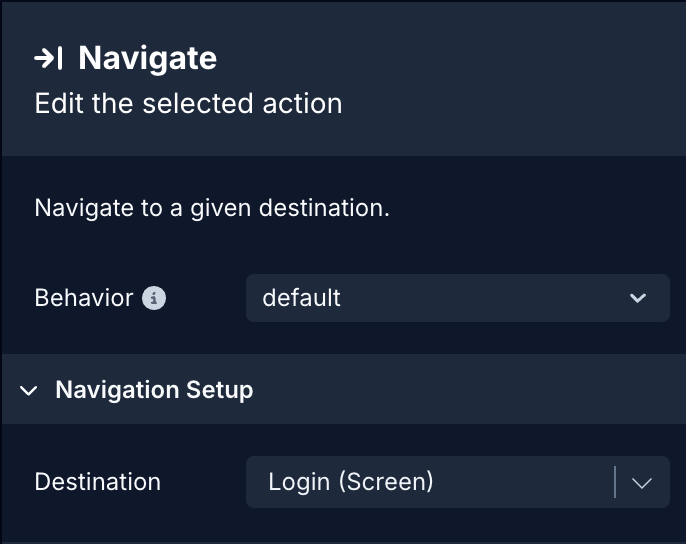
Navigate to Destination
This action will allow the app user to navigate to a destination screen when the auth token is received and the API request is fulfilled.
Sign Up
Signing up is the process of allowing an app user to create a new account within the app. It is based on a Provider. The most common Provider is email/password.
In the Draftbit app, you will need to add an endpoint for the REST API service. Start by clicking the button Add Endpoint. Then follow the steps below:
- In Step 1: enter the name of the endpoint. Select the Method
POSTfrom the dropdown menu. - In Step 2: append the Base URL and add the specific path required for sign up:
/your-path. - In Step 3: add a valid Body structure to submit a
POSTrequest. Add one or many{{variable}}for test values. Click Body Preview to validate the structure of the Body in the request. - In Step 5: click the Test button next to the Endpoint input to verify the response from the API service, and then click Save.
Dev & Prod URLSThe Base URL parameter has been updated to give you the ability to set separate base URLs for Development and Production. When you publish your app, you can set which base URL to use, Dev or Prod.
In the above example, notice that when verifying the sign-up endpoint, the API service returns an authToken. This token is saved in the Global Variable AUTHORIZATION_HEADER. This token is then later used to allow a user to view protected screens.
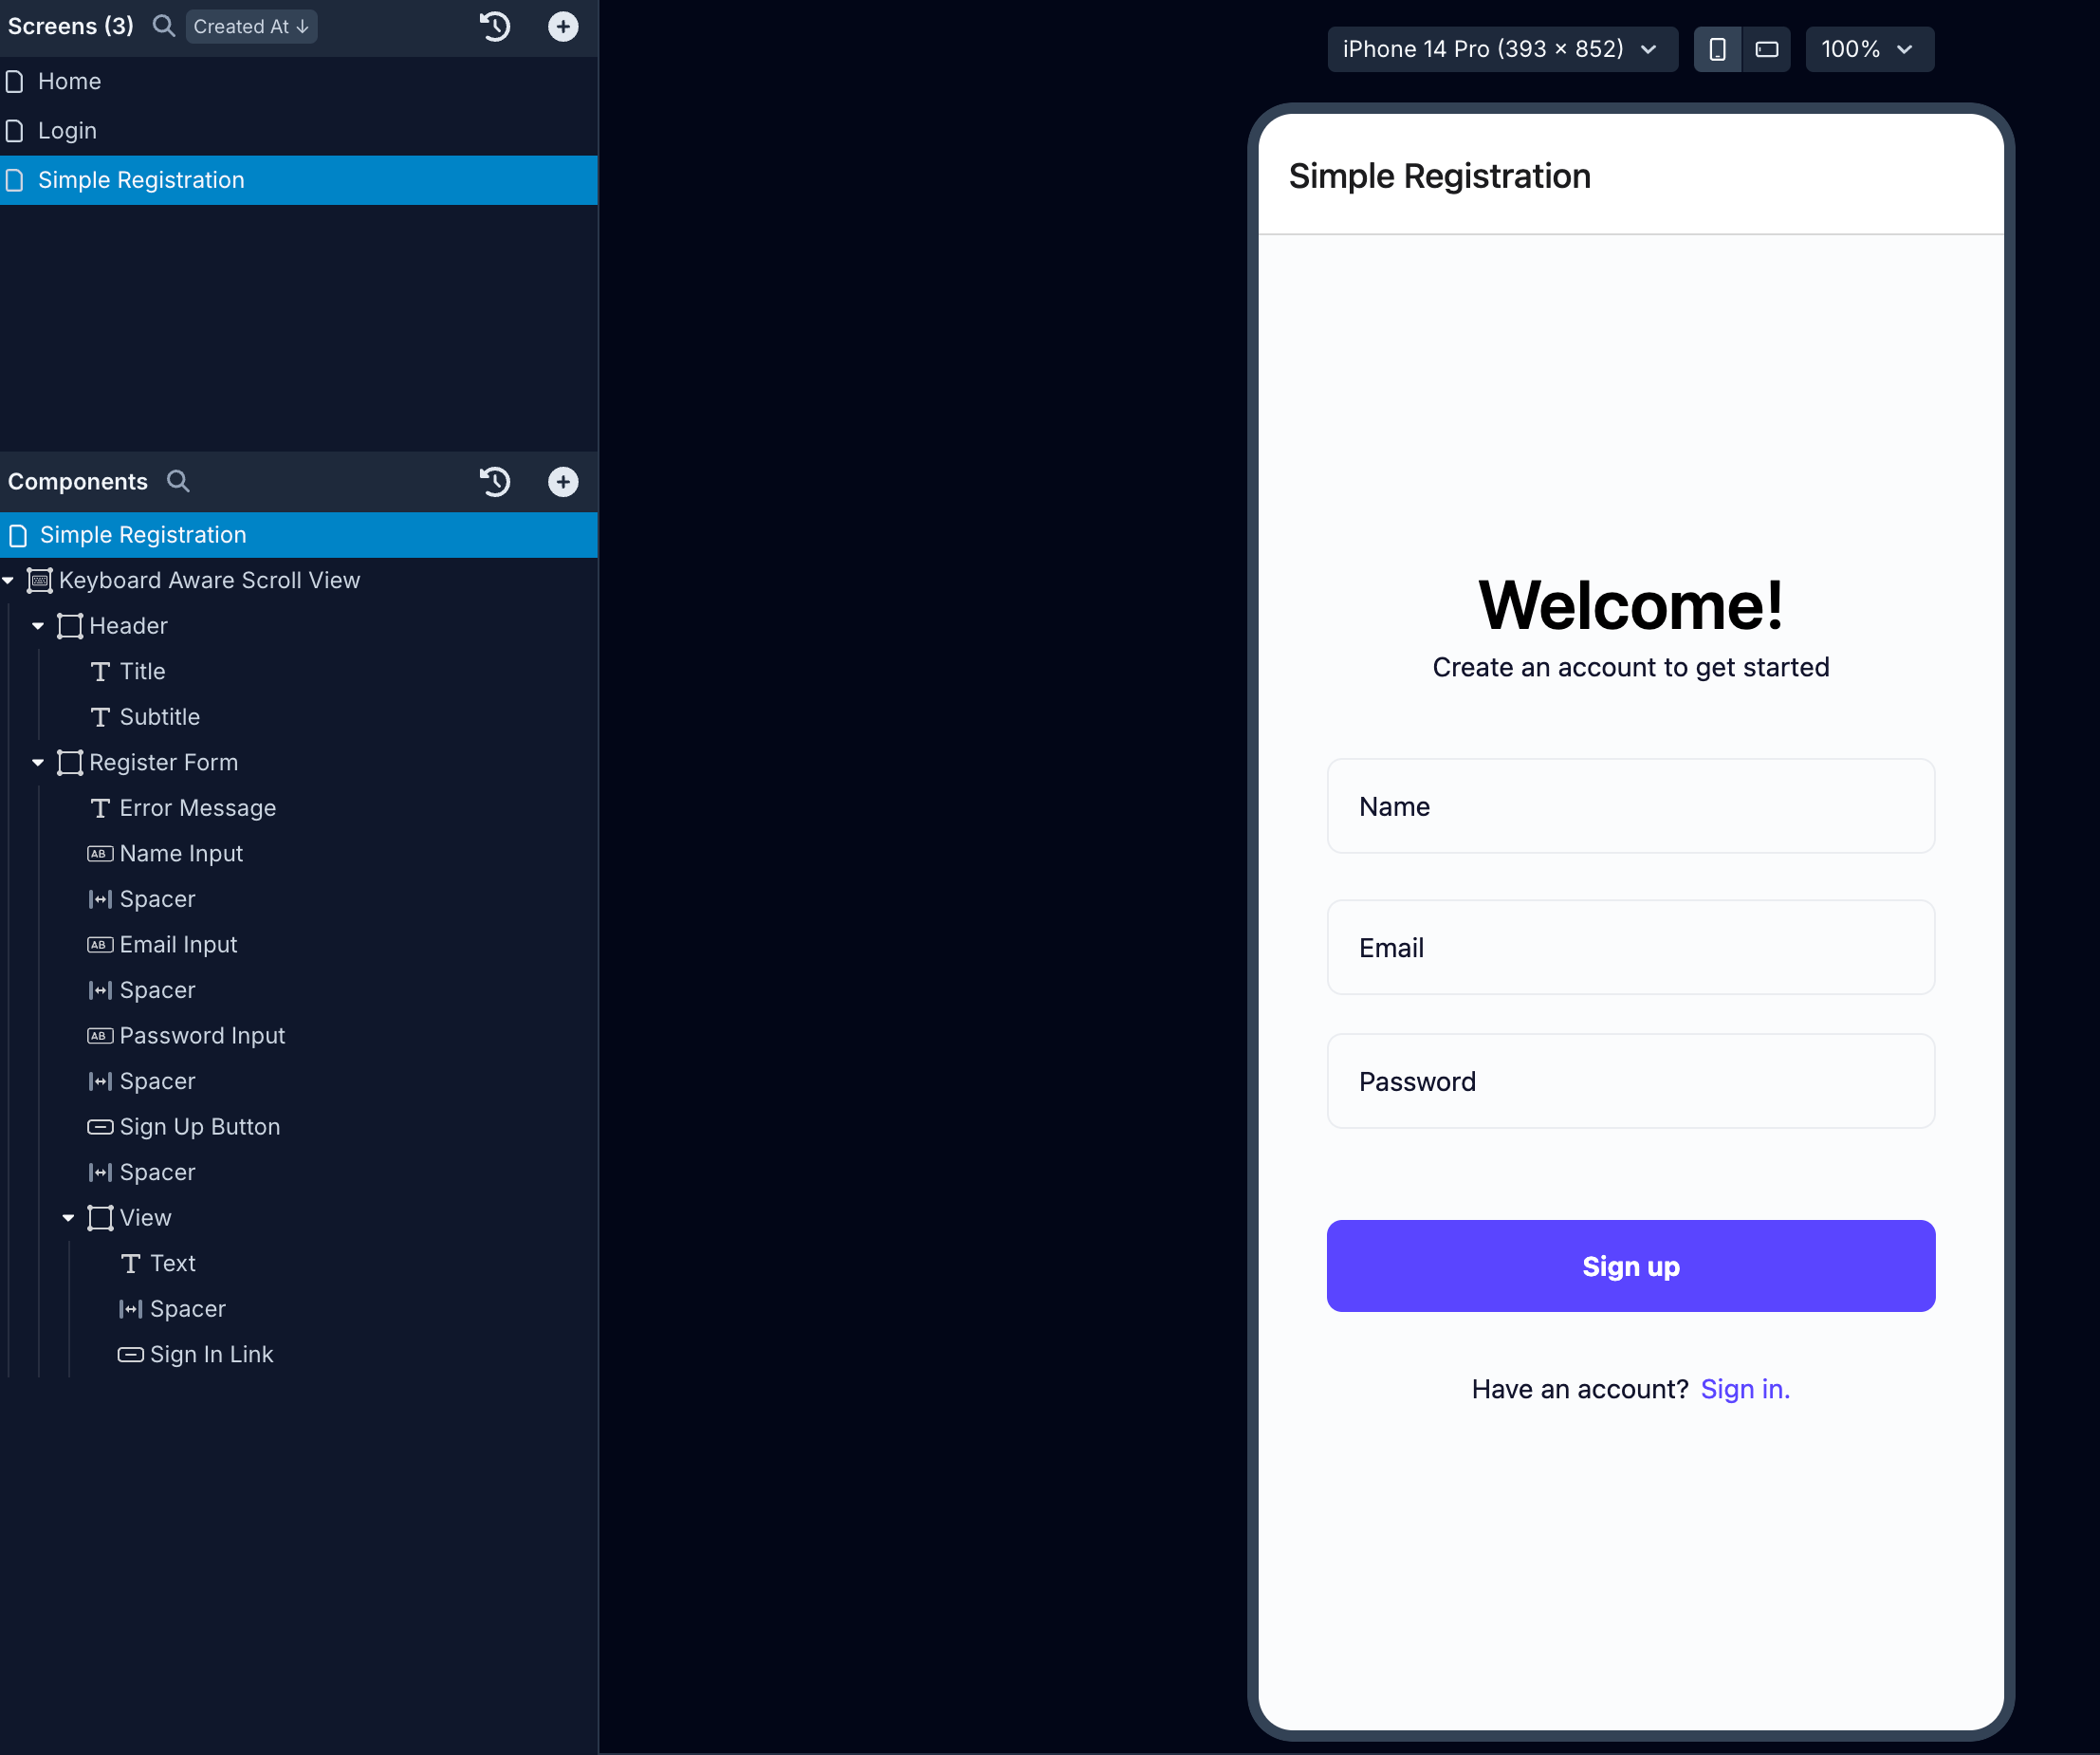
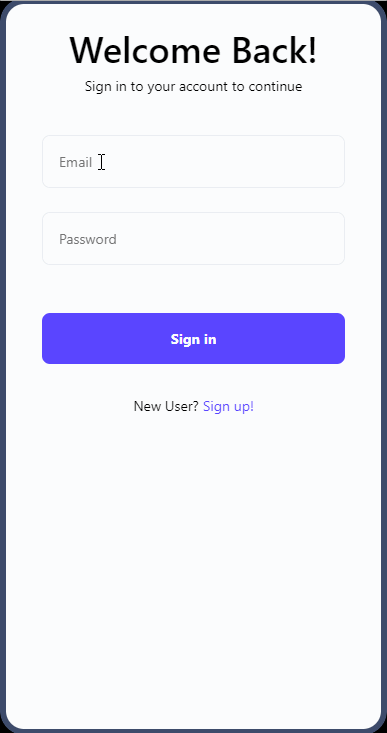
After setting up the endpoint, you need to integrate it on a Sign up form. An example of a sign up form is shown below:
The next step is to stack different actions when the user presses the Sign up button. These actions are created on the Buttons or the Touchable component. The following actions are used in the order they are described:
Log In
Logging in is the process of allowing an app user to use credentials to access protected screens and functionality within the app.
In the Draftbit app, you will need to add an endpoint for the REST API service. Start by clicking the button Add Endpoint. Then follow the steps below:
- In Step 1: enter the name of the endpoint. Select the Method
POSTfrom the dropdown menu. - In Step 2: append the Base URL and add the specific path required for sign up:
/your-path. - In Step 3: add a valid Body structure to submit a
POSTrequest. Add one or many{{variable}}for test values. Click Body Preview to validate the structure of the Body in the request. - In Step 5: click the Test button next to the Endpoint input to verify the response coming from the API service and then click Save.
In the above example, notice that when verifying the login endpoint, the API service returns an authToken. This token is saved in the Global Variable AUTHORIZATION_HEADER. This token is then later used to allow a user to view authenticated screens and make further authenticated API requests.
After setting up the endpoint, you need to integrate it on a Log in form. An example of a log in form is shown below:
The next step is to stack different actions when the user presses the Log in button. These actions are created on the Buttons or the Touchable component.
Log Out
The process of logging out an authenticated user requires a Button/Touchable component that triggers the following components in the order they are described:
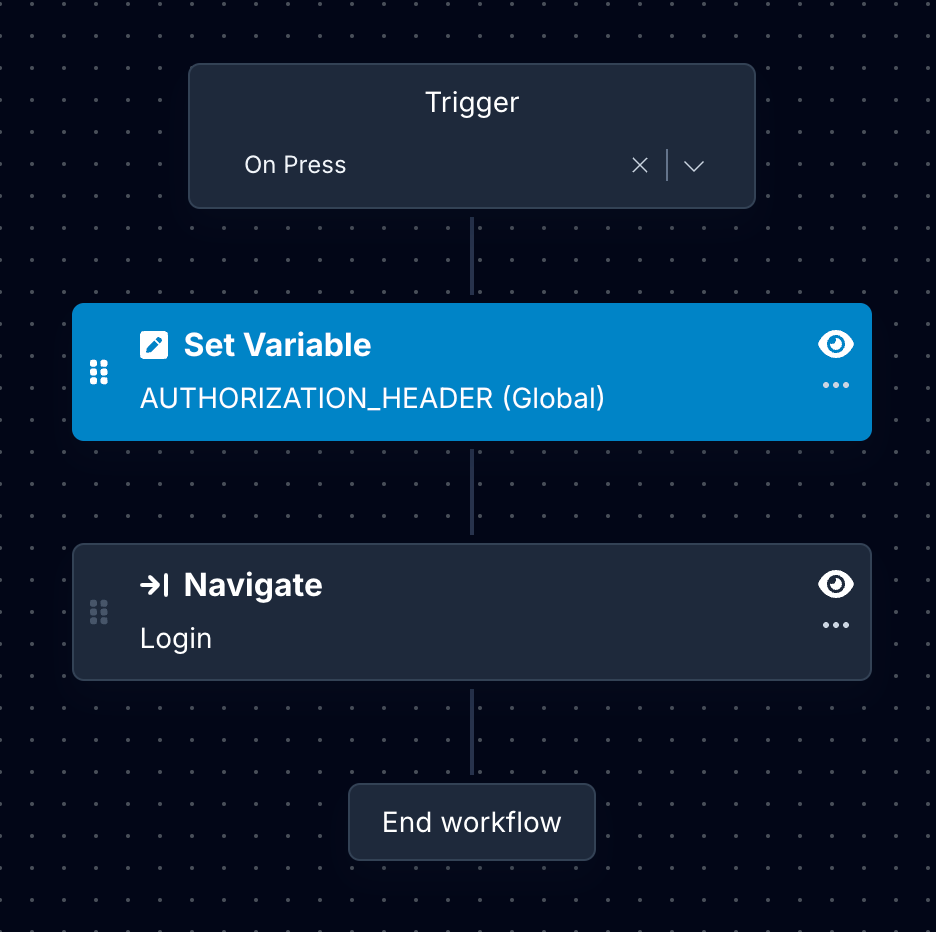
1: Set Variable
This action here removes the current value of the Global Variable (the current state has the token) by setting it to an empty string.
2: Navigate
This action is used to set the destination screen that navigates back to the login or signup screen.
Authenticated API Requests
The authenticated API request allows the user to access data from the backend service that is only available if an app user is logged in (authenticated).
To make an authenticated API request, the initial step is to add an endpoint to the API service. This endpoint will require an Authorization header whose value will be the auth token stored as a Global Variable in the process of login or sign up.
Testing an Authenticated API endpointInitially, when adding an authenticated endpoint, a real token value is required to be passed as the
Authorizationheader. It is recommended to save the actual token value in the Global Variable. Add the endpoint, test it and save. Then set the value of the Global Variable back to the default value after you have successfully added all the authenticated endpoints.You can use a REST API client (like Insomnia or Postman) to test the login/sign up endpoint to get the value of the token or if use the Swagger API if your backend service supports it.
In the Draftbit app, you will need to add an endpoint for the REST API service. Start by clicking the button Add Endpoint. Then follow the steps below:
- In Step 1: enter the name of the endpoint. Select the Method type from the dropdown menu.
- In Step 2: append the Base URL and add the specific path:
/your-path. - In Step 3: add the
Authorizationheader and set its value to the Global Variable. - In Step 4: click the Test button next to the Endpoint input to verify the response coming from the API service and then click Save.
In the example below, an authenticated API request of method type GET is constructed to get the logged-in user's data.
Using the Fetch component on the logged-in screen the above endpoint can be used to display the information.

Displaying Errors on screen
Many of the API services respond with a specific error message when the credentials of a user do not match or cannot be validated. In Draftbit, you can use these error messages to display them on the form screen.
Necessary steps to handle and display errors in your app requires:
- Define an App Variable to store the error message
- Have a Text defined in the screen's Components tree and the Global Variable mapped to the Text component
- Modify the stacked actions for an API request in your screen component by adding the three new actions as shown below:
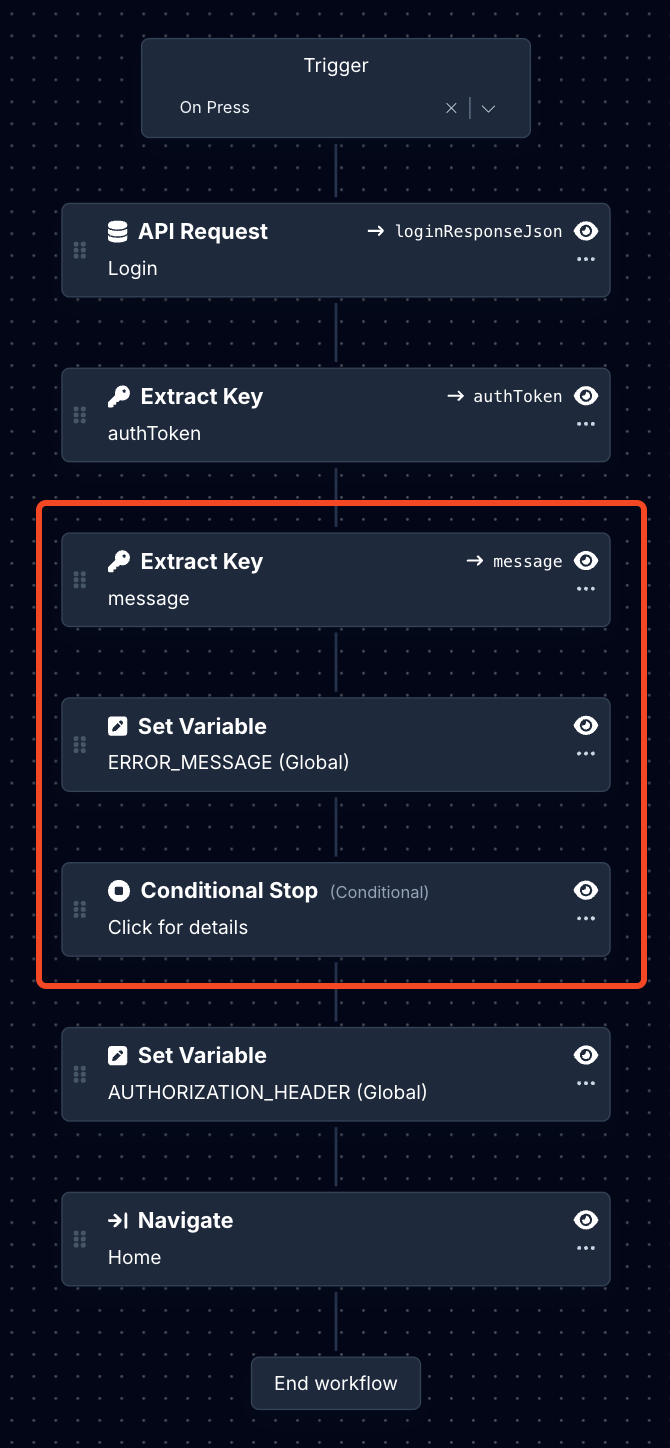
1: Extract Key
This action is responsible to extract the error message field (or any other field name in the response of the API request) from the Parsed JSON response.
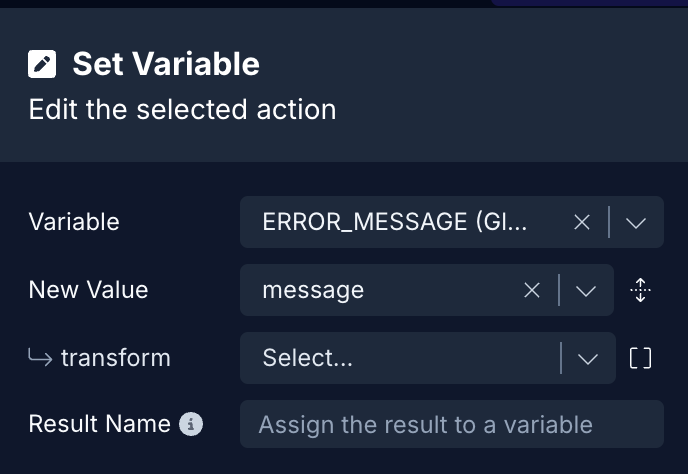
2: Set Variable
This action will set the value of the extract key in the previous action to the Global Variable defined to store an error message.
3: Conditional Stop
This action will stop the execution of any actions defined after it. It will check if the auth token value is present or not and if not, the action will stop the execution. This prevents an app user to navigate from a form screen to an authenticated screen.
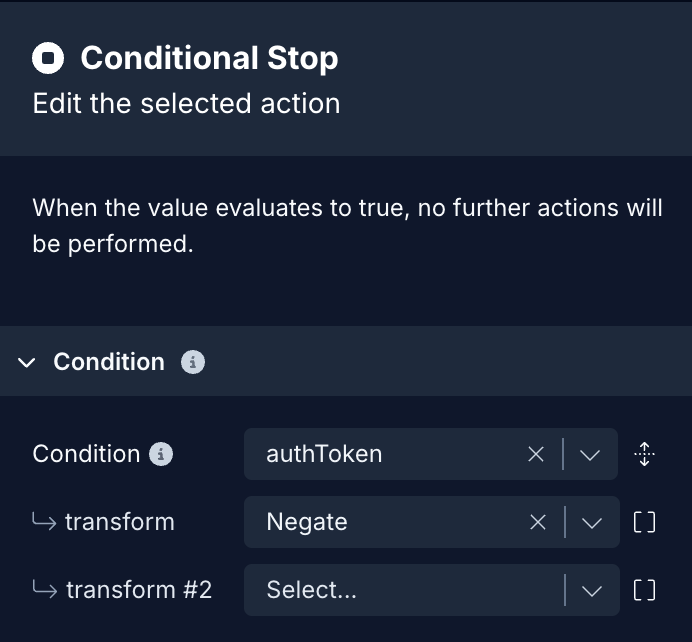
Here is an example of how an error message is displayed on the screen and further execution stops:
Additional Auth Guides
Checkout our additional documentations for integrating authentication using a specific service such as: