

Creating a New App
To start a project, click Create New Project in the sidebar, or Start new project on the Dashboard. A few questions set up the project, then the agent starts building it.
Answer a few questions
Section titled “Answer a few questions”Your answers are kept in this browser, so Exit leaves them for next time. Start over clears them and goes back to the first question.
-
How do you want to start?
Choose Start a new app. To bring code you already have, choose Continue an existing app instead: import it, work in your GitHub repository, or move an app from Draftbit Classic. See Importing an existing app.
To skip the questions, choose Create a blank project. The project opens with no apps, and you add them from its page with Add app.
-
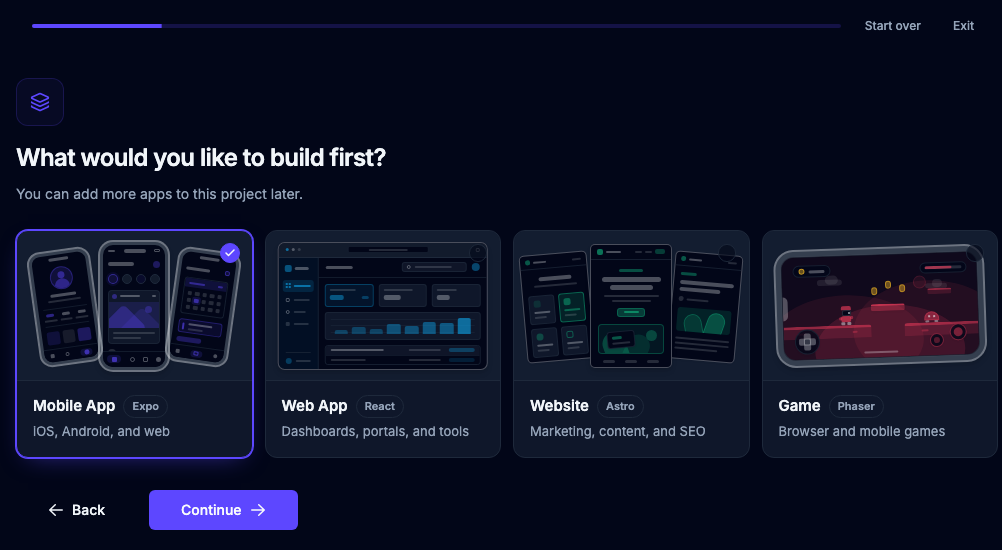
What would you like to build first?
Pick a Mobile App (Expo, for web, iOS, and Android), a Web App (React), a Website (Astro), or a Game (Phaser). You can add more apps to the project later.
-
Tell us more about what you want to build
Describe your goals, the outcomes you want, who will use it, and any tech requirements. Try an example fills in a sample idea. Then choose Recommend my setup, or Skip, I’ll choose myself to answer the backend questions yourself.
-
Here’s what we’d set up
From your description, Draftbit recommends a backend, its database, how people sign in, and features such as payments or file uploads. Select a part of the project to see why it was picked, including the words from your description that led to it, and choose Change to pick something else, or Ask AI to ask about it. Later lists ideas you can add now with Add now, or from your project once it exists, and any feature you picked as Eventually. Choose Looks right to continue.
If you skipped the recommendation, you answer Do you want a backend? instead:
- Create a new backend: pick Supabase (the default) or your own API backend (Hono). For your own API, choose its database (Cloudflare D1, Supabase Postgres, or your own Postgres), how people sign in, and any features it needs, such as payments. Supabase includes sign-in, so it goes straight to features. For each feature, pick Now to build it into the first version, or Eventually to leave it out for now and get a task for it in your project. See API Backends and Supabase.
- Connect my existing backend: Supabase, Xano, Neon, or any REST or GraphQL API.
- No backend for now: start with just your app. You can add a backend from your project later.
On the backend, database, sign-in, and features screens, the panel beside the options explains the one you’ve selected under About this option: when to pick it, what you get and give up, and when another option fits better. Switch to Ask AI to ask about it in your own words, or pick a suggested question. It’s one conversation for the whole setup, so your questions and answers follow you from screen to screen, and the agent sees them when it starts building. On a phone, Ask AI is in the bar at the bottom of the screen.
-
How do you want to use AI?
Sign in with a ChatGPT or Claude plan, add an API key, or start with Draftbit credits. A plan or key your workspace already connected is marked Connected to your workspace, so picking it doesn’t ask you to sign in again. You can change it later in the project’s settings.
-
How do you want to begin?
- Create a plan and designs first: the agent drafts a plan and screen designs from your description, and you review them before anything is built.
- Start building now: Draftbit writes a build prompt from your answers. You check it on the next screen, then the agent builds a first version.
Under Bring what you already have, you can also add:
- Screenshots or Figma: upload screenshots or mockups, upload a ZIP or HTML export, or paste a Figma link. The agent matches your look and layout. Planning first can’t use a Figma link or an export yet, so adding one means starting to build right away.
- A template: start from a template’s screens instead of blank.
- A spec or long prompt: paste a requirements doc, a PRD, or a detailed prompt, up to 20,000 characters. The agent follows it.
Select one, and the button at the bottom names its next step, such as Add your spec. That button opens its page, which brings you back when you’re done. Choose Change or Remove to edit what you added.
Check out the Writing your initial prompt doc for helpful info.
-
Check the prompt we’ll build from
If you chose Start building now, Draftbit writes the build prompt from your description and setup: what you’re building and who it’s for, its screens, and what it’s built on, with your spec added at the end. What’s in it shows where each part came from, and lists anything you left for later as not included, so the agent doesn’t build it yet. Edit the prompt, choose Rewrite with AI for a new version (Undo rewrite brings back the one before it), or choose Use my description as is.
-
Click Start building
Or Start planning if you chose to create a plan and designs first. The app opens in the builder while it gets ready, and then the agent begins.
If the project has a backend, the app and the backend build at the same time, so you can start on your app’s screens right away. Until the backend is ready, the app shows labeled sample data, and the agent connects it to the backend once the backend’s first build finishes.
Your answers are saved in this browser as you go, so you can leave and pick up where you left off.
Planning first
Section titled “Planning first”If you chose Create a plan and designs first, the builder opens in a focused view until your first save, or until you click Done to leave it. The top bar shows the steps, Setup, Plan, Design, and Build. At the top right, a button moves you to the next step, next to Done. The chat stays on the right, and the middle shows what the current step is about. On narrower screens, the top bar shows the current step instead, for example Plan · 2 of 4 (just Plan on the smallest phones); tap it to see every step and move on.
-
Plan
The agent writes a plan brief from your description and setup. It covers the overview, what people use today instead, users, what they do each time they open the app, key screens, the information the app keeps, its look and feel, the first version, later work, and open questions. It marks its guesses and asks about the ones that would change the app most. Reply in the chat and it revises the same plan.
-
Design
Click Finalize Plan & Start Designs at the top right when the plan looks right. The agent makes mockups in two passes, looks first. It starts with four looks of the app’s main screen, each a different visual direction with its own colors, fonts, shapes, and image style, including at least one dark look. Click Use this mockup on the look you like, then Use [look] & Design Layouts at the top right. The agent then makes four layouts of the plan’s key screens, all in that look, each a different take on the app with its own layout, navigation, and wording. Each screen’s page appears as soon as it’s ready, so you can start comparing while the agent works on the next. Pick a layout the same way: Draftbit records your pick right away without building it, and you can change it until you start building. If you started from a template, the first look keeps the template’s look and feel. Click Plan in the top bar to go back and change the plan.
-
Build
Click Finalize Designs & Start Building at the top right and confirm. To skip Design, click Build in the top bar’s steps from Plan. The layout you picked, in its look, sets the app’s theme and the layout of its key screens (without a pick, the app keeps its starting theme), the agent builds the first version from the plan, and the plan’s later work is added to your tasks. You can’t go back to Plan or Design after this, but you can keep asking the agent for changes in the chat.
-
Done
When you’re happy with the first version, click Done to save it. That first save ends planning, and the builder’s usual tools come back. Your plan and mockups stay in Briefs and Mockups.
You can also leave at any step: when there’s nothing to save, Done asks you to confirm and opens the full builder, where you can keep chatting with the agent.
Continue Building
Section titled “Continue Building”After the AI has built the initial version of your app it’ll take you into the Builder where you can continue chatting with the AI to build your app. Take a look at the Composing task prompts doc for helpful advice on getting the most out of your interactions with the AI.
Adding an App to a Project
Section titled “Adding an App to a Project”Open the project and click Add app. You need the Editor role or higher.
-
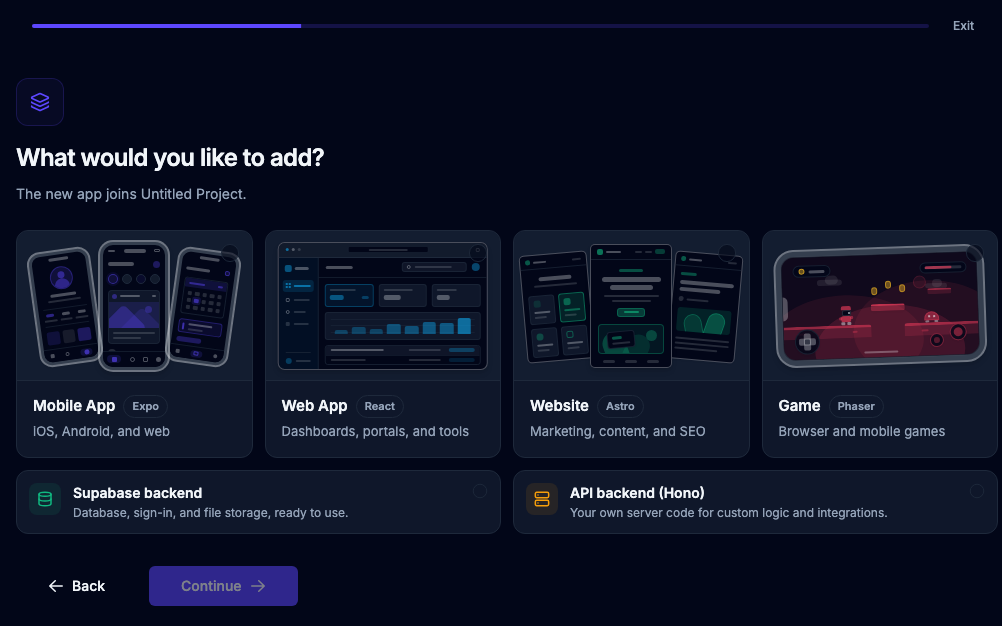
What would you like to add?
Pick a Mobile App, Web App, Website, or Game. If the project doesn’t have a backend yet, you can also add a Supabase backend or an API backend (Hono).
To skip the rest of the questions, pick one and choose Add blank app. It’s added to the project with no prompt, so the agent doesn’t start building until you ask it to.
-
Choose a template
For a Mobile App, Web App, Website, or Game, pick what the app starts from. A backend added on its own skips this step.
- Add as is on a template adds the app right away with that template’s code and no prompt, the same way as Add blank app.
- Click a template or its Preview button to see its screens. Then choose Use this template to keep setting up with it, or Add as is.
- Continue with blank keeps setting up from a blank app.
-
The project’s backend
The new app uses the project’s backend. If the project has one backend, that’s the one it uses. If it has several, choose the one this app should use. If it has none, you’re asked whether you want a backend, the same way as for a new project.
-
How do you want to use AI?
Pick the AI the new app uses, the same way as for a new project. It becomes the app’s Default AI Gateway, so the app keeps using it until you change it under Agents & Models in the app’s settings. If you’re adding a backend on its own, click Start building on this step to create it.
-
How do you want to begin?
Choose Start building now. You can also change the template under A template, or add A spec or long prompt. Paste a prompt if you haven’t described the app yet, then click Start building. The app opens in the builder.
To bring in code you already have, use the project’s Import app or Connect repo buttons instead.
Common Questions
Section titled “Common Questions”How long does it take to build an app?
The initial app generation takes 2-5 minutes. After that, you can continue refining and adding features at your own pace.
Can I use my own data and APIs?
Absolutely! You can connect to any REST API, GraphQL endpoint, or database. Supabase is built in: Draftbit can run a managed Supabase backend for your project. Firebase works through its client SDK, which the agent can add to your app. Airtable needs a backend that holds your access token, such as an API Backend, so the token stays out of your app.