

Setting Up Android Push Notifications with Expo
Push notifications let your app reach people even when it’s closed. There’s more than one way to send them—you could call Firebase Cloud Messaging directly, or use a third-party service like OneSignal—but this guide covers Expo’s push service, the most common path. On Android, Expo delivers through Google’s Firebase Cloud Messaging (FCM V1)—the current version of Firebase’s messaging API. Most of this guide is code the AI Agent writes for you; the last two steps happen once in a terminal, because they involve an interactive credential setup that can’t be run through the Builder or the AI Agent.
Before you begin, make sure you have:
- Your app in Draftbit with the screen(s) you want notifications on
- Access to the Google account you’ll use for Firebase
- A free Expo account—step 2 covers creating one
- A few minutes at a terminal with your project exported (steps 6–7)
1. Design the UI, then ask the AI Agent to wire it up
Section titled “1. Design the UI, then ask the AI Agent to wire it up”Add the permission prompt, a notifications toggle in settings, or wherever the in-app banner should land. Once the screens exist, ask the AI Agent in AI Chat to connect them using expo-notifications, the library that talks to Android’s notification system on your behalf:
“Add push notification support using expo-notifications. Request permission the first time the user opens the app, register for an Expo push token once permission is granted, and store that token against the signed-in user. Add a listener that shows an in-app banner when a notification arrives while the app is open, and navigates to the relevant screen when the user taps a notification.”
2. Create an Expo account
Section titled “2. Create an Expo account”Expo is the service that actually delivers the push—your app sends notifications through it rather than talking to Android directly. Skip this if you already have an account.
- Go to expo.dev/signup and sign up with an email or GitHub.
- Verify your email from the link Expo sends you.
- Note your username—you’ll need it exactly as it appears on your Expo profile in step 5.
3. Get your Firebase files
Section titled “3. Get your Firebase files”Two different files come out of Firebase here, and they’re used in two different places: google-services.json goes into your project, while the service account key never does—it’s uploaded straight to Expo’s servers in step 7.
Register the Android app and download google-services.json
Section titled “Register the Android app and download google-services.json”-
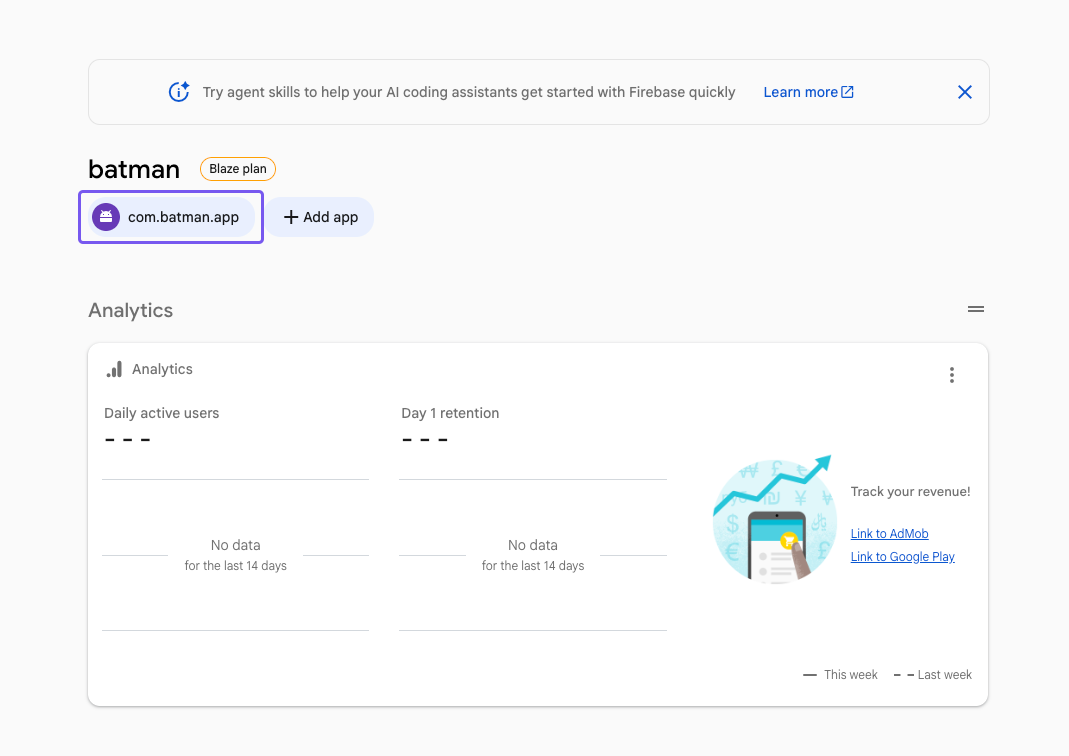
Open the Firebase console and select your project, or create one if this app doesn’t have one yet.
-
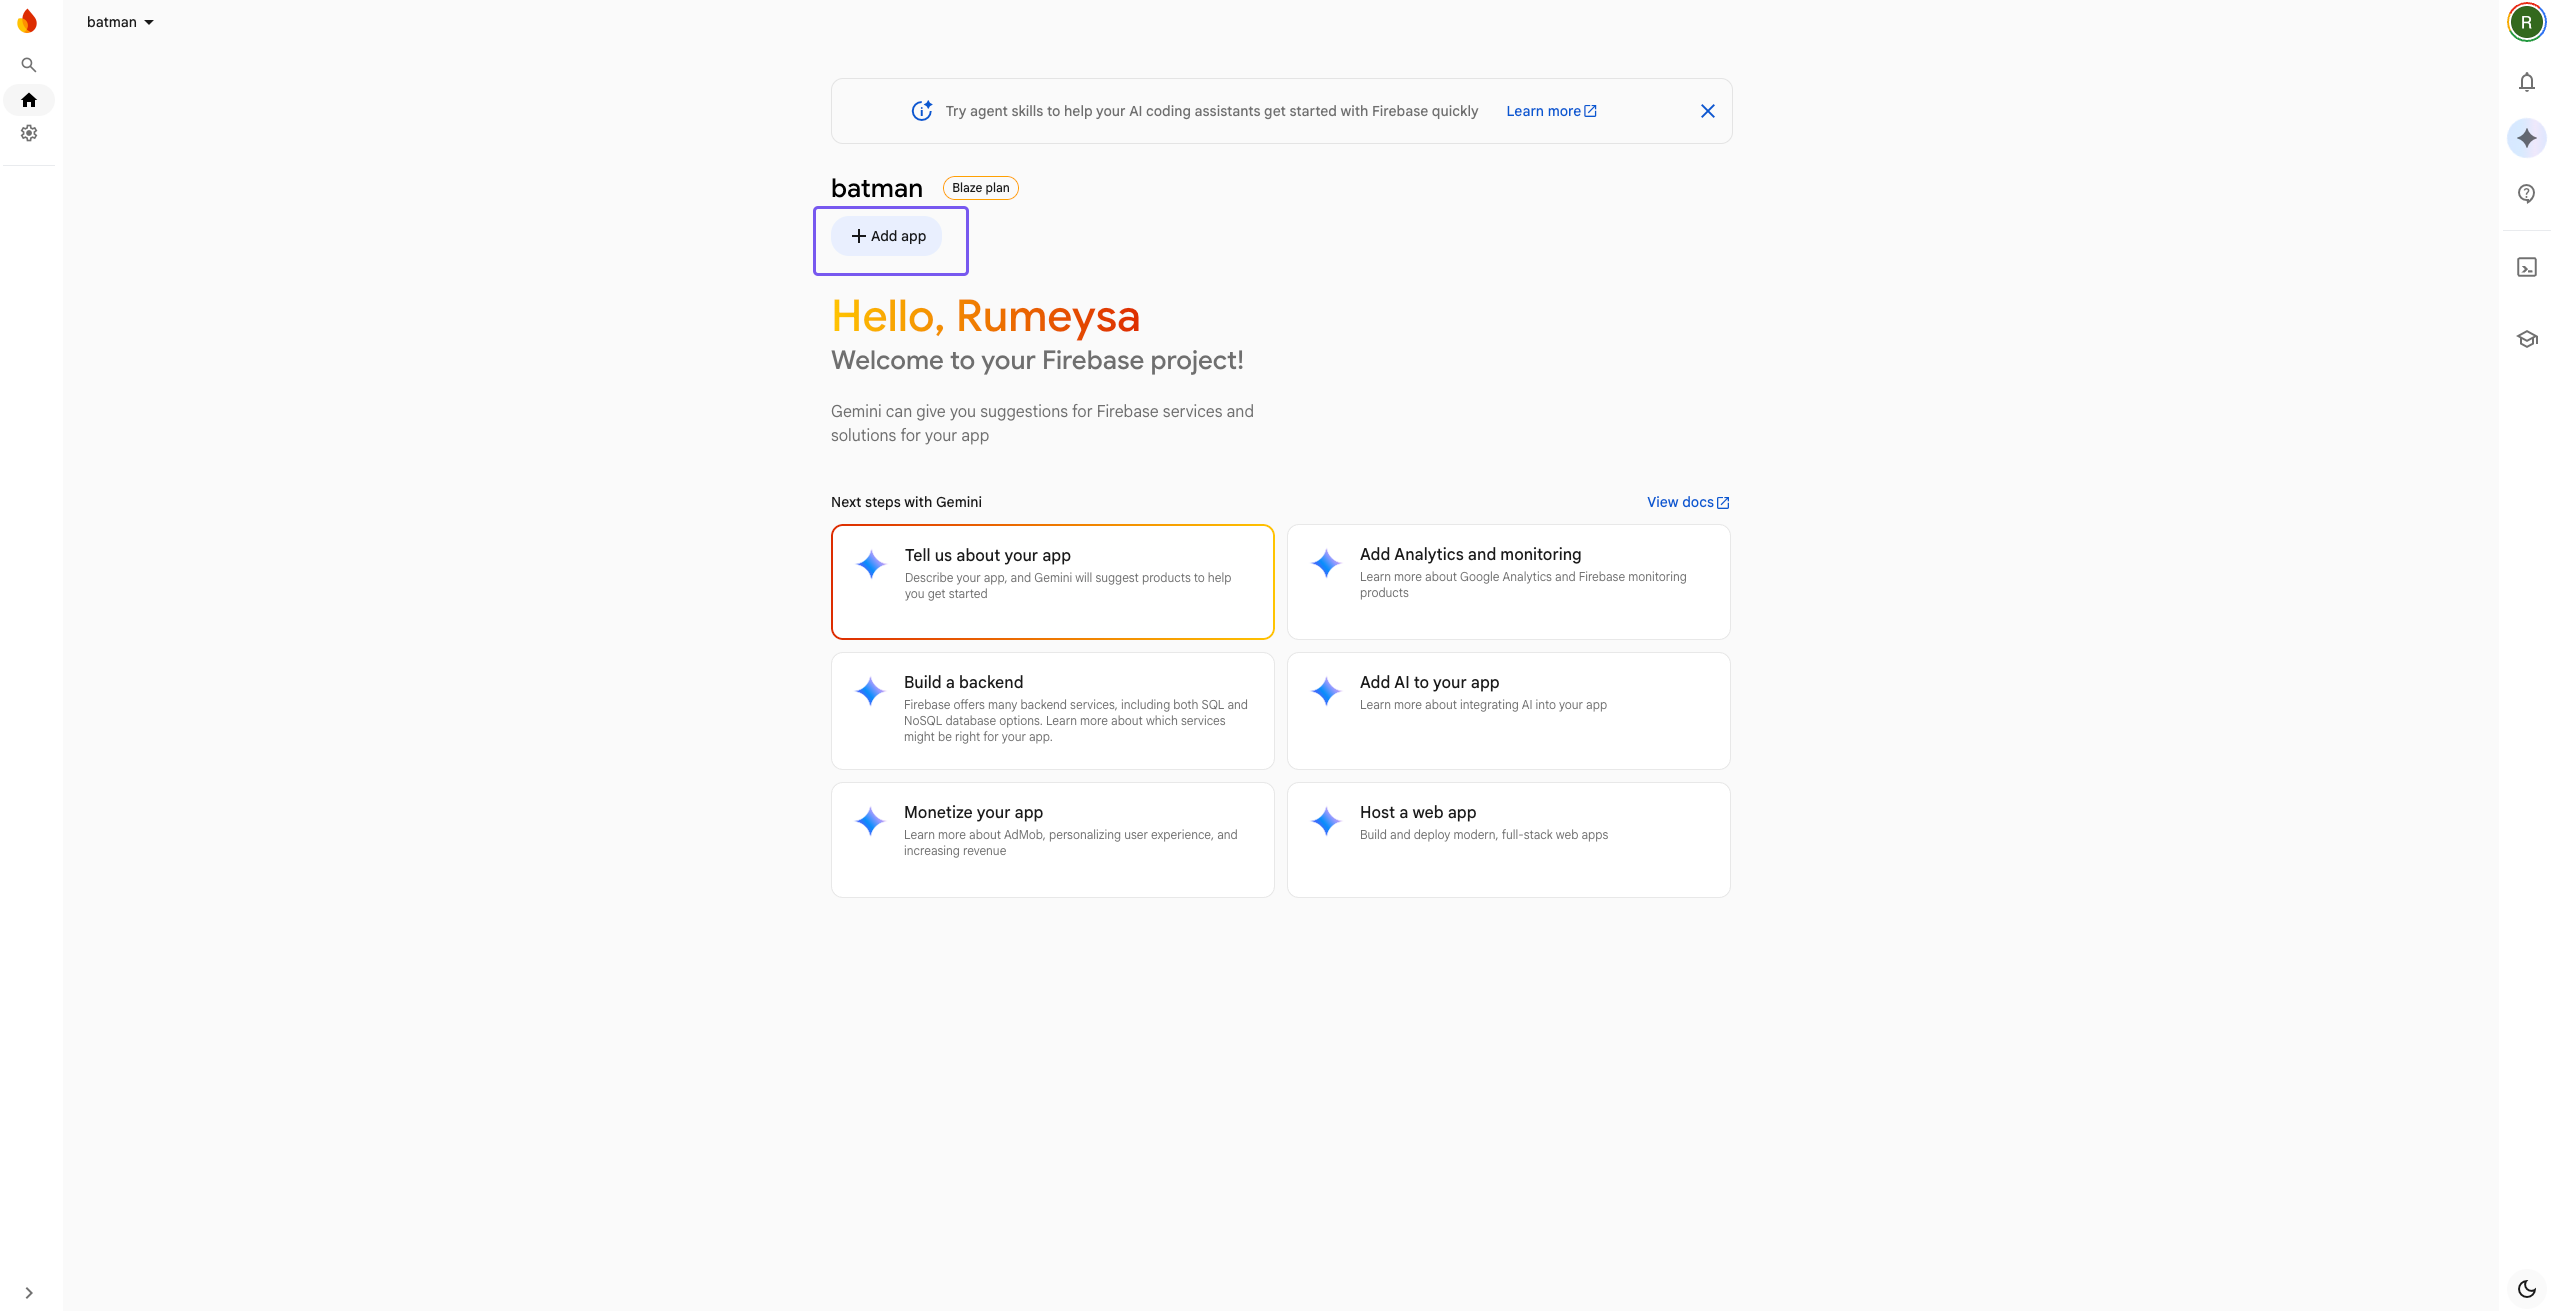
Click Add app.
-
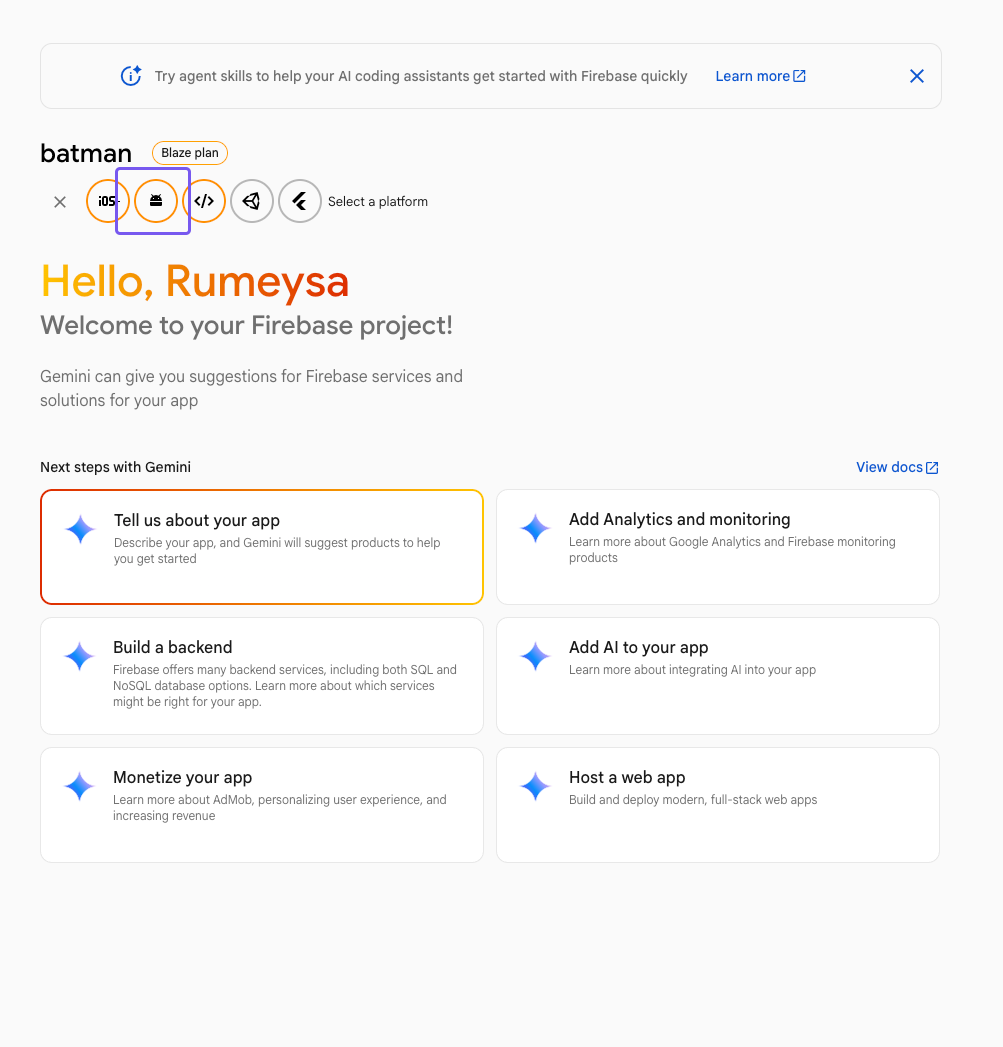
Select the Android platform.
-
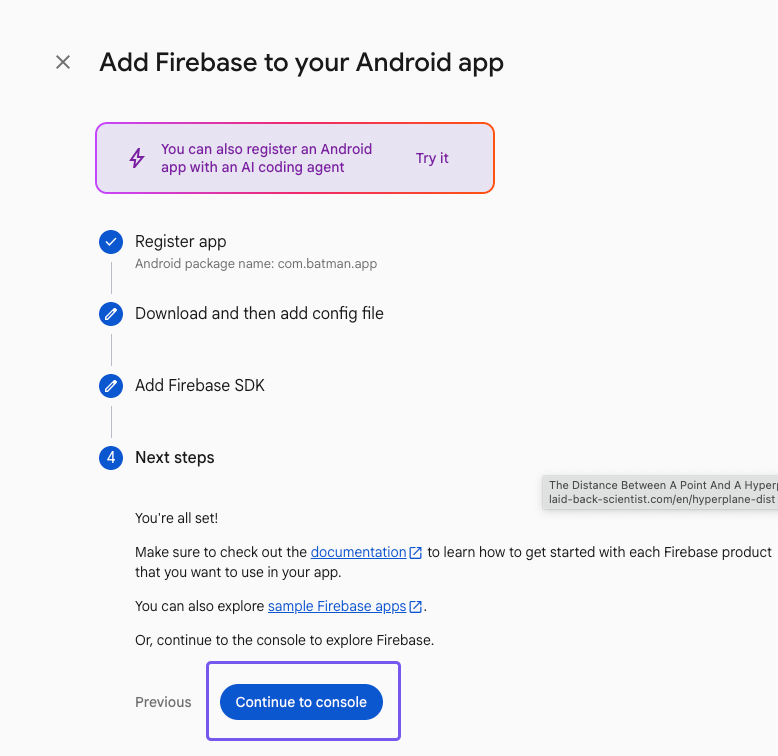
Enter your app’s package name—it needs to match the
packagevalue in your app’sapp.config—and click Register app.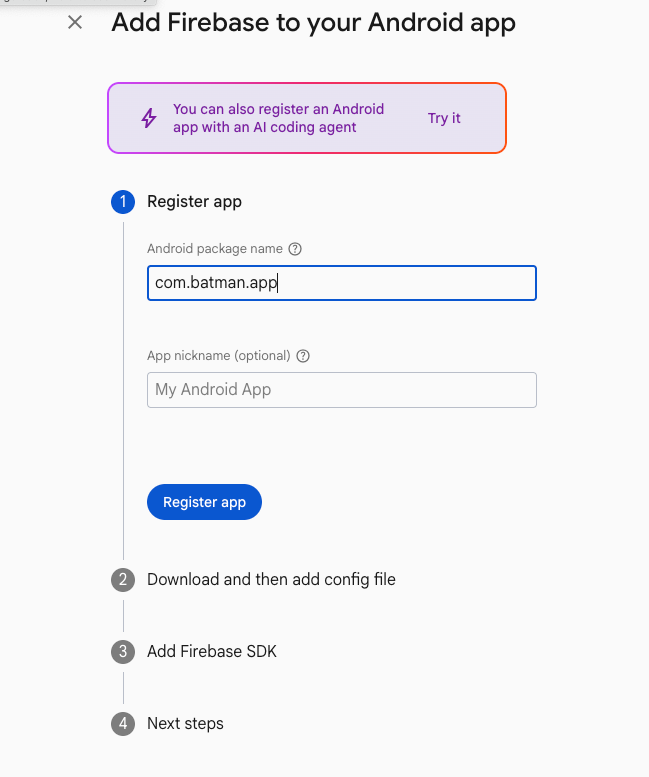
-
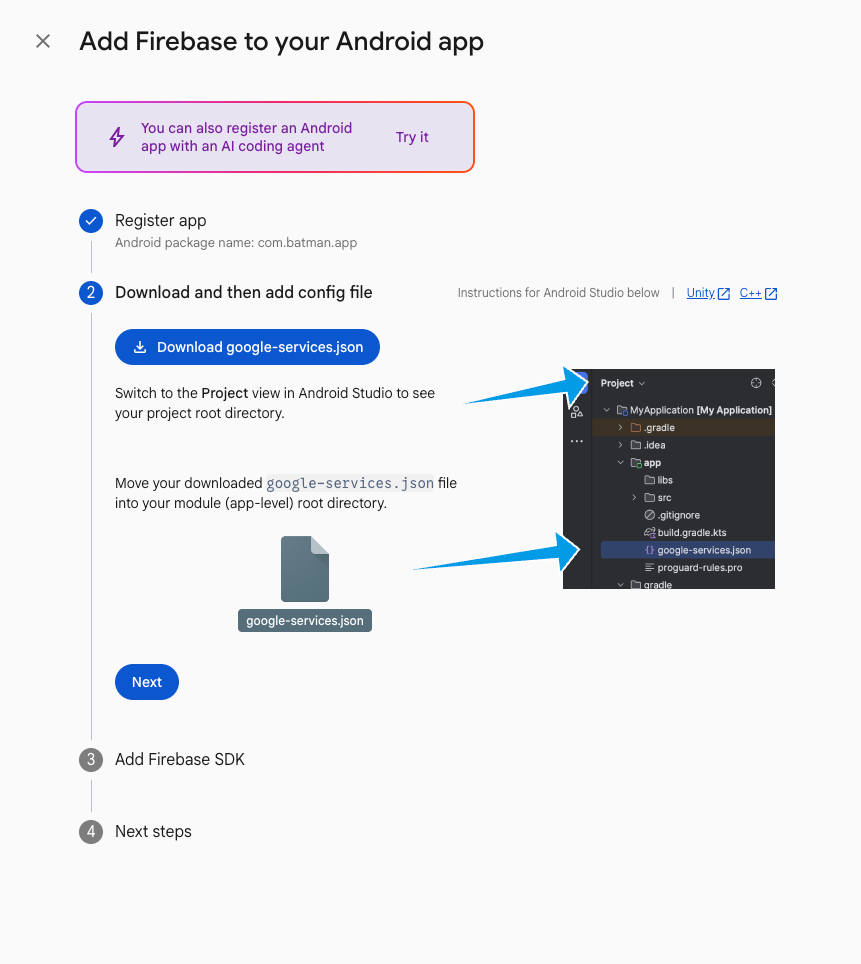
Click Download google-services.json, then Continue to console.
Generate the FCM V1 service account key
Section titled “Generate the FCM V1 service account key”-
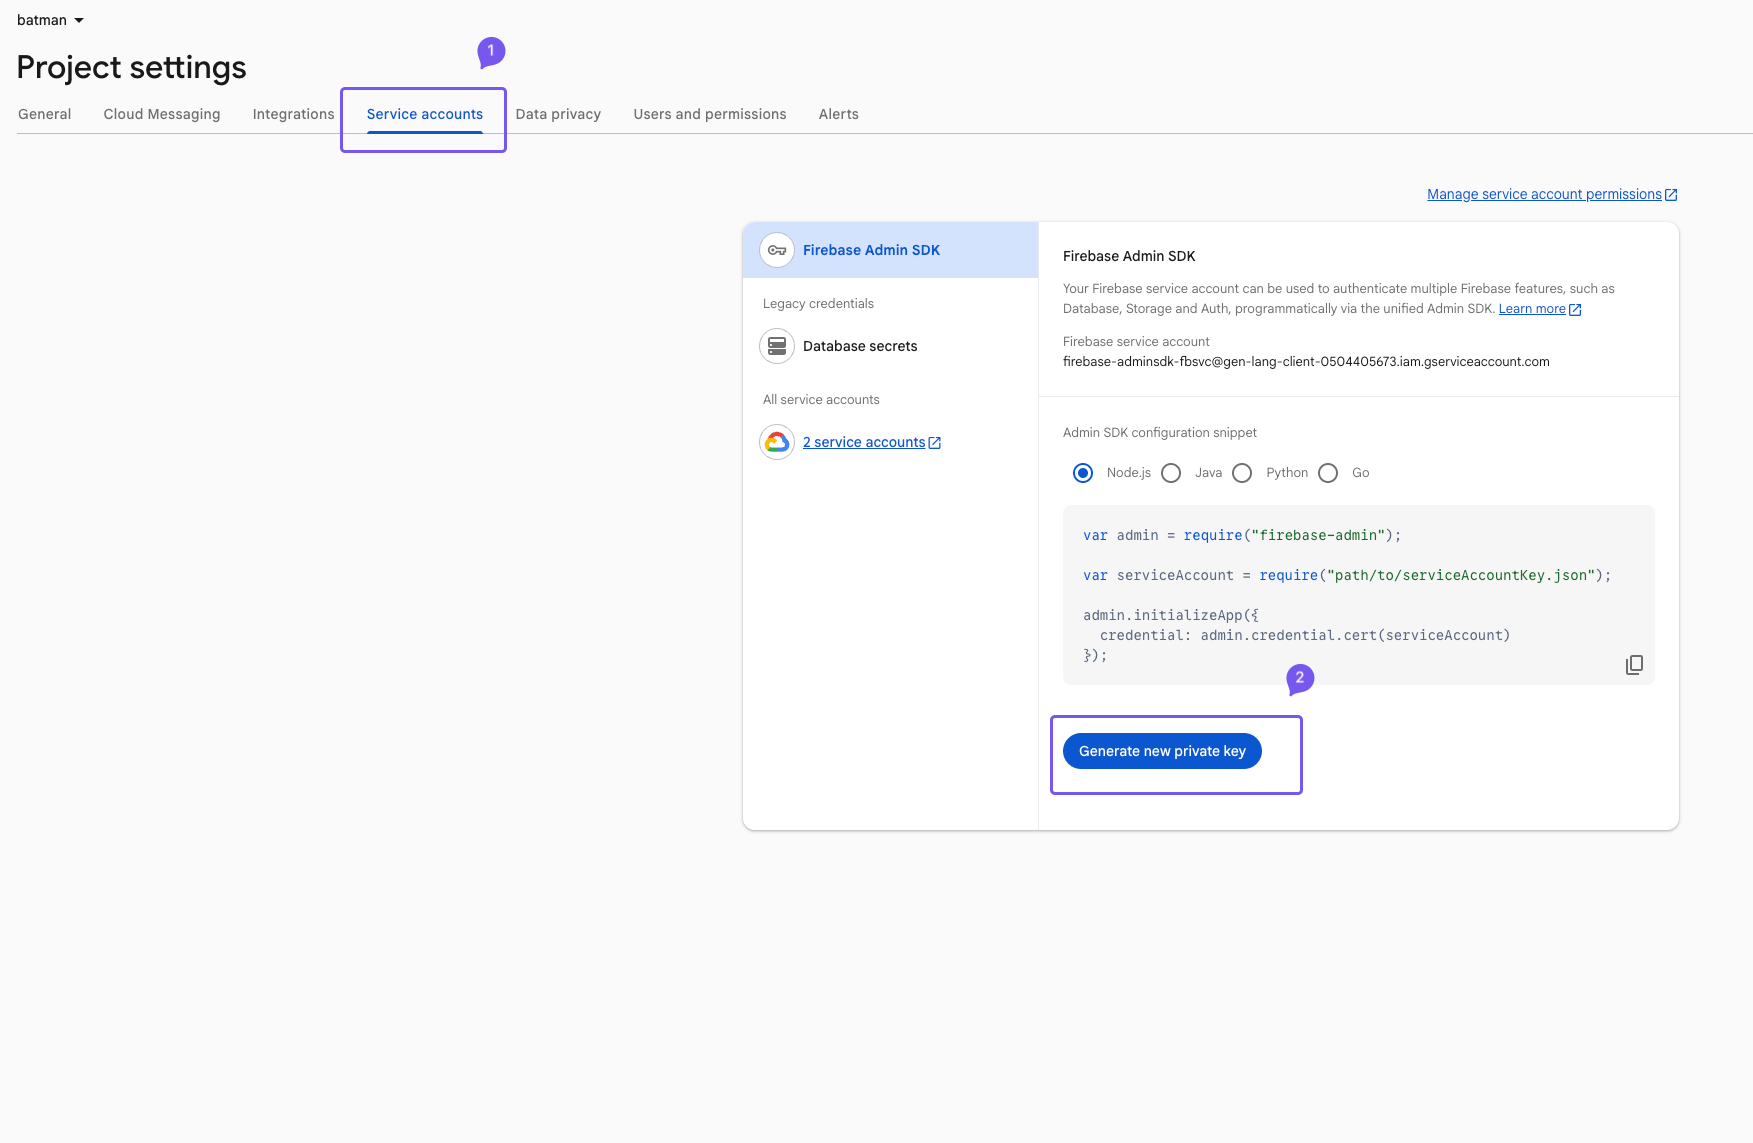
Go to Project Settings → Service accounts—it’s a separate tab from Cloud Messaging, not nested under it.
-
Click Generate new private key. This downloads the FCM V1 service account key—set it aside for step 7.
4. Add google-services.json to your project
Section titled “4. Add google-services.json to your project”Upload google-services.json to your project’s assets, then ask the AI Agent to move it where the build expects it:
“I uploaded google-services.json to the assets folder. Move it to the project root and tell me the exact filename so I can reference it later.”
5. Point the project at your Expo account
Section titled “5. Point the project at your Expo account”The build needs to know which Expo account owns it. Ask the AI Agent to set the owner field to your Expo username from step 2:
“Set the owner field in app.config to my Expo username: your-expo-username.”
6. Run a first EAS build for Android
Section titled “6. Run a first EAS build for Android”Expo can’t manage push credentials for a project until it has at least one Android build configured—that’s what generates eas.json and links your app’s package name to your Expo account. The Builder can’t trigger this part: export your code and run it once from a real terminal.
- Export your project from Draftbit.
- Open a terminal in the exported folder and log in:
eas login - Create and link the EAS project to your account:
eas init - Generate the build config:
eas build:configure -p android—this writeseas.json. - Kick off the build:
eas build -p android --profile development
eas logineas initeas build:configure -p android# ✔ Generated eas.jsoneas build -p android --profile development7. Upload the FCM V1 key to Expo’s credential store
Section titled “7. Upload the FCM V1 key to Expo’s credential store”There are two ways to do this—pick whichever you prefer.
Upload from the Expo dashboard
Section titled “Upload from the Expo dashboard”No terminal needed for this option.
-
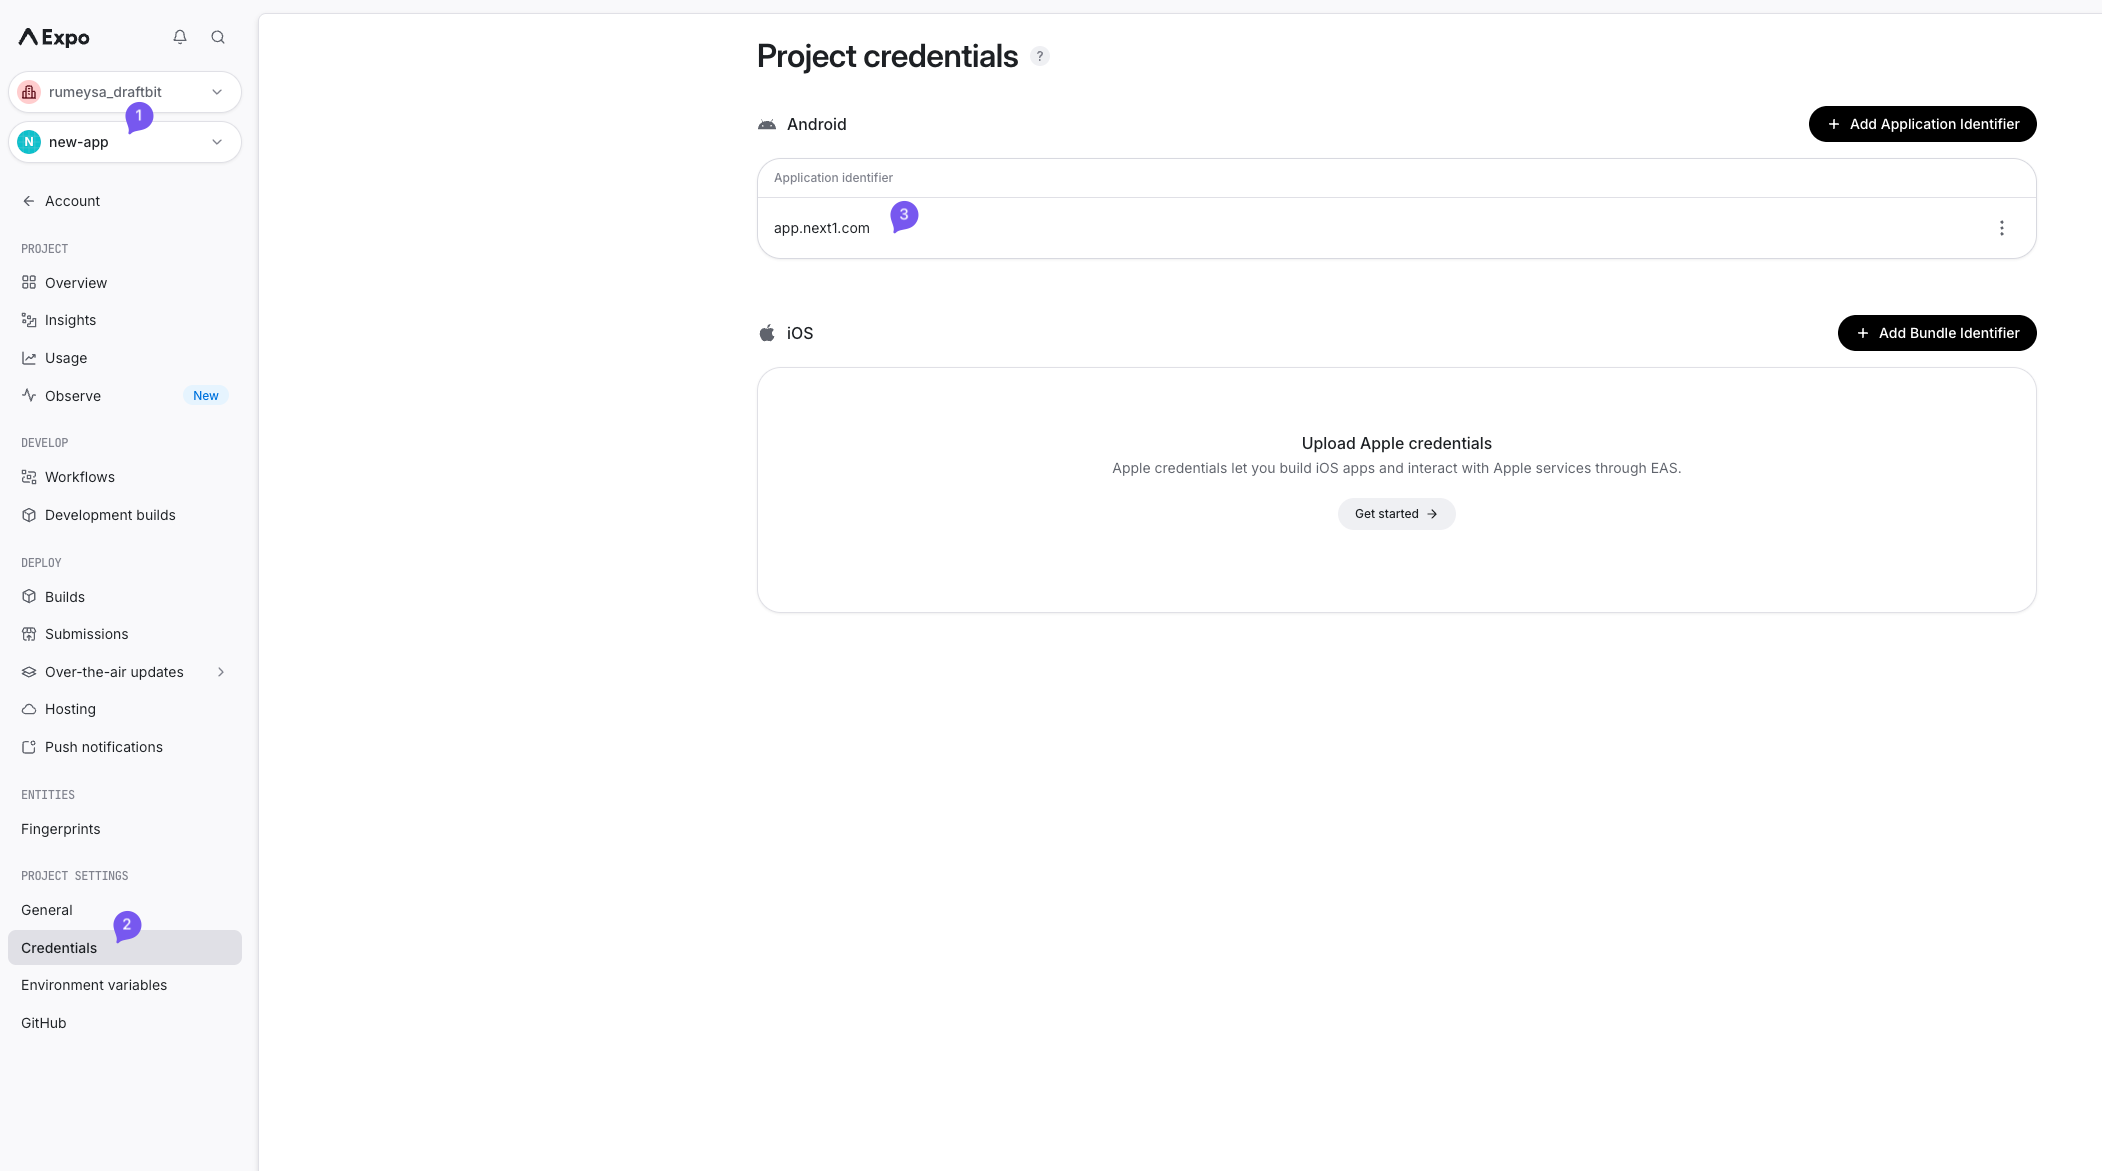
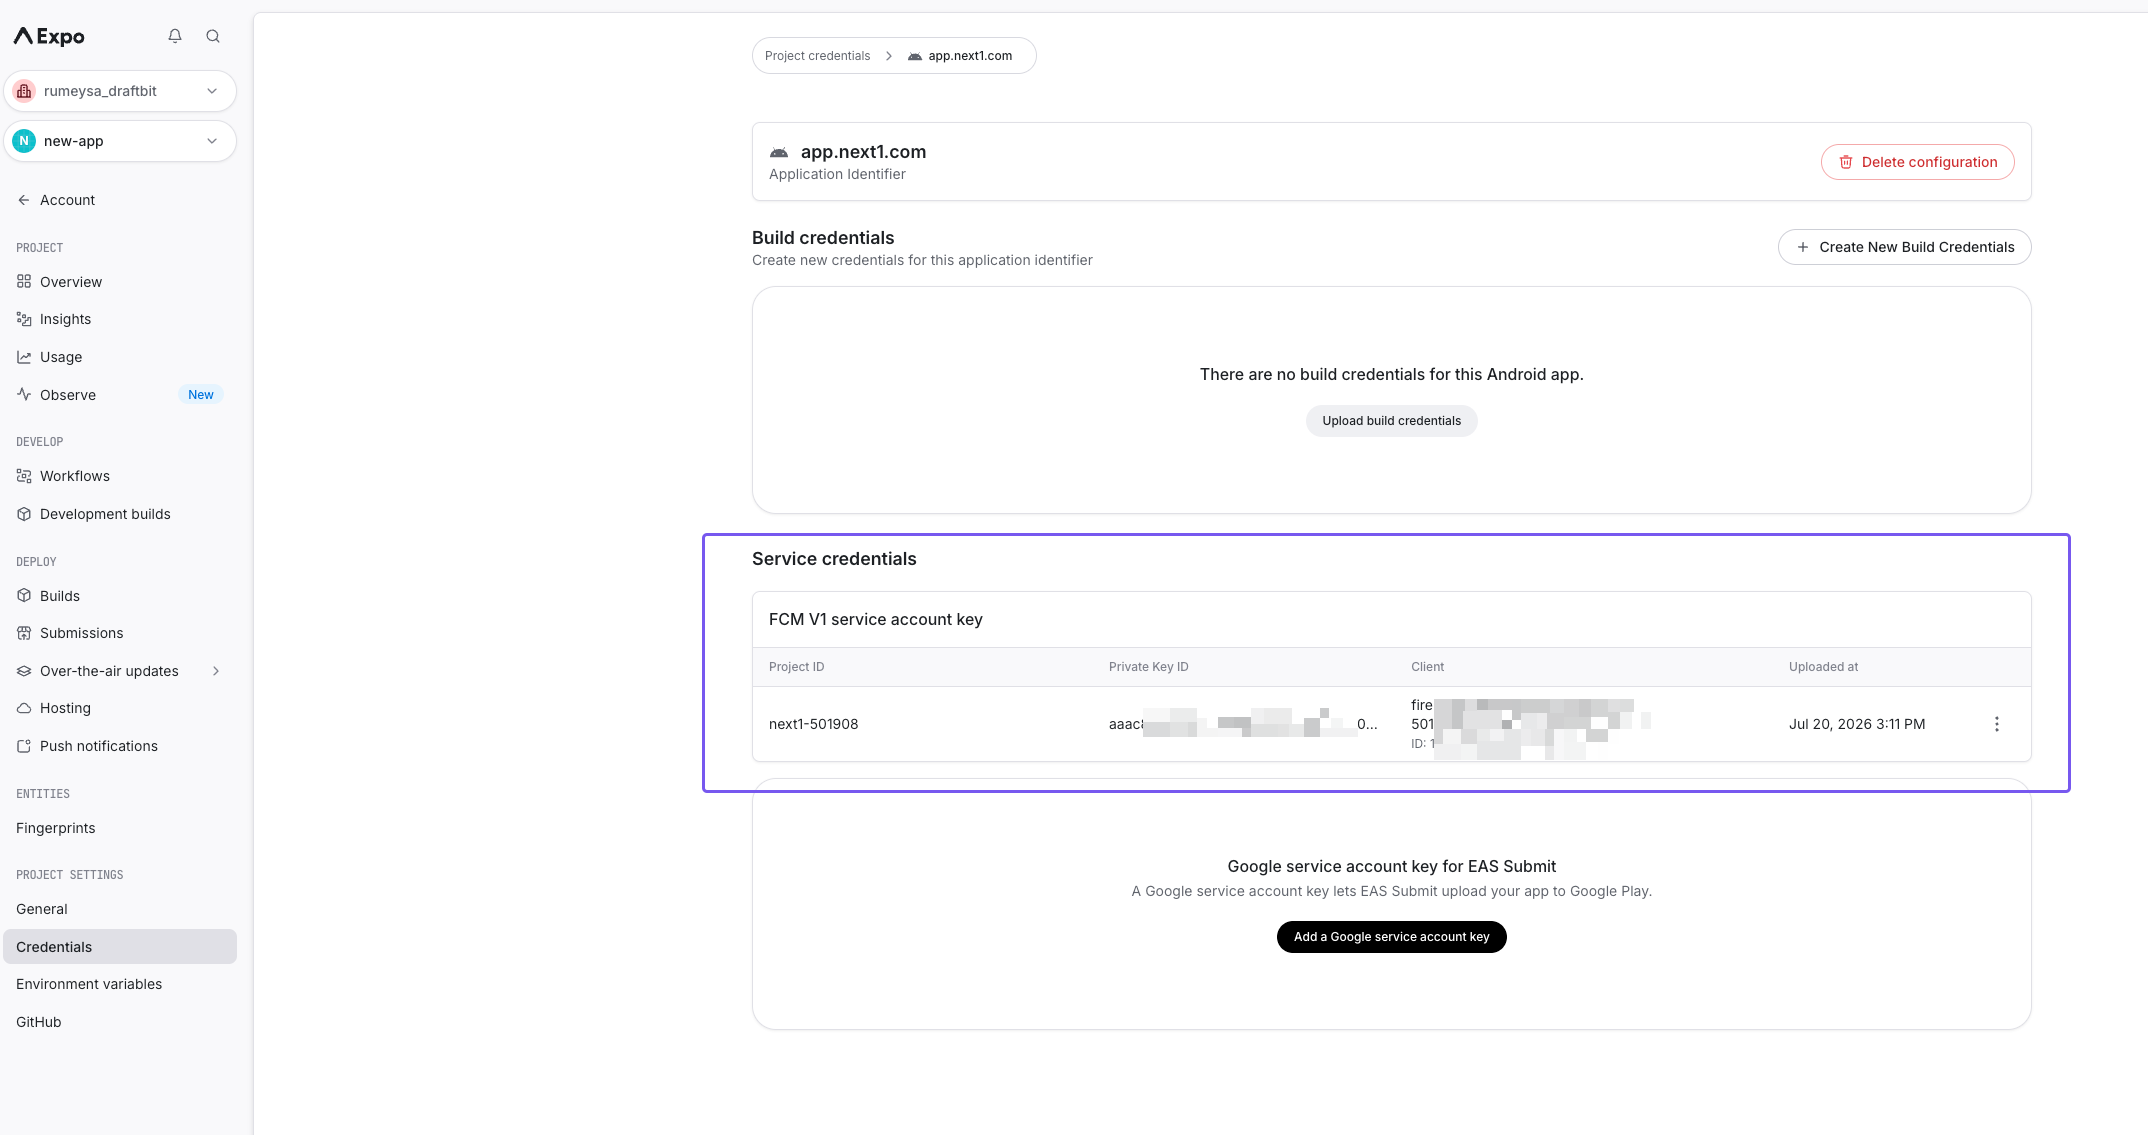
Open your project on expo.dev, go to Credentials, and select your Android application identifier.
-
Under Service credentials, add the FCM V1 service account key using the file from step 3.
Or, use the terminal
Section titled “Or, use the terminal”This runs as a menu-driven prompt, so stay in the same exported project and terminal from step 6—it isn’t something the Builder or the AI Agent can click through remotely.
- Start the credentials manager:
eas credentials -p android - Pick any build profile when asked—it doesn’t affect the outcome.
- Navigate: Google Service Account → Manage your Google Service Account Key for Push Notifications (FCM V1) → Set up a Google Service Account Key for Push Notifications (FCM V1).
- If it asks whether to reuse an existing key, choose Upload a new service account key.
- Paste the full path to the service account key file from step 3 and hit enter.
eas credentials -p android# › Google Service Account# › Manage your Google Service Account Key for Push Notifications (FCM V1)# › Set up a Google Service Account Key for Push Notifications (FCM V1)# ? Path to Google Service Account file: ~/Downloads/your-project-firebase-adminsdk.json# ✔ Google Service Account Key assigned for FCM V1You’re done with this step once you see Google Service Account Key assigned … for FCM V1 printed in the terminal.
8. Publish again
Section titled “8. Publish again”The credential now lives with Expo, not in your exported copy—go back to Draftbit and publish once more so the live build picks it up. From here, a push sent through Expo’s push service reaches real Android devices.
Troubleshooting
Section titled “Troubleshooting””Missing config” error when running eas credentials
Section titled “”Missing config” error when running eas credentials”You need at least one Android build configured before credentials can be managed. Run eas build:configure -p android (step 6) first.
eas credentials hangs or shows no prompts
Section titled “eas credentials hangs or shows no prompts”It’s an interactive-only command and needs a real terminal—it won’t work over a non-interactive shell, CI runner, or the Builder’s own terminal-like surfaces. Run it locally on your machine.
Notifications aren’t arriving on a device
Section titled “Notifications aren’t arriving on a device”- Confirm the Google Service Account Key shows as assigned when you re-run
eas credentials -p android. - Make sure the device has notification permissions granted and a push token was actually registered—ask the AI Agent to log the token after registration.
- Rebuild and republish after any credential or
app.configchange; existing installs won’t pick up new credentials until the next build.