

Connecting to GitHub
Draftbit’s GitHub Export lets you push your app’s generated source code straight to a repository you own, so it lives alongside the rest of your engineering workflow. The GitHub Export integration commits your app’s generated source code (React Native, Astro, Vite, or a backend variant, depending on your app) to a repository and branch you choose, whenever you trigger an export.
Before you start
Section titled “Before you start”You’ll need:
- A Draftbit app you’d like to connect, on a workspace with the Pro plan or higher — GitHub Export is a Pro-tier feature.
- A GitHub account with access to the destination repository.
- An existing GitHub repository (empty or not) that you have push access to.
- One way for Draftbit to push to it: the Draftbit GitHub App (recommended), installed on the account or organization that owns the repository, or a fine-grained personal access token you create on that GitHub account.
Set up the connection
Section titled “Set up the connection”-
Open your app in the AI Builder at next.draftbit.com.
-
Find the GitHub Export destination. There are two entry points:
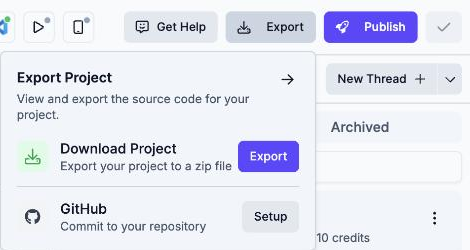
- Export menu — click Export in the top toolbar, then select Setup next to the GitHub entry.
- Publish Destinations — open Publishing → Publish Destinations, alongside App Store Connect, Google Play Console, and Custom Domain.
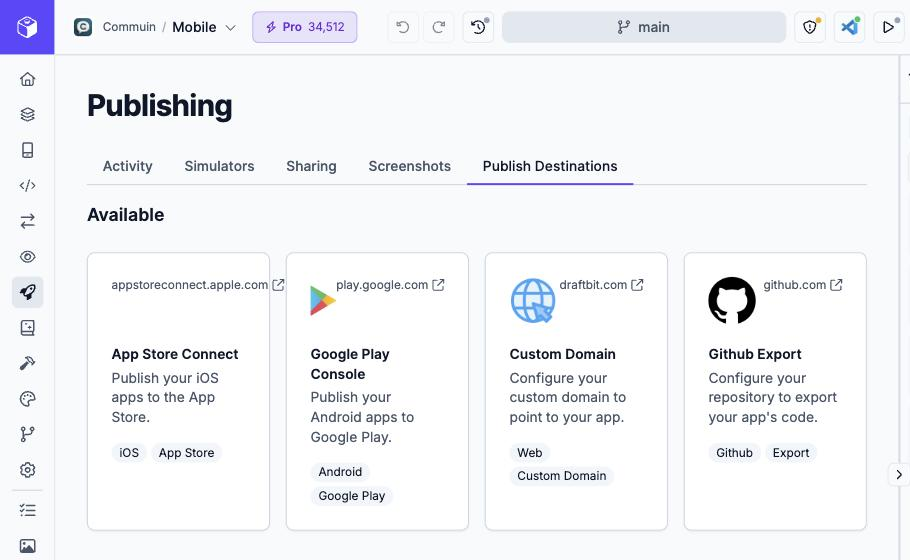
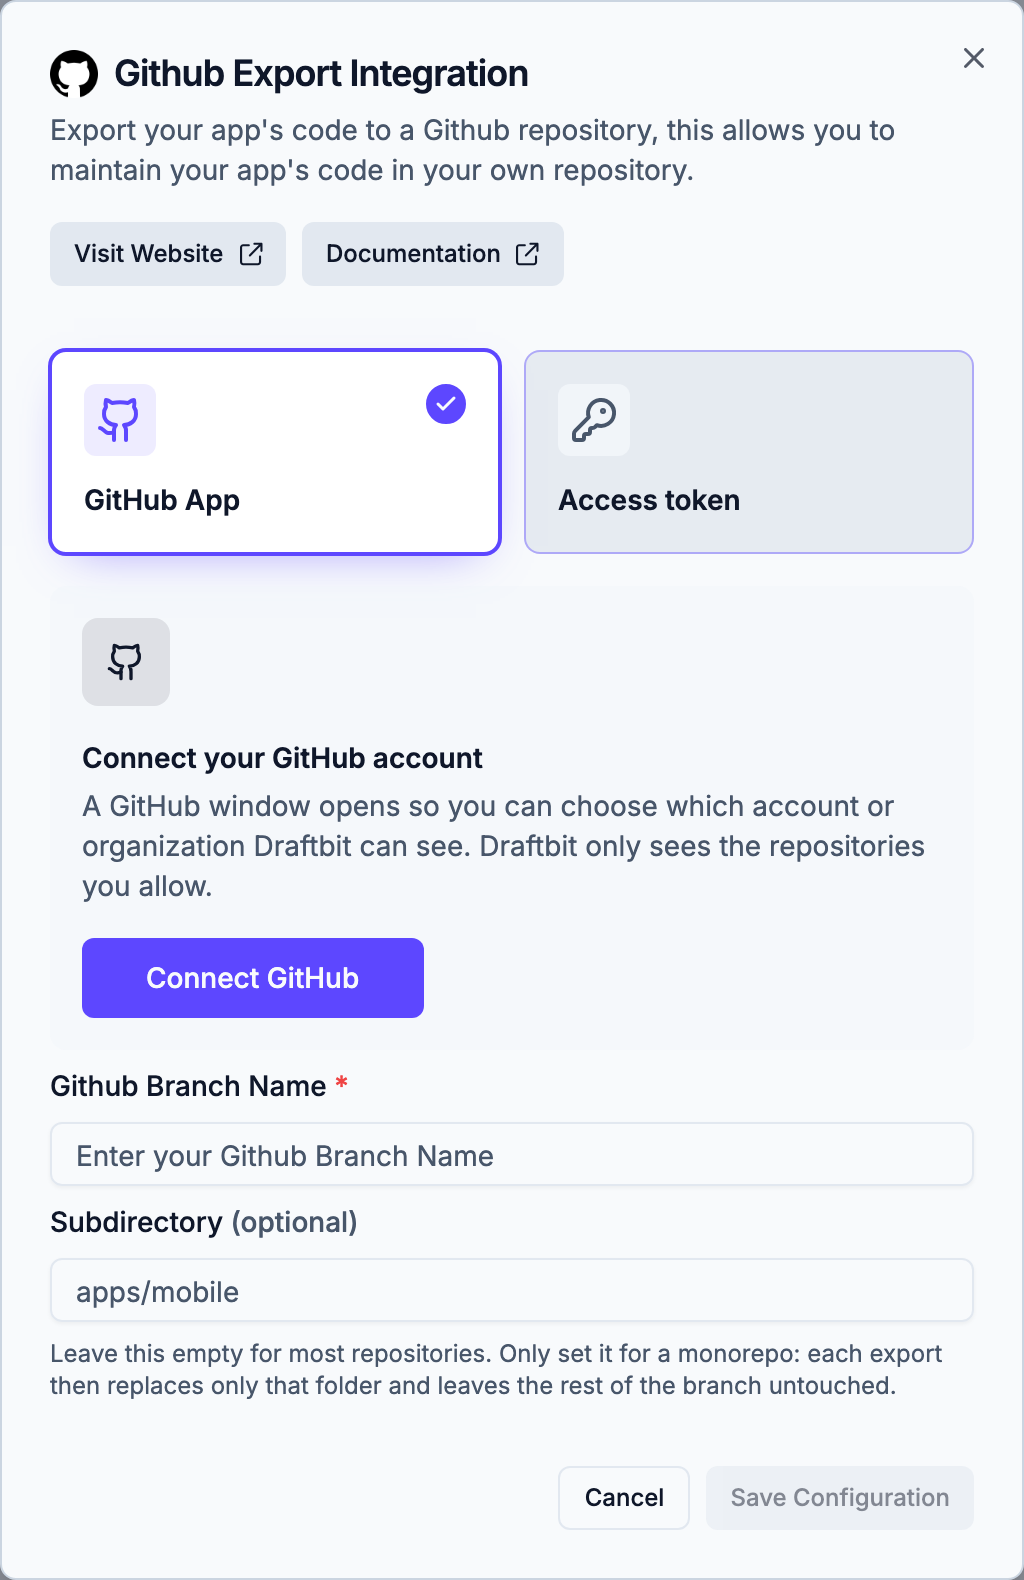
From the Publishing page, click the Github Export card to open the Github Export Integration dialog, shown below.
-
Choose how Draftbit pushes to your repository. New setups start on GitHub App.
- GitHub App (recommended): Draftbit pushes through the Draftbit GitHub App, the same app used to import and connect repositories. There’s no token to create or renew. Click Connect GitHub, choose the account or organization to install the app on and which repositories it can see, then pick the account and select the repository. To use a repository the app can’t see yet, click Add account to reopen GitHub and add it to the installation. When you save, Draftbit checks that your own GitHub account can push to the repository.
- Access token: you create a fine-grained personal access token and paste it into the form, as described in the next step.
-
If you chose Access token, create a GitHub personal access token. Draftbit authenticates to your repository with a token scoped to Contents: Read and Write on the target repo. If your app’s generated code includes a
.github/workflowsdirectory, also grant Workflows: Read and write — otherwise the export will fail trying to write those files, even to a branch that doesn’t have them yet.- In the setup form, click the here link under the token field — this opens GitHub’s fine-grained token creation page.
- Give the token a recognizable name, for example
draftbit-export. - Under Repository access, select Only select repositories and choose your target repo.
- Under Permissions → Repository permissions, set Contents to Read and write (and Workflows to Read and write if your app’s generated code includes a
.github/workflowsdirectory). - Click Generate token, then copy it immediately — GitHub only shows it once.
-
Fill in the branch name, and the Subdirectory if you export into a monorepo. With an access token, also enter the repository URL and token, then click Check Access. This confirms Draftbit can reach and read the repository — it only needs the repository URL and access token to enable, so you can check access before entering a branch name. It doesn’t push anything or confirm write access, so double-check the token was created with Contents: Read and Write as described above.
-
Click Save Configuration to store your repository, branch, and GitHub App choice or token. This saves the connection but doesn’t push any code by itself.
-
To push your code, open the Export menu in the top toolbar and click Commit next to the GitHub entry — this opens the export dialog. In the dialog, select Github from the Destination dropdown (it resets to blank each time the dialog opens, and Export stays disabled until a destination is chosen), then click Export to push your code to the configured branch. Larger apps can take a few minutes to push.
Field reference
Section titled “Field reference”| Field | What it’s for | Example |
|---|---|---|
| GitHub Repository URL (required) | Access token only. The repository your exported code will be pushed to. A full URL or an org/repo slug both work — Draftbit validates it before saving. With the GitHub App, you pick the repository from a list. | https://github.com/username/repository |
| GitHub Branch Name (required) | The branch that receives each export. Use an existing branch, or a new name Draftbit can create on first push. Not required to check access, only to save. | main or draftbit-export |
| Subdirectory (optional) | Only for monorepos. Leave it empty for most repositories. A folder inside the repository to export into; each export replaces only this folder and leaves the rest of the branch untouched. | apps/mobile |
| GitHub Access Token (required) | Access token only. A personal access token with Contents: Read and Write permission on the target repository. Entered as a masked field. | github_pat_•••••••• |
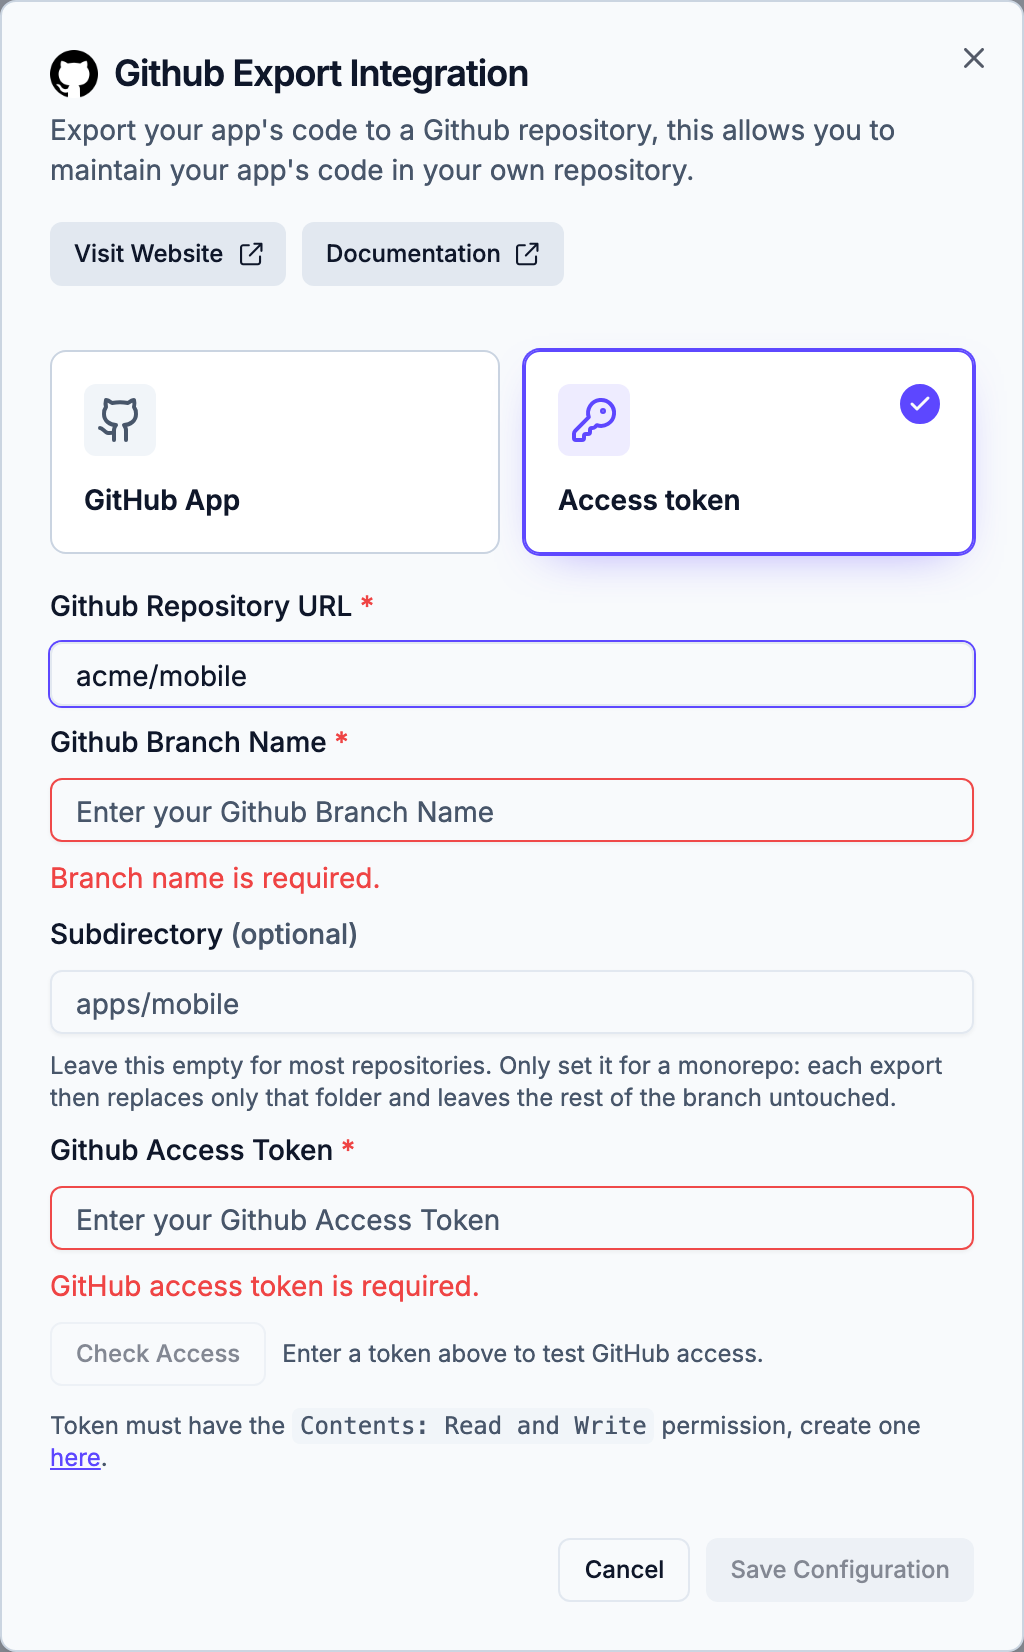
Validation errors for missing fields appear inline as soon as you start filling in the form. With an access token, Check Access only needs the repository URL and access token to enable — the branch name isn’t required until you save. Save Configuration stays disabled until all three fields are valid:
Best practices
Section titled “Best practices”- Use the GitHub App when you can. There’s no token to store, rotate, or leak, and Draftbit only gets access to the repositories you add to the installation.
- Scope your token tightly. If you use an access token, use a fine-grained token limited to the one repository you’re exporting to, with
Contents: Read and writeenabled (plusWorkflows: Read and writeif your app’s generated code includes a.github/workflowsdirectory) — avoid classic tokens with broad, account-wide access. - Use a dedicated branch you don’t hand-edit. Every export overwrites the entire contents of the target branch, or of the subdirectory if you set one. Exporting to a branch like
draftbit-exportinstead ofmainkeeps generated pushes from clobbering code your team edits by hand. - Rotate tokens periodically. Set an expiration when you create the token and regenerate it periodically. Revoke it immediately from GitHub if it’s ever exposed.
- Verify before you save. Click Check Access first to confirm Draftbit can reach and read the repository — it only needs the repository URL and token, so you can do this before filling in a branch name. It doesn’t verify write access, so also double-check the token has
Contents: Read and Writebefore exporting.
Troubleshooting
Section titled “Troubleshooting”| You see this | Here’s what to do |
|---|---|
| ”Branch name is required” / “GitHub access token is required” | These inline messages appear as soon as you start filling in the form with a field still empty. Save Configuration stays disabled until all three fields are valid. Check Access only requires the repository URL and access token, so it can be used before a branch name is entered. |
| Check Access fails | Confirm the token hasn’t expired, that it grants Contents: Read and Write on the exact repository entered, and that the repository URL or slug is spelled correctly. Note that Check Access only recognizes a token typed into the field during the current session — if you’re reopening the dialog to update just the repository or branch, you’ll need to re-enter the token as well before Check Access will re-enable. |
| Repository URL rejected | Use either a full HTTPS URL (https://github.com/org/repo) or an org/repo slug, with or without a trailing .git — other formats (like SSH URLs) aren’t accepted. |
| ”The Draftbit GitHub App no longer has access to this repository” | The app was uninstalled from the account, or the repository was removed from its installation. Add the repository back to the installation on GitHub. If you reinstalled the app, reopen the GitHub Export card and choose the account and repository again. |
| ”The Draftbit GitHub App needs permission to push to this repository” | The installation hasn’t approved the permissions Draftbit needs. Approve the updated permissions for the installation on GitHub, then export again. |
| ”Your GitHub account can’t push to that repository through the Draftbit GitHub App” | Saving checks your own access as well as the app’s. Ask a repository admin for write access, or choose a repository you can push to. |
| ”GitHub blocked this export because it changes files in .github/workflows” | The GitHub App can’t edit workflow files. Switch to an access token with Workflows: Read and write, or, for a monorepo, set a Subdirectory. |
| Export seems stuck | Larger apps can take a few minutes to push. GitHub exports don’t appear on the Activity tab — check your repository’s commit history on the target branch to confirm the push completed. |
Can I reconfigure the connection later? Yes — reopen the GitHub Export card from Publish Destinations at any time to update the repository, branch, or token, or to switch between the GitHub App and an access token. Switching removes the saved token or GitHub App choice, so switching back means choosing the repository or entering a token again. Note that Check Access only recognizes a token entered during that session, so if you’re only updating the repository or branch, you’ll need to re-enter the token as well to re-verify access.
Does this replace the ZIP export? No, they’re independent. Download Project gives you a one-time ZIP; GitHub Export pushes commits to a live repository each time you export.
What exactly gets exported?
Your app’s generated source code — the same codebase you’d get from a manual ZIP export — pushed as a commit to the branch you configured, unless nothing has changed since your last export, in which case no new commit is created. Each export replaces the branch’s existing contents (aside from .git), so use a dedicated branch as described above.
ZIP and GitHub exports remove Draftbit preview files and configuration, environment files containing values, package registry credentials, and symbolic links that point outside your app’s code. ZIP downloads list any links that were left out in a DRAFTBIT-EXPORT-NOTES.txt file. Environment templates, source files, assets, and your own analytics integrations are kept. Configure your environment values and private registry access separately when running the exported code.
Can I export into a folder of a monorepo?
Yes. The optional Subdirectory field exists for this case only; if you don’t use a monorepo, leave it empty. Enter the folder, for example apps/mobile. Each export then replaces only that folder, and every other file on the branch stays as it is. If the branch doesn’t exist yet, Draftbit creates it from the repository’s default branch so it can be merged with a pull request. Changing the subdirectory later doesn’t remove the old folder, so delete it yourself if you no longer need it.